Took this at the headwaters of Purlingbrook Falls at Springbrook in the Hinterland of the City of Gold Coast, Australia. I am quite pleased with that whimsical ambiance of Oz... Nice camera configuration (Hutech-modified Canon 20D with clear glass over the sensor, no UV/IR Blocker pop-in filter behind the lens, Hoya R72 filter infront of the lens) for those of us lazies who do not get up to shoot our landscapes at dawn. Offers a bit of drama in mundane lighting.
An explanatory note on what kind of mod to request from Hutech (or if you do it yourself or elsewhere) for your Canon DSLR. All these optional mods will make the camera very sensitive to H-alpha:
1. REMOVAL OF THE CANON IR BLOCKER AND NO REPLACEMENT AT ALL. This mod leaves the sensor naked and renders the autofocus non-functioning because of a change in optical path length. I cannot see any advantages in choosing this option except in saving a minor amount of money for the replacement glass or filter. The camera will behave as in 2 below but it will not autofocus. Do not under-estimate the value of retaining autofocusing functionality, explained further in the next paragraph. Many of those who do it themselves choose this option, IMHO not recommended. Take the extra bother and find a source for a UV/IR blocking filter (e.g. from Baader Planetarium) or clear glass of the correct thickness.
2. REMOVAL OF THE CANON IR BLOCKER AND REPLACING IT WITH CLEAR GLASS HAVING ANTI-REFLECTION COATINGS. This is the option I chose for my first modded camera. The camera's autofocus remains functional and the camera becomes fully sensitive to the Near IR between 700nm and 1000nm. With an IR-pass filter like the Hoya R72 (bandpass is 720nm and longer) or Kodak Wratten 89B the camera remains fully sensitive to IR. These filters are widely available from the larger photo retailers, e.g. B&H, for use at the front of the lens (Hoya R72 or the 89B) or as a pop-in filter (only the gelatine 89B that you cut yourself). Hutech also offers a pop-in filter, though I feel, at a very high price for a dye (not interference) filter. Even though these filters look black, exposures in daylight are even slightly faster than for an unmodded camera, e.g the Sunny 16 Rule. The autofocus is fully functional right through these black filters even though the viewfinder becomes useless for framing since your eyes cannot see IR.
FOR ASTROPHOTOS (with no filter at all) the camera is sensitive to all visible light and to the Near IR. The sensitivity to starlight is consequently enormously enhanced, filter factors given below. This full-spectrum mode is very useful when you use mirror optics, but not refractive optics. Normal lenses do not focus the Near IR and visible light to a common focus, hence the use of a camera lens or an APO OTA in this mode will lead to bloated stars. When you wish to use a refractor you have to partition the spectrum somehow, i.e. choose either visible light by using a UV/IR Blocker of some kind, or the Near-IR only by using an IR-Pass filter. I use the pop-in Huteck Type 1 UV/IR Blocker (UIBAR) for shooting in visible light. It is an expensive interference filter and unless you are interested in photographing in the Near IR it might be wiser and cheaper to have Huteck install this filter permanently over the sensor, Option 3 below. The camera will autofocus on the brightest stars or planets with most Canon lenses of 100mm focal length or longer. The convenience of this feature is hard to overstate since focusing on the night sky is generally quite a demanding process. Nevertheless my most recent measurements of skyfog at my home indicate that I have little pollution in the Near-IR, at least very late at night, and a Near-IR-Pass filter may well turn out to be an effective method to combat light pollution for white-light astro objects such as galaxies and star clusters (including globular clusters, of course). A Near-IR-Pass filter should also work well with refractors and camera lenses. For those who wish to dabble in spectroscopy it's obvious that they should go for this clear-glass-over-the-sensor option. Despite web chatter to the contrary, SCTs do focus very well throughout the visible wavelengths and the Near IR, simultaneously. This allows sub-exposures half the length of those using visible light only; particularly useful for high magnification imaging such as planetary videos using Live-View or trying to split obscure and tight double stars in the Trapezium, or resolving the cores of globular clusters, or whatever.
FOR NORMAL DAYLIGHT PHOTOGRAPHY you will need a UV/IR Blocker (e.g. the Hutech Type 1 pop-in filter) otherwise you will simply not be able to obtain satisfactory colour balance, demonstrated in the next slide. With the UV/IR Blocker you use Custom White Balance and the camera is now fully capable of taking great photos of your cat or grandma, with fully functional autofocus and auto-exposure (after you have determined how much you need to adjust the exposure compensation in the camera. Needs to be done only once and takes only a couple of minutes). Auto White Balance will not be functional but I feel that this is a very trivial loss of functionality. Once you are used to Custom White Balance you will soon recognise that CWB and Raw capture is what should be used for all serious photography, even in unmodded cameras.
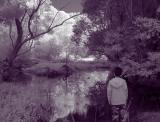
FOR INFRA RED DAYLIGHT PHOTOGRAPHY you will need a Hoya R72 to be used at the front of your lens or a Kodak Wratten 89B. The 89B is particularly convenient since this gelatine filter can be cut to be used as a pop-in filter, either stuck onto a cardboard ring for convenience, or as a naked disc. It has characteristics similar to the Hoya R72. No UV/IR Blocker is used. Autofocus is fully functional, auto-exposure is not (you have to use the histogram), the viewfinder goes black (you have to use the back-of-camera LCD for trial-and-error framing). If your DSLR has Live-View, then shooting IR is a joy! This kind of photography is used to produce monochromatic landscapes, like the photo above, or portraits that show minimal skin blemishes, quite popular with wedding photographers. The IR actually leaks into all the RGB pixels and excellent resolution is retained, i.e. there is no loss in resolution that might have been expected if the IR recorded only on the R pixels.
3. REMOVAL OF THE CANON IR BLOCKER AND REPLACING IT WITH A HUTECK TYPE 1 UV/IR BLOCKER OVER THE SENSOR. This mod is perhaps the most appropriate for most astrophotographers. There is no need to purchase an additional expensive pop-in UV/IR blocker. The camera retains autofocus and auto-exposure.
FOR ASTROPHOTOS. Autofocus should be functional for lenses with focal lengths >=100mm. Very high sensitivity to H-alpha. No sensitivity to Near IR, hence the overall sensitivity to starlight is less than half of Option 2. above; but recall that that extra sensitivity can only be used with mirror OTAs. Hence for any APO user this is quite irrelevant.
FOR NORMAL DAYLIGHT PHOTOGRAPHY you do not need any extra filter. Custom White Balance should do a very good job.
FOR INFRARED DAYLIGHT PHOTOGRAPHY. This version, as for the unmodded camera, is hopelessly insensitive to IR and, frankly, impractical. Exposures in bright sunlight will be several seconds long even with a fast lens, the results relatively blurry and some wierd vignetting or reverse vignetting may well show up. Useless for IR.
IN BRIEF: For astrophotography with refractor telescopes and camera lenses go for Option 3 unless you already have an interest in shooting IR or in spectroscopy. Option 2 is more flexible but it carries the penalty that you will have to purchase that expensive pop-in Type 1 UV/IR Blocker in addition. Nevertheless my most recent measurements, reported below, also indicate that shooting in IR may be the way to combat light pollution for galaxies and star clusters. This has not been verified as effective in actual astrophotography as yet. Daylight IR shooters should obviously go for Option 2.
Here are the filter factors that I measured in tungsten room lighting. A factor >1.0 implies that the camera is more responsive (sensitive) than the unmodified version. I found daylight varies too quickly to get consistent data. I suspect that ordinary tungsten bulbs, running much cooler than the Sun, emit proportionately more Red and Infra Red than the Sun, probably a more appropriate source for such measurements. Consequently the data are very likely favoring the longer wavelengths:
Unmodified camera: 1.0
Modded camera without any filter: 3.3x
Modded camera with Hutech Type 1 UV/IR Blocker (Hutech's UIBAR): 1.3x
Modded camera with Hoya R72: 1.7x
Modded camera with Wratten 89B: 1.7x
*Modded camera with IDAS LPS-P2: 0.8x
*Modded camera + UV/IR Blocker + Astronomik UHC: 0.27x
*Modded camera + Astronomik H-alpha CCD Filter: 0.07x
*These filters are useful for cutting down light pollution when photographing nebulae in particular. The concept is that the generalised light pollution from broad-spectrum sources (tungsten, high pressure sodium, etc) will be cut down by at least the factor quoted, narrower-band light pollution (mercury lights, neon, low-pressure sodium, etc) will be cut down much more drastically, while the appropriate nebula emission lines would hardly be attenuated at all. The combination (UV/IR Blocker + Astronomik UHC) looks very promising for nebulae emitting in H-beta, OIII (in blue/green) and H-alpha, SII (in deep red). The Astronomik H-alpha CCD Filter is of course useful for the deep red nebulae emitting H-alpha. Nevertheless it should be noted that the one used here has a nominal 13nm passband. Recently Astronomik has started offering one that should be even more effective, with a 6nm passband. How narrow should your filtering be anyway? Light polluted suburbs may have a VLimMag 3.5 sky at zenith. To get the equivalent of a dark site, VLimMag 6.5, we need to cut the skyfog by a factor 0.06x, so the H-alpha filter used above is almost there. But the UHC could still be the better choice since many nebulae also emit in the blue/green. Eg. the Lagoon, M8, has been reported to be as bright in blue/green as it is in H-alpha, to the extent that in a non-modded camera (very low sensitivity to H-alpha, like for human vision) it photographs blue, not red! Similarly, when I tried to image M42 (the Orion Nebula) through the Astronomik UHC and then through the Astronomik H-alpha 13nm filter on an unmodded Canon 1Ds there was no visible difference between the Red components of either scheme. I.e. the H-alpha filter did not go deeper than the UHC in Red. The UHC of course also had Blue/Green in addition; very conveniently. I have not repeated such a test with a modded camera.
NB. A modded camera without any filter at all, just clear glass over the sensor to retain autofocus, provides a lot of extra sensitivity, employable when using mirror optics; something to keep in mind when shooting star clusters, even at light polluted sites. Eg. many globular clusters require large apertures and long focal lengths to resolve effectively, Newtonian and SCT territory. At these long focal lengths tracking becomes particularly problematic and being able to shorten exposures by >3x for these white light objects is very welcome indeed.
OK, now that we have measured the filter factors for white light, be it tungsten room lighting, how do the filters actually behave under real-world light pollution? I re-did all the above measurements simply pointing the camera at zenith one night, between 3 and 5am when my local sky was particualrly clear and thus as dark as it ever gets, Visual Limiting Magnitude measured at about 4.6. For convenience I have put the earlier, white-light, data in brackets. Here are the results:
Unmodified camera: 1.0
Modded camera without any filter: 1.3x (3.3x)
Modded camera with Hutech Type 1 UV/IR Blocker (Hutech's UIBAR): 1.04x (1.3x)
Modded camera with Wratten 89B: 0.17x (1.7x)
*Modded camera with IDAS LPS-P2: 0.5x (0.8x)
*Modded camera + UV/IR Blocker + Astronomik UHC: 0.14x (0.27x)
*Modded camera + Astronomik H-alpha CCD Filter: 0.01x (0.07x)
We note immediately, and very surprisingly, that my home has very little light pollution in the Near IR. From the data for the Wratten 89B I would conclude that tungsten room lighting has roughly 10x more Near-IR than my local skyfog. Next, that the filters to be used to combat light pollution should be more effective with my local, late-night skyfog than with ordinary tungsten room lighting. That's good news. The absence of much Near-IR skyfog leads us to look for astro objects that emit in that region of the spectrum. Since galaxies and star clusters do emit in the Near-IR, perhaps Hoya R72 or Wratten 89B can act as good light pollution suppression filters for these white light objects, provided that Near-IR is not severely absorbed by the atmosphere. Such severe absorption is very unlikely given that we have no problems using a Hoya R72 or a Wratten 89B for sunlit landscapes. Certainly such IR-Pass filters look a lot more promising than, say, an IDAS LPS for photographing dim, white-light sources (galaxies and star clusters). Note the filter factors under skyfog, 0.17x for the 89B versus 0.5x for the IDAS-LPS. One more project to check out galaxy photography in Near-IR...
The next slides demonstrate the white balance issues regarding modded DSLRs in Daytime photography and then autofocus capabilities in Infra Red.