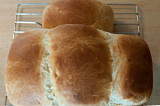
Mine didn't turn out that perfect looking...hehe...I didn't pinch them down well and was impatient..so I had a few earthquakes here and there....
To prevent the earthquakes, you need to make sure your dough is smooth and well tucked in. Mine was uneven and it was a hassle to take it out and redo it as I was running short of time. It's most avisable to have them neatly tucked in to contain the CO2 (carbon dioxside) in the bread when it rises. Cracks will leak out the CO2 and cause it not to rise.
You should make 4 loafs joined together...but my bread pan was too small, so I ended up with 3 and a little bread at the back.
To make the toping brown, you can brush some egg on the top prior baking or some milk.
There are several styles you might want and each ingredient produces different end results from egg, milk, water or just plain or ....etc!
Those textures you see in the supermarket are called egg wash - brushing a layer of beaten egg on the top of the loaf before baking. That should make it look glossy and very brown. Otherwise you will get a matte finish