Commenting on this page requires a PBase account.
Please login or register.
Olaf.dk
05-May-2004 21:05
OK, I'll give it a try, here's what I would do:
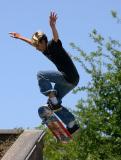
1) Cropping: first, I would crop some off on the right - nothing there that really adds to the image. I would crop about 3/4 in from the right side to the back of his right hand shoe. If this is already a crop and you have more on the left, I might want to use some of that. If you don't have more on the left, the way it is, is OK too - it would just help in making him a little off centre with more space in front of him than in the back (usually preferable). Maybe also crop slightly at the top - about halfway between the top of his fingers and the present top of the frame. If this is already a crop and you have more at the bottom, I would give a little more space at the bottom. The reason for this and the slight crop at the top would be to make him seem to "fly" higher.
2) Cloning: after you have cropped some off the right, there will still be three branches reaching towards his body in the background. I think they are kind of distracting, which is why I would clone them out. This would also make it seem like he is flying higher, as there would be nothing but sky surrounding his upper body.
3) Brightening up the face a bit and here is how I'd do it: assuming the image consists of one layer, the background layer, copy the background on to a new layer by pressing Cmd-j (on a Mac) or Ctrl-j (on a PC). Press Cmd-m or Ctrl-m to get curves and drag up at the middle of the curve. Overdo this a bit, at input/output=128/179, for example. Now create a layer mask by clicking on the layer mask icon at the bottom of the layers palette. If the background color is white, reverse the foreground and background colors by pressing x on the keyboard. Select canvas by pressing Cmd-a or Ctrl-a and then delete. The mask should be all black now and the image should look like the background layer. Select the brush tool by pressing "b" on the keyboard. Use a soft brush about the size of his arms and start painting with white on the mask where you want the image to be brighter, the face and maybe the bottom of the skateboard. It's OK if it is too bright, we'll fix that later. If you overshoot and brighten something you didn't want to brighten, just press "x" to reverse the foreground/background colors and paint with black to undo. Fine-tune the amount of brightening to your liking by adjusting the opacity of the brightened layer. Done!
Sounds a lot more complicated than it is. Really, this is a very quick fix - done in a few minutes...
--
Olaf.dk
Gary Roberts
05-May-2004 01:24
Dang Olaf, I missed my "*" I forgot it somehow. If you are still around I would love constructive criticism. I am always trying to get better. My one realization is that they were a bit backlit and I didn't compensate well for that. This was a luck shoot because I didn't know they were going to be there riding. I was out shooting other things.
Olaf.dk
03-May-2004 08:58
Another image without any comments. I could have left some constructive criticism on this one, had it only had an asterisk (*) in the title. Now, all I can say is: Good catch! --Olaf.dk