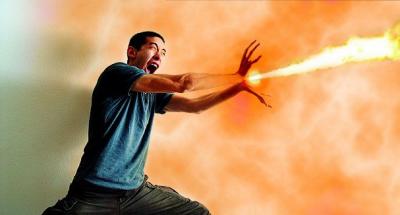
photo sharing and upload picture albums photo forums search pictures popular photos photography help login
Type your message and click Add Comment
It is best to login or register first but you may post as a guest.
Enter an optional name and contact email address. Name
Name Email
help private comment
Arjun Roychowdhury | all galleries >> Galleries >> retouching > Flame Chui
previous | next

Flame Chui

"Fear his Wrath"

Original at http://forums.dpreview.com/forums/read.asp?forum=1006&message=8764519

The approximate steps were:

* Background=your image (call it B)
* create new layer, select foreground=orange, background=white
* Then did a Filter->render cloud (call it L1)
* Set L1 to darken mode (I think)
* use a layer mask to reduce reds on the body where I did not want it
* create a new black layer above L1 (call it L2), create a lens flare,
use blending properties (blendif-gray) to create a very light circular flare around
the hands (look closely for a sphere around the hands)
* clone a flame picture in , add a yellow blob for the 'fire source'
* add a gradient mask to L1 to get some of your original picture wall in
* paint a tad bit of orange on your eyes


other sizes: small medium original auto
comment | share
Guest 14-Sep-2006 15:50
Is this really a fake image, or did you just happen to get a clear shot of a lithium battery shorting out in a palmtop! :-)
Vikas Malhotra13-Jan-2006 06:01
Fabulous... Love it and thanks for the explanation.

Cheers, Vikas
Guest 04-Jan-2005 06:51
super class, great work!
Dag Ivarsoy 12-Dec-2004 17:33
Avery nice comp
There is a darker edge around the flame, if you mask out the core and take the outside bit and created a
new layer and used mode add to blend that with the core. The hands gets to saturated, there should be a mask
for the hands to keep the natural skin color. You could fether the mask of the person a little bit so that the bgn
blended in across his edge. I like what you have done.
Regards Dag