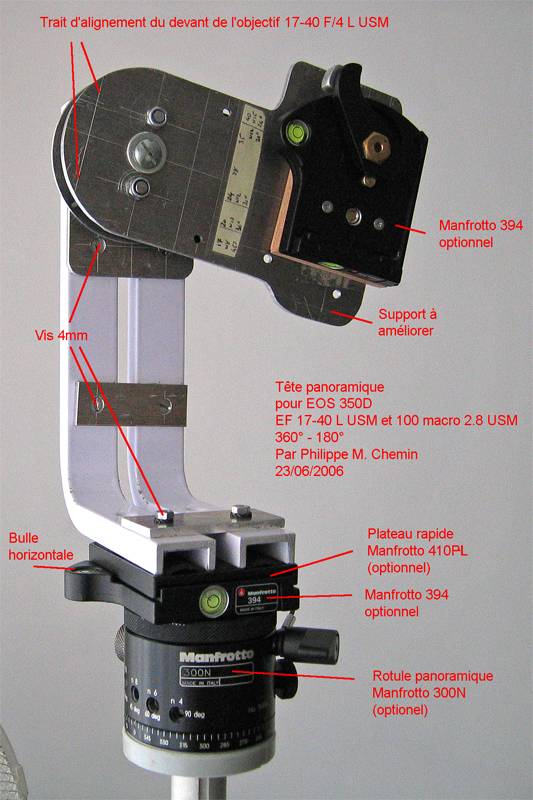
Tête panoramique 360°
I present here my June 2006 version of panoramic head (version in the course of improvement).
This assembly has the advantage of being very compact to transport, in two parts:
- on the one hand the camera equipped with a plate fast and assembled on the head and
- on the other hand the tripod with the panoramic rotation head and the 394 quick adapter with its bubble.
The camera can be removed instantaneously, used alone and be reassembled also quickly on the assembly.
The success of the assembly depends on its rigidity and more particularly in the rigidity of the square.
Concerning the latter, a simple flat in aluminum or in steel bent with right angle is insufficient because can put ten seconds to be stabilized and vibrates with the raising of the mirror and the least wind. I use here 2 aluminum brackets for shelves. Envisage a solid vice and a tube to right angle those brackets out of square.
One could use a quick adapter in the horizontal axis for more convenience, but I avoid making panoramic the apparatus in horizontal position because the number of pixels becomes insufficient then in height for the impression. Many of the panoramas I present in my galleries are cropped to preserve to the maximum the panoramic effect obtained while scrolling the image on the screen.
Foot-note: Quick Release Adapter Manfrotto 323 for fast plate RC2 (200PL-14) is unusable here on the 300N because present an important relief at its base too close to the axis (damage for the price, the weight, compact, not need for screwdriver but without bubble).
To adjust the camera with his lens compared to the entry pupil, I prefer the screw 3/8 + nut rather than the screw 1/4 + nut because that avoids putting a reducing sleeve in the plate Manfrotto 364.
Lastly, for those which do not want to invest in material (quick adapters and panoramic rotation head), you can do and make without it an assembly entirely out of aluminum and wooden (for that, be inspired by this assembly and the assembly published before) with the same results.
I think that this assembly can inspire to you for any other camera that the EOS 350D.
Good do-it-yourself
************************
Je présente ici la version de juin 2006 de ma tête panoramique (version en cours d'amélioration).
Ce montage présente l'avantage d'être très compact à transporter, en deux parties :
- d'une part l'appareil photo équipé d'un plateau rapide et monté sur la tête et
- d'autre part le pied avec la rotule panoramique et l'adaptateur de plateau rapide 394 avec sa bulle.
L'appareil photo peut être déclipsé instantanément, utilisé seul et remonté tout aussi rapidement sur le montage.
Le succès du montage repose dans sa rigidité et plus particulièrement dans la rigidité de l'équerre.
Concernant cette dernière, un plat simple en alu ou en acier coudé à angle droit est insuffisant car peut mettre une dizaine de secondes à se stabiliser et vibre au
relevage du miroir et au moindre vent. J'utilise ici 2 équerres en alu pour étagères. Prévoyez un étau solide et un tube pour rendre d'aplomb et ŕ angle droit ces "équerres" approximatives.
On pourrait utiliser un adaptateur de plateau rapide dans l'axe horizontal pour plus de commodité, mais j'évite de faire des panoramiques l'appareil en position horizontale car le nombre de pixels devient alors insuffisant en hauteur pour l'impression. Beaucoup des panoramiques que je présente dans mes galeries sont des extraits pour conserver au maximum l'effet panoramique obtenu en faisant défiler l'image à l'écran.
Nota : La fixation rapide Manfrotto 323 pour plateau rapide RC2 (200PL-14 ) est ici inutilisable sur la 300N car présente un relief important à sa base trop proche de l'axe (dommage pour le prix, le poids, l'encombrement, pas besoin de tournevis mais sans bulle).
Pour régler l'appareil avec son objectif par rapport à la pupille d'entrée, je préfère la vis 3/8 + écrou plutôt que la vis 1/4 + écrou car cela évite de mettre un fourreau réducteur dans le plateau Manfrotto 364.
Enfin, pour ceux qui ne veulent pas investir dans du matériel (fixations rapides et rotule panoramique), on peut s'en passer et faire un montage entièrement en alu et bois (pour cela, inspirez vous de ce montage et du montage publié antérieurement) avec les mêmes résultats.
Je pense que ce montage peut vous inspirer pour tout autre appareil que l'EOS 350D.
Bon bricolage