


|
|
|
|
|
|
| |
| 19-MAY-2011 | |
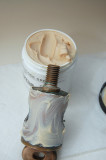
This is the final step. What you see here is way too much grease. Smear it on then wipe much of it back off. It is best to coat both the inside of the valve and the cone with grease before assembly.
WARNING ****** WARNING
The cone and valve MUST be free and clear of ALL lapping compound before re-assembly. I find that denatured alcohol and microfiber rags work best for this but terry cloth works too. Reach your finger into the inlet and outlet and wipe them too or the lapping compound will be re-deposited onto the cone. You'll want to clean them three to four times with a fresh rag each cleaning. The lapping compound has a tendency to play hide and seek and you really need to "seek" it out.
1- After cleaning, grease the valve body and the cone/plug.
2- Insert the cone and line up the flat spot on the cone with the flat spot on the large washer. If it has a "dog" be sure the flat spot is facing up so the dog lands at 12:00 when open.
3- Install the flange nut and then the jam nut.
4- Adjust the valve slowly while working the grease in by moving the cone around.
5- Re-Install the handle and make final adjustment.
6- Adjust the tension so the handle needs some pressure to turn it but not so loose that it falls down on its own. This will leave room for any future adjustment that may be needed.
7- If it weeps on launch take very small turns on the flange nut until it stops weeping then lock the jam nut against the flange nut.
© All Images property of Compass Marine Inc.