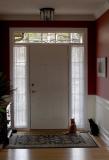
After bringing through the darker window panels I felt the transom area was lacking in detail so I converted the image yet a third time and adjusted to bring out more color. This was pasted beneath the previous adjustment and with another layer mask I brought through the detailed area. After merging the layers on a new layer I tried to use Noise Ninja to noise reduce and nothing happened. I guessed that the file was just to big, so I saved the file as a smaller jpg and then Noise Ninja worked. (Something new learned about Noise Ninja!) The inside of the door had shown tremendous noise because it had been so underexposed. Noise Ninja did a great job on it. To get as noise free images as possible you should use the lowest ISO setting you can get by with and expose as correctly as possible. Had I not used the -1 exposure compensation in this high contrast shot there would have been NO detail through those windows. Note: I didn't like the slightly off kilter rug and door bottom in the original so I transform/skewed it. The image was also slightly cropped for composition's sake.