


|
|
|
|
|
|
| |
| 10.02.2006 | Anita Stanhope |
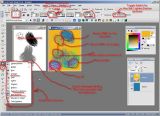
| I am writing this for people who are learning PSP. Some of these tips, you won't see in the manual. For this tutorial, we will use the brush we made in an earlier tutorial. In PSP, you can use your paintbrushes for other things as well. I especially like to use them when erasing for cool effects.
In the black and white image, I have shown just how our new brush looks when stamped, brushed, and smudged on a lower opacity. The default Step was 19 on this brush which causes it to skip. If you want a smoother look, just lower it to 1. To demonstrate the eraser effects. I created two layers, the teal on the lower one, yellow on top. You can see where I erased the yellow, revealing the teal. I like this technique when working on a photo to create a kind of misty look. Just put a layer of paint (try white) over the photo, then randomly erase with a cool brush at low opacity. Look at the toolbar on the left. Just below the paint brush is another icon (which varies because it shows which one you used last). Click on the hue tool. I show it with some reddish shades. By checking or unchecking the swap box (circled in red) you can change hues. This is really nice when painting flowers on a photo. You can also use this brush in combination with the lighten, darken tool, burn, dodge, saturation increase, etc. |
All images are the property of the artist, please don't copy without permission.
| Guest | 04-Nov-2006 15:21 | |