


|
|
|
|
|
|
| |
Changing Backgrounds using Photoshop Background Eraser | |
| After posting the image A Fruit Bowl I received several requests asking how I changed the background on that image. This tutorial is long overdue but here goes.
First, you need to know that I seldom change backgrounds on an image. I sometimes remove a background, leaving it plain white or black, but I seldom insert a new background. I think finding an alternate background that fits the exposure and direction of the lighting is difficult. Just a little off and the image looks fake. Second, there are many approaches for accomplishing this, and each equally effective. Here's an index to a few other approaches: Third, I'm not a Photoshop Guru. Most of what I know is by trial and error and I may have learned wrong. Please feel free to make suggestions in the comments function below. This tutorial focuses on using the Background Eraser tool to change backgrounds in images. This can be done in both Photoshop and Elements | |
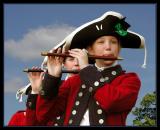
| The image above was taken a while ago. The Yorktown Fife and Drum corps was the opening act to a summer Classical Music Concert held under the stars. Unfortunately the Corps performed in front of a large tent that would later be used by Virginia Symphony. I got some great shots of the Corps performing, but with that busy, ugly background... it became a good image for a background change. Changing backgrounds is a bit of work, but in this image, I was intrigued with how the face of the second fifer showed through the arms of the first; it had an interesting balance. |  |
| A little fiddling, cloning and cropping produced this which was ok but the background was a bit blah. I could have saved a lot of fiddling by going directly to the approach below. BTW, that first Fifer is actually a girl, the Yorktown fifer Corps is coed. |  |
| In a seperate window, I opened a "sky" image, and drag it over the fifer image so it created a new layer. I know a number of folks who collect sky images for this purpose. I then duplicated the "fife" background layer so that I was working with a copy of my original layer. Then drag the new layer so that it is above the sky layer or the top layer. |  |
 Select the polygonal lasso tool and select an area around the fife players. Delete the area and deselect. |  |
 Use the background eraser (one of the eraser option) to totally eliminate the sky.
|  |
| To complete the image, I added an adjustment layer so that I could make the foreground layer match the new brighter sky that was added. Create New Adjustment Layer (under the Layers menu) and from drop-down list, choose "Levels". I also used the "blurr" tool to soften the hard edges, particularly around the coat area. This creates a more natural transition between the fifer layer and the sky layer.
A change of background transformed this image quite dramatically. Flatten the image and save. That's all there is to it. |  |