April-15-2005
Getting Ready To Dig Out The Old Flax
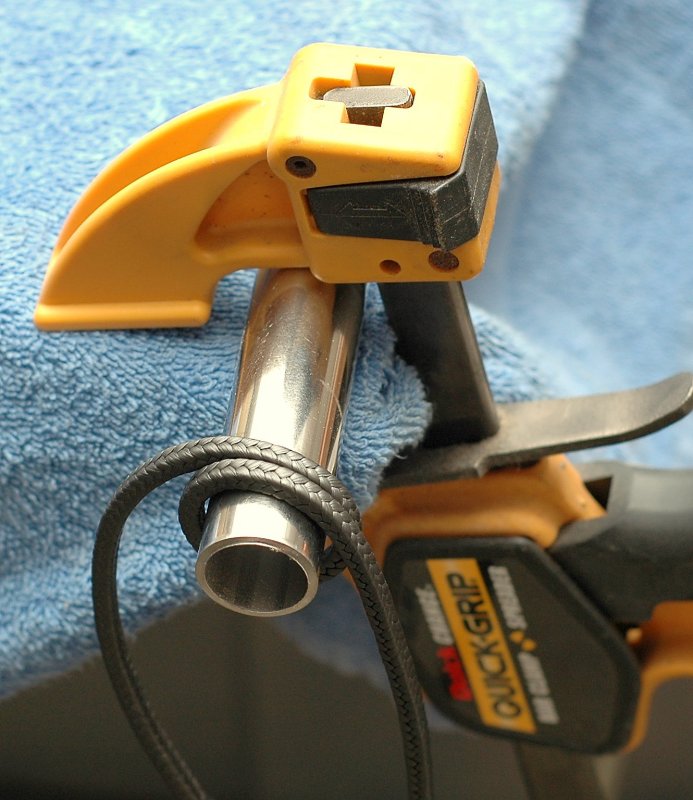
In this photo I left about an inch between the male end of the stuffing box and the female nut. This is typical of the space you'll have on many production boats like the Catalina 30 & 36.
*WARNING: If you have not attempted this type of DIY job before it's best to do it with the boat out of the water for obvious reasons. With the female flax nut removed water will flow in to the boat from between the male end of the box and the shaft!
*******CLICK BELOW FOR PAGE 2*******
April-15-2005
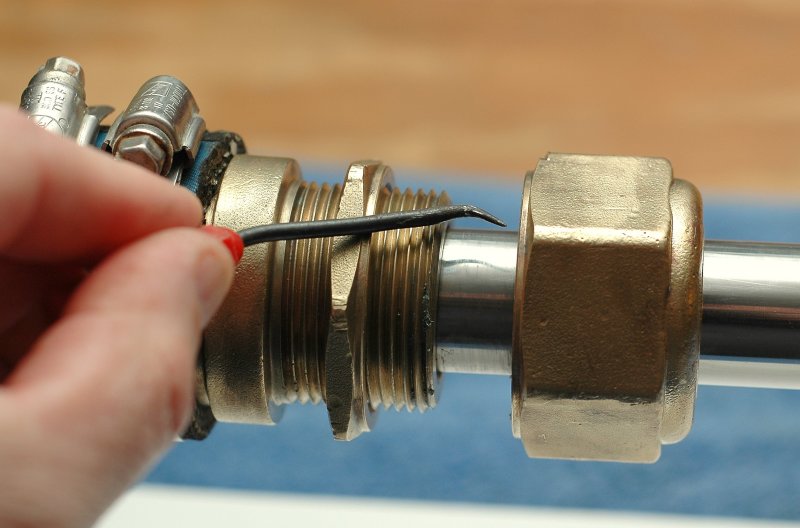
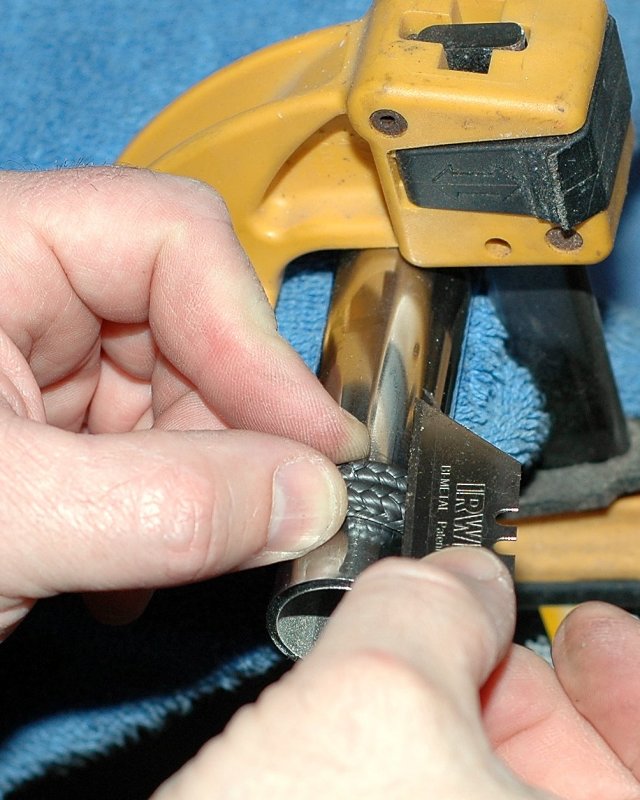
Grabbing The Flax
What you can't see in this picture is that the sharp end of my pick is firmly embedded into the first flax ring and ready to pull it out of the nut.
April-15-2005
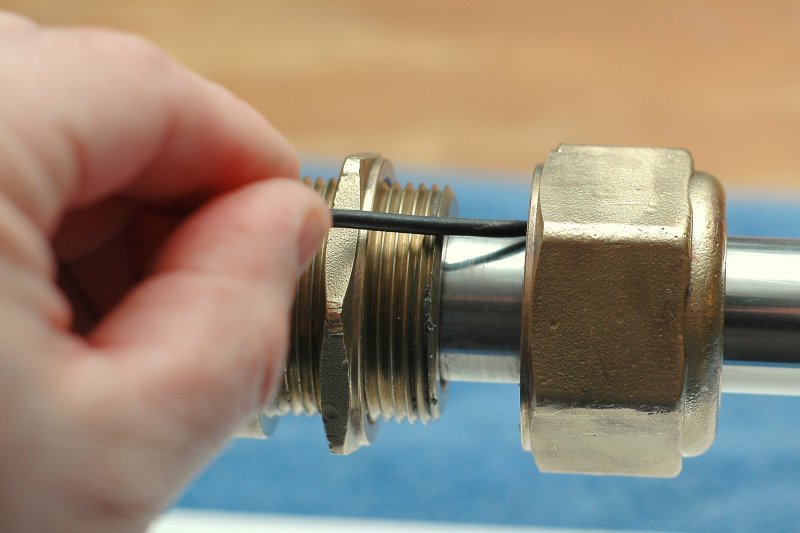
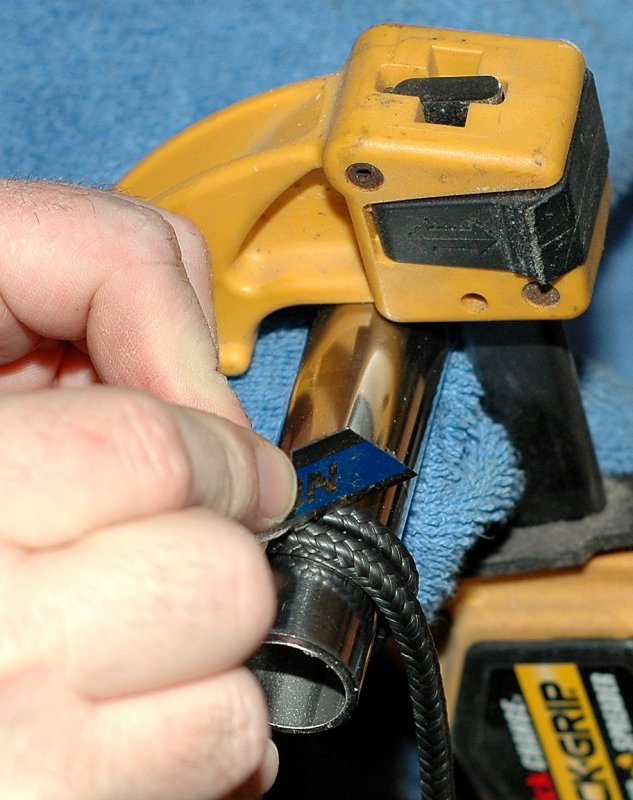
Removing Flax With A Pick
Success! The first flax ring is on its way out!
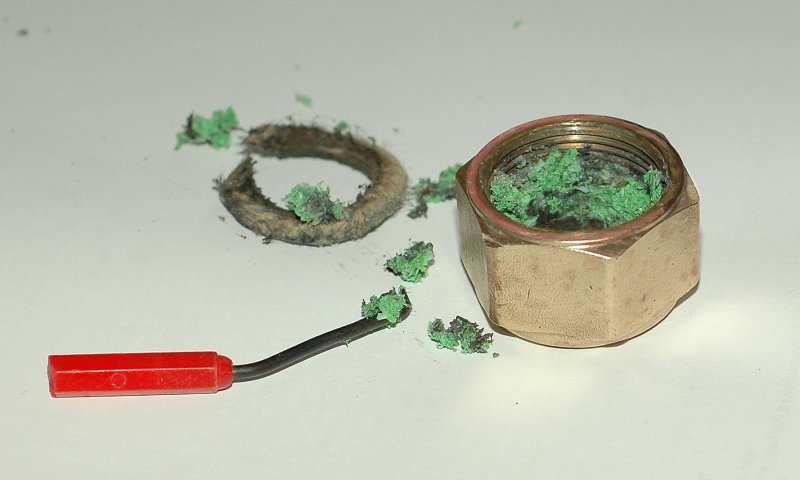
April-15-2005
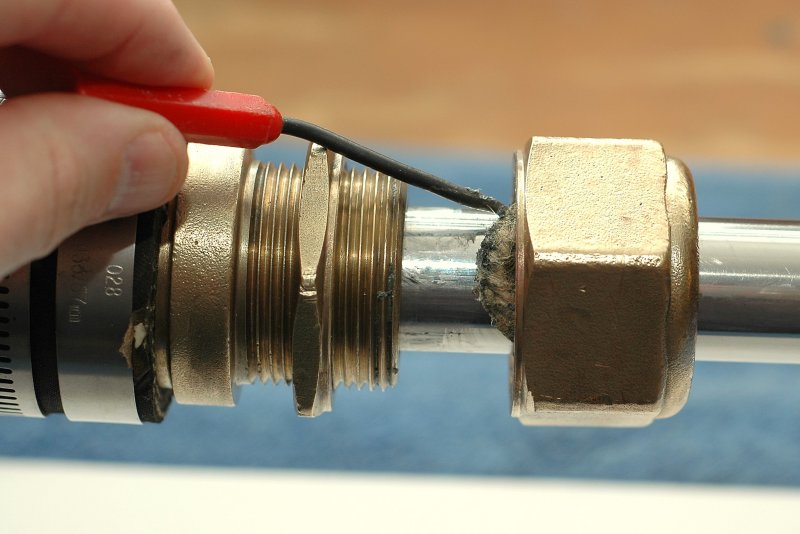
Packing Nut Off & Old Packing Out
I don't advise, and can't with a good conscience, suggest the use of "miracle lubes" such as the moldable packing materials like the "West Marine Moldable Packing Kit". While some have claimed good success with these miracle clays or lubes I did not.
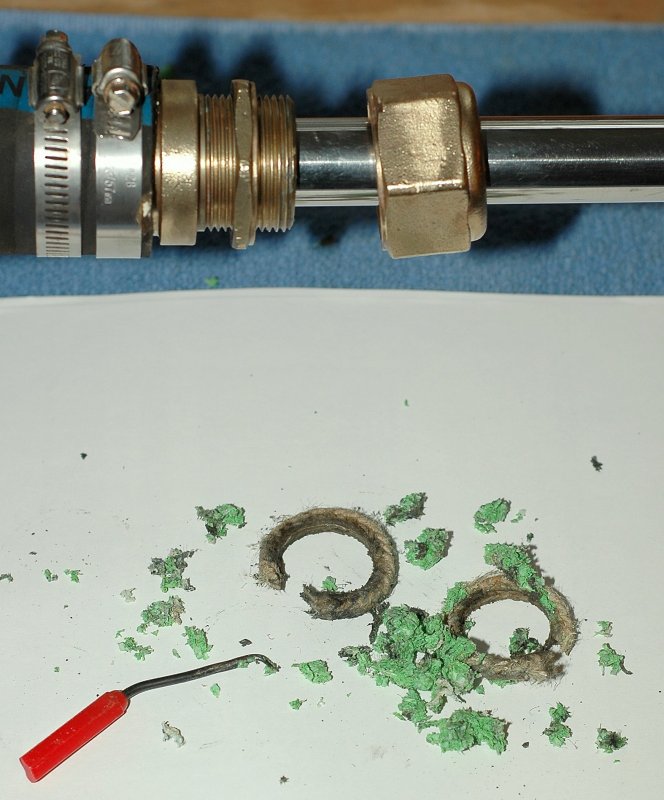
On our older C-36 I installed the "West Marine Moldable Dripless Stuffing Kit" and it became a nightmare. The green stuff in the picture is the "moldable clay" shown with the two rings of Teflon flax that came out of my female flax nut. Read below for more info on why I had problems with this stuff.
EDIT: Since writing this I have conducted extensive temperature testing of packing glands with a fixed temp probe mounted directly to a traditional bronze stuffing box. The digital temp display was mounted in my cockpit. What I have learned is that packing gland temperatures can be anything but static.
Air can become entrapped in the shaft log and with no cooling water you can, quite suddenly and without warning, develop a massive temp spike. Some boats are more prone to this than others. Our old C-36 was quite prone to this. Even after converting to a PSS dripless seal, before they introduced the vent, I found it needed to be burped multiple times per season due to entrapped air.
At one point during testing we had motored for over 3 hours using graphite impregnated packing set for less than a drip every three to four minutes. The temp stayed at steady at 85-102F for over three hours. We hit some prop wash from a large yacht and within 3-4 minutes the packing gland was pushing 300F. Ouch!!! This same event happened about 14-16 times over a 6 month period. My goal in testing was to find the happy medium for the least drips to the most consistent temps. I adjusted the gland for 1 drip per minute and the temp spikes were gone.
This is why stuffing boxes are intended to drip some. When they drip they also displace any entrapped air. Not all boats are prone to entrapped air in the shaft log, but many are. The simple act of backing down on an anchor can force air bubbles up into the shaft log and with no drip there's no way for the air to escape.
It is my best guess that this is what happened with our "miracle clay" packing...
April-15-2005
Packing Nut Showing Syntef & Teflon Flax
The idea behind this green "moldable clay" is that it will make your traditional stuffing box dripless. To install it you insert the first ring of flax, then pack in the green clay like substance and insert the second ring making, in essence, a green stuff sandwich.
While the idea of a dripless shaft seal is not new this stuff is probably not the ideal way to go dripless. Not only is it very, very tough to remove with a pick, and replace once installed, it also did not work as advertised for me. This stuff can plug the male end of the stuffing box with a thick black sediment as I found out.
This sediment can only be described as, remnants of the "syntef lubricant" and the "moldable clay". This gray/black goo totally plugged our stuffing box essentially preventing any cooling or lubricating water from getting to the female nut. If left alone for a long enough period it could wind up ruining your prop shaft.
Again, many folks claim success with the "miracle clay" so take my advice as cautionary only and do your own research beyond what I've said.
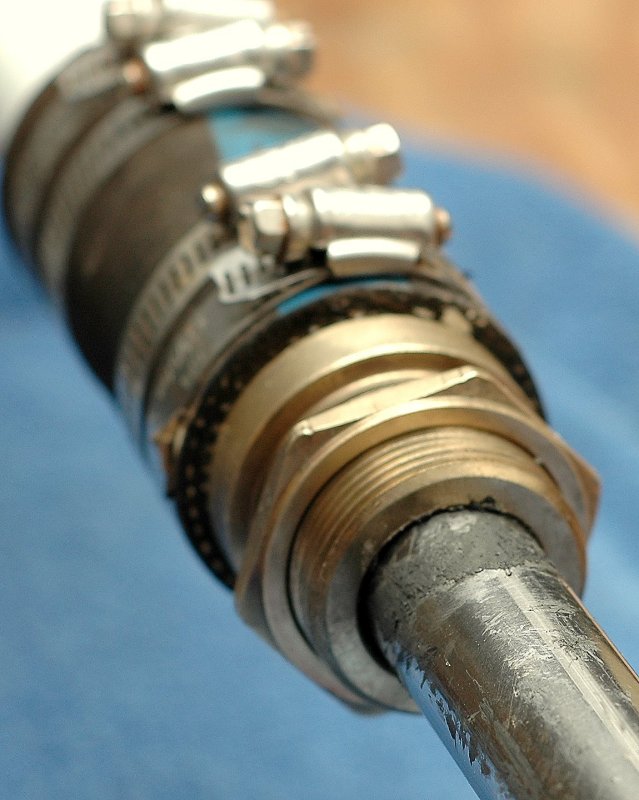
April-15-2005
This Mess Of Syntef Really Messed Up This Stuffing Box
If you clicked on this picture to enlarge it you can see the black goo residue on the shaft caused by the "dripless" packing that was clogging my stuffing box. All traditional stuffing boxes require water for lubrication and this "dripless" stuff totally plugged the area between the shaft and the male end of the of the stuffing box as seen in the picture.
Even with the female nut totally removed, in the water, I was getting, at best, 4 drips per minute with the nut off! Please be cautious using this stuff! My stuffing box actually got so hot, from the lack of water lubrication, that it started to smell and I burned my fingers, enough to blister them, when checking on it.
Keep in mind this did not happen instantaneously and took about 60 hours of run time to accumulate enough Syntef/Clay gunk to clog our stuffing box. It ran at what I thought were normal temps during and after break in as I measured it with an infrared thermometer. I now know that "spot" temp checks do not tell the whole story. Temp spikes and excessive heat are likely what caused this stuff to clog my shaft log over time. In my opinion this stuff is not suitable for a "tight" shaft log where you don't have sufficient clearance between the shaft and the male end of the stuffing box.
I highly suspect that due to the "dripless" nature of this packing that air became trapped in the shaft log. This used to happen frequently with PSS seals before they went to vented or plumbed models that allowed any trapped air to escape. With entrapped air inside the shaft log the packing would have no water lubrication and could begin to melt and clog the shaft log making it worse, as I suspect happened here.
How does air get in there? Docking or anchoring with quick blasts of reverse will send cavitation air bubbles up into the shaft log. If the shaft log is totally sealed or "dripless" the air accumulates until it causes no lubrication and eventually damage. There is a reason traditional style stuffing boxes are meant to drip. These newer packings should be considered "drips less" not "dripless". Beyond entrapped air stagnant water in the shaft log can cause crevice corrosion of a prop shaft as you'll see below.
Why It Should Drip Some
Real Tobin bronze shafting has been long gone for many years now and as such alloys in the stainless family such as Aqumet & Nitronic are now being used. These alloys, like type 304 and 316 SS can suffer from crevice corrosion. Crevice corrosion is worst when a stainless is in contact with seawater and also oxygen starved. This corrosion can happen between wet or leaking decks to chain plates or in keel stubs to the stainless keel bolts but many are unaware that it can happen to prop shafts too. Allowing the packing box to drip helps keep the water in the shaft log from becoming oxygen depleted.
Over the last 10-15 years there has been a dramatic rise in crevice corrosion of prop shafting. With the newer packing materials, and misleading advertising that use phrases like drip-less that cause DIY's to think it means "dripless" not drips less, owners have been starving the packing box area of oxygen by not allowing any fresh oxygenated water to pass through it. This can lead to the destruction of your prop shafting from crevice corrosion. While some packings such as Gore GFO, Ultra-X or GTU may be able to be adjusted to be mostly dry and still some what cool to the touch it is still a bad idea from a crevice corrosion stand point.
Another pit fall when a stuffing box is run totally sealed and "drip free" they can begin to trap air up in the shaft log. All it takes is a quick blast of reverse, and the resulting cavitation bubbles forced up and in, or after sailing in rough weather. Once enough air becomes trapped up in the shaft log the packing box you thought was cool to the touch begins cooking while you least expect it. Even PSS has now moved to selling all their dripless packing boxes with an air vent.
If a stuffing box is allowed to drip it allows for excellent cooling, longer shaft life, less opportunity for crevice corrosion and less opportunity for trapped air to run the box totally dry and cook it.
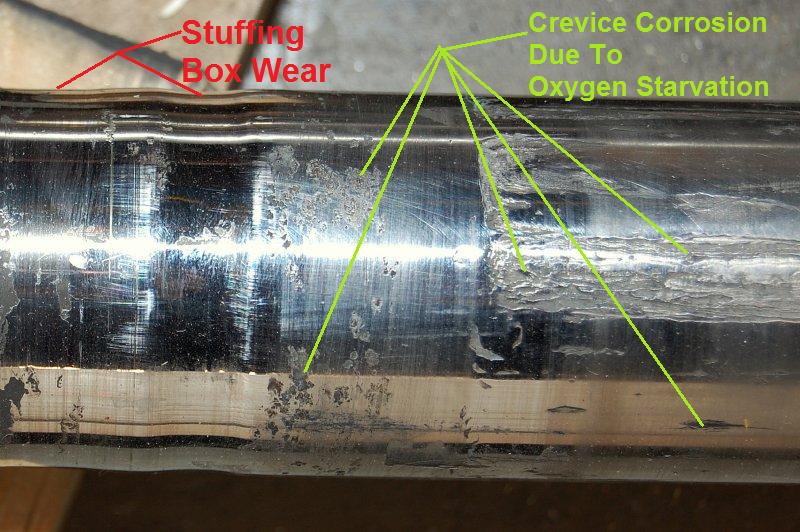
13-JUL-2010
.05" Of Wear
This shaft had roughly .05" of stuffing box wear and was deemed "scrap metal" by the shafting shop. This owner was using Teflon impregnated natural flax and thought when the advertising said "drips less" that it meant it was supposed to be "dripless". This was an expensive mistake you should aim to not repeat.
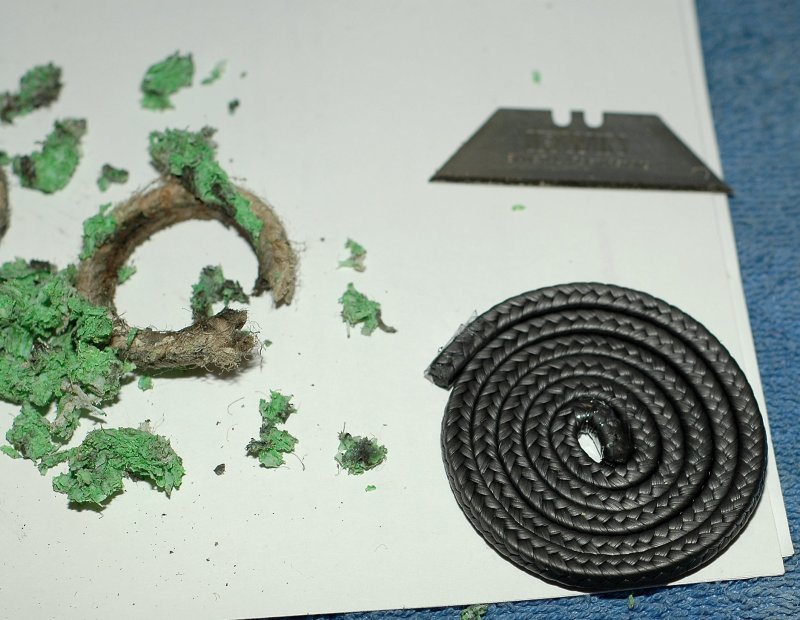
April-15-2005
New & Old Packing
This photo shows the old Teflon flax packing with the "miracle clay" and the new GTU packing. GTU is a knock off of Gore GFO, but it frays worse due to the braid design.
I used the Gore GFO for half a season on our new boat before switching to a PSS again. The Gore is the best of the flax type packings in terms of heat dissipation but it is at the very, very top of the galvanic scale, which can cause other issues.
These packings also needs a few drips per minute to run cool and not damage the shaft. My one complaint with this GTU packing, made by Western Pacific Trading and sold through West Marine, is that it tends to fray easily and does not make the cleanest cuts even when using a brand new razor blade.
April-15-2005
Scrap Tubing As A Cutting Jig
Many sail boats have a 1 or 7/8 inch prop shaft and a piece of 1" or 7/8" scrap "dodger tubing" works great as a cutting jig for new flax rings.
Use a set of calipers to make sure your "jig" of choice is the same O.D. as your prop shaft and then cut away. I usually cut the rings in this manner but you could also cut them on the actual prop shaft too.
Please cut the rings on the outside of the boat where the shaft exits the hull between the strut and the hull and not at the stuffing box. If you cut the rings on the shaft, at the stuffing box, you run the risk of scoring the shaft and causing a burr that can damage the new packing and inevitably leak more until the burr gets polished away from the friction. This could take a very long time unless you are in heavily silt laden water...
April-15-2005
Cutting New Rings (Wrong Way)
This may get a little confusing but there actually is a right way and a wrong way to cut the 45 degree angles on your flax rings. In this photo I am holding my razor blade at a 45 degree angle parallel to the shaft. Unfortunately if I cut the rings in this manner they do not seal quite as well. Yes it will work but it is not optimal. Because the shaft nut does not compress the flax on the circumference, like the action created by a hose clamp, cutting it 45 degrees & parallel creates a less than optimal seal.
April-15-2005
Cutting New Rings (Right Way)
In this picture it's easier to see the 45 degree cut and how the two ends of the packing will join together. The shaft nut will actually compress these two ends together and create a better butt joint than if they were cut vertically for a circumference (think hose clamp) type compression. I told you this was a little confusing.
Once the ring is cut be very, very careful to minimize fraying before installing it. If you're using the "imitation" PTFE or traditional "wax" flax fraying is not an issue but with Gore GFO it is.
NOTE: When you cut rings this way they will usually not wind up the correct length. Shave one end down until you get the right fit.