Most all boats have some sort of "core" in the decks. Whether it's balsa, plywood or some of the foam cores all can eventually absorb water from a leaking deck penetration. A leaking deck, especially with wood cores, can lead to core rot and eventually delamination of the deck and loss of structural rigidity. Sailboats especially can have hundreds of holes drilled into the deck for cleats, stanchions, blocks, winches, genoa tracks or many other mechanically fastened and through bolted or screwed items.
Unfortunately most builders do not take the time, nor have the patience, to protect the core from moisture. Most all builders also fall short in their bedding techniques, choosing in favor of time over lost profit. The "can't be seen, must not be there" mentality certainly rings true in the category of deck hardware installations.
The re-bedding of deck hardware is a time consuming task but one that can save your five, six or seven figure vessel from loosing 25% to 50% of it's market value due to saturated and rotted decks.
There is no method better than "potting" the holes with thickened epoxy to prevent core damage if you have core where hardware passes through. This job is easy but time consuming. Once done correctly you will never have to worry about water getting into your core again.
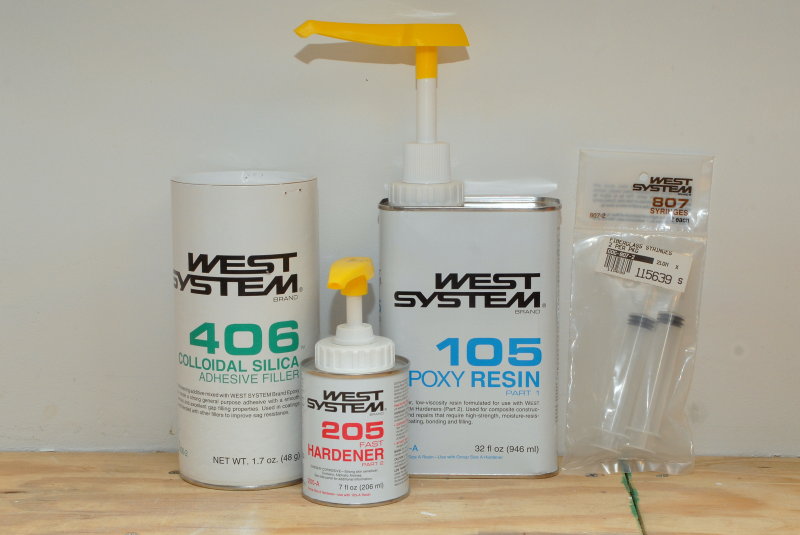
These are the epoxy products I use to "pot" deck holes. I generally use System Three Epoxy products but for this I used West System because its very easy to find and use. I use a #205 hardener #105 resin & Colloidal Silica or "Cabosil" as the filler or thickening agent. In order to inject the resin into the holes I use the West System syringes.
*CLICK ANY IMAGE TO MAKE IT LARGER*
04-Nov-2006
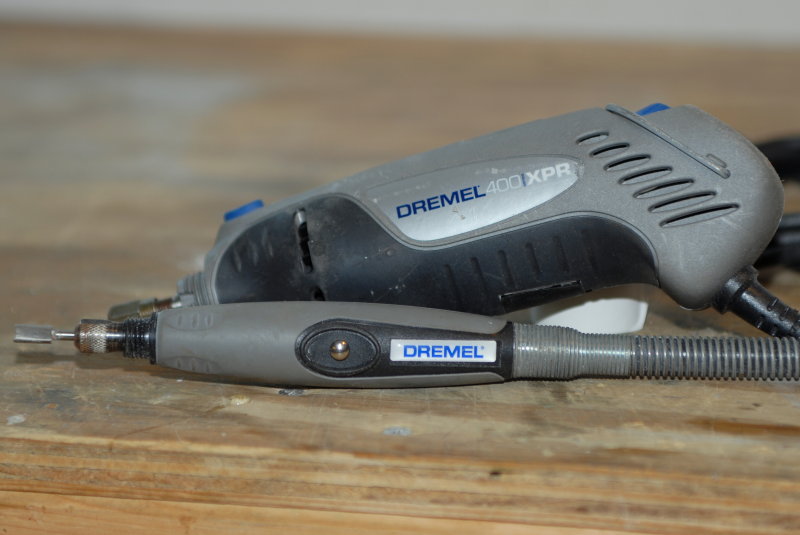
A Dremel With Remote Wand
A deck core is a sandwich of fiberglass skins laminated to a foam, balsa or plywood core. In order to "pot" a hole you must first remove a small amount of core from between the skins. I often read of the "bent nail and drill" for this task but it's not a pretty or an easy task. I sometimes question whether the authors and folks recommending this practice have actually ever tried it, but I digress.
While I have chosen to illustrate this using a balsa core you should be aware that most builders do not use foam or balsa directly beneath high load deck hardware. More often than not you'll be dealing with marine grade plywood under deck fittings. Plywood can handle the compression loads far better than either balsa or foam cores and this is why it's laminated into the deck beneath deck hardware. Plywood is hard to carve out, comparatively speaking, and one more reason why the bent nail trick is not as easy as some would make it seem.
The easiest way to remove core from between two skins, that I have found, is with a Dremel. I also advise the use of the "magic wand" as I like to call it. This flexible extension gives you artist like finesse and makes the job of removing core material significantly easier. Dremels are cheap these days and I can't imagine owning a boat without one especially when potting deck core penetrations.
04-Nov-2006
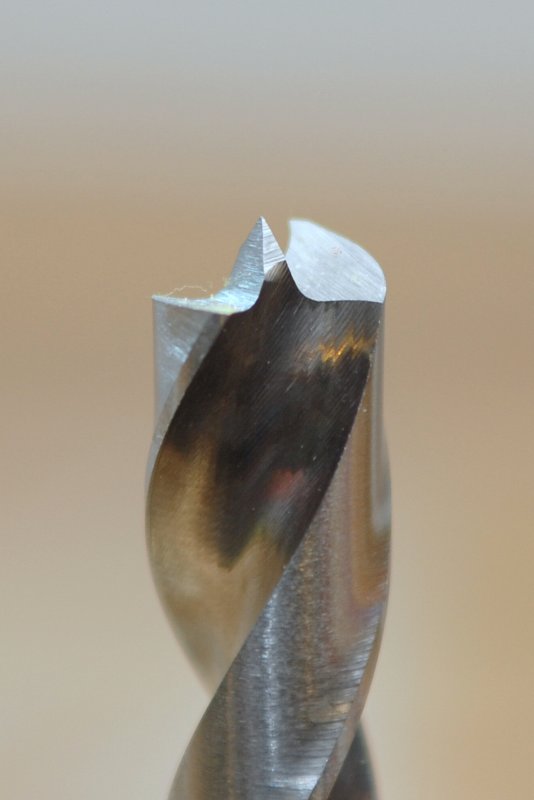
Brad Point Drill
When drilling into fiberglass the proper tool is a must. This is a brad point drill and it will create a clean, no chip hole in gelcoat provided you use a few tricks.
The main trick is to always start the drill in reverse! This trick also works well with hole saws. By starting in reverse it allows the outer cutting edges of the drill to cut cleanly through the gelcoat. Once through the gelcoat you can then switch the drill to forward and complete the hole without chipping any gelcoat off the surface.
04-Nov-2006
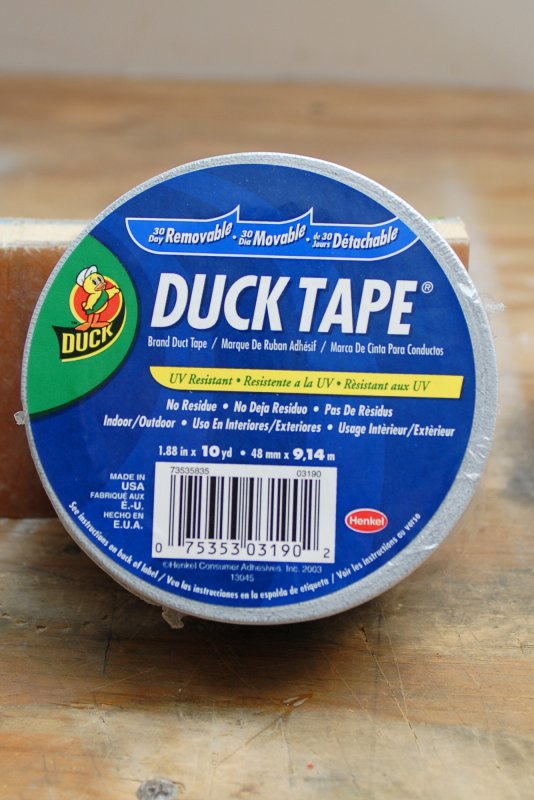
Tape For Sealing The Underside of The Deck
This is one of my favorite marine duct tapes. It's a UV stabilized, white in color, heavy duty duct tape made by Duck brand. It is hard to find but I have found no better duct tape, in white, that is also UV stable for use on a boat.
I use often use this tape to seal off the underside of the deck. This prevents the epoxy from dripping into the cabin. Gorilla brand duct tape is even better for this as it is even more adhesive than the Duck brand.
04-Nov-2006
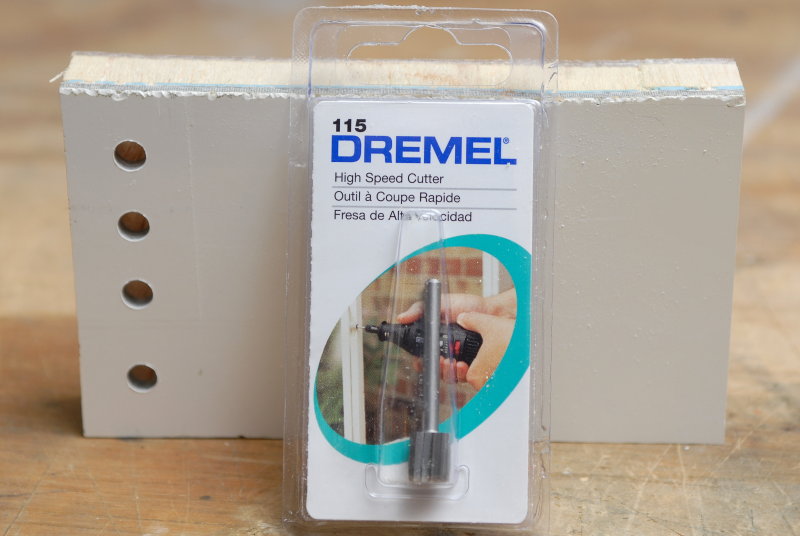
Dremel Bit #115
This is one of two bits I use to remove the core. It is a 5/16" diameter head with a 1/8" shank. It allows a perfect amount of core removal to seal the deck from moisture.
04-Nov-2006
Dremel Bit #654
This is my other favorite bit the Dremel #654. I like this one because most hardware, like stanchions, on 28-42 foot sailboats, is through bolted with 1/4" X 20 thread bolts. The head of this bit is 1/4" and it fits down into a 1/4" hole and can then be used to remove core, for potting, without first over-drilling the top skin to 5/16".
I should mention that I personally prefer to leave as much of the top and bottom skin in place as is possible. Much of the strength of the deck comes from these skins so leaving them intact when potting hole is what I consider a good practice. Leaving the top and bottom skins intact, without over drilling all the way through both skins, leaves you with a "captured plug" of epoxy that can't physically pop out or break free as easily as a complete over drill of both skins can. A number of years ago I set up some destructive testing in my own shop to see which was stronger. While both are strong I found the captured plug to be stronger.
Either method is arguably far better than what the builder did, and that is not sealing the core at all. Don't fret over the method just chose one and do it before it's too late.
04-Nov-2006
Enlarging An Existing Hole
In order to complete this article I used a scrap piece of end grain balsa deck structure. I wanted to use a scrap piece so that I could make cut-a-ways to show the inner workings and what actually happens on the inside of the deck.
Here I have drilled three holes; one for the #115 bit, one for the #654 and one that will remain as 1/4" with no epoxy fill.
The center hole, as you can see, has been counter sunk. This was originally a 1/4" hole that I over sized to 5/16" to make the #115 bit fit into it. Over sizing holes in fiberglass can often result in an "oops" and some serious deck chipping.
So here's the trick to over sizing holes:
#1 Pre-countersink/chamfer the hole to just beyond the width of the drill you will use for the over sizing, in this case 5/16". If your countersink bit is new and sharp get in the habit of using reverse, not forward, when countersinking fiberglass. Forward will remove too much material too fast if you are not careful.
#2 Place your brad point drill in the chamfered hole and use reverse. You will cut through the top skin only and have a nice clean hole. You do however need a brad point drill set. You won't find them at Home Depot and will find them a Rockler or on line. This is the quickest and cleanest way to bore the top skin without the drill wandering or causing serious gelcoat chipping!
04-Nov-2006
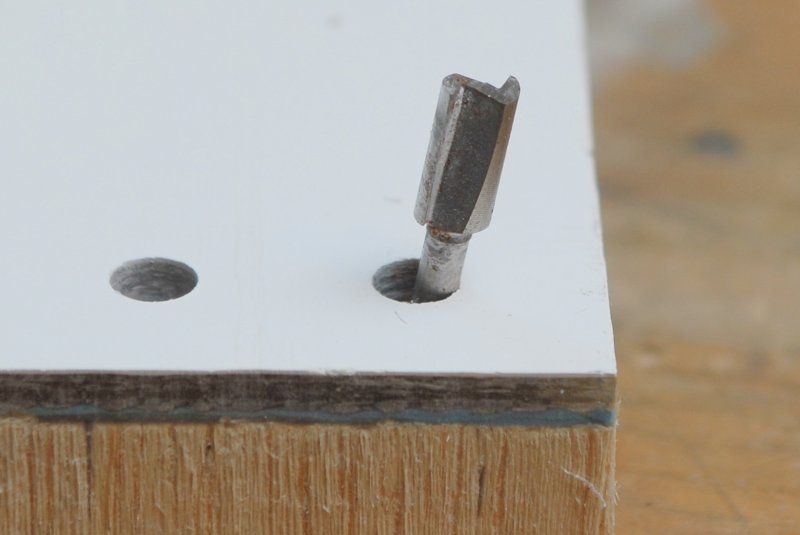
Bit Fits
As you can see (click image to make it bigger if you can't) the 5/16" head of the Dremel #115 fits into the recess created by the countersink. I have purposely created a little extra room with the countersink to 100% avoid edge chipping.
04-Nov-2006
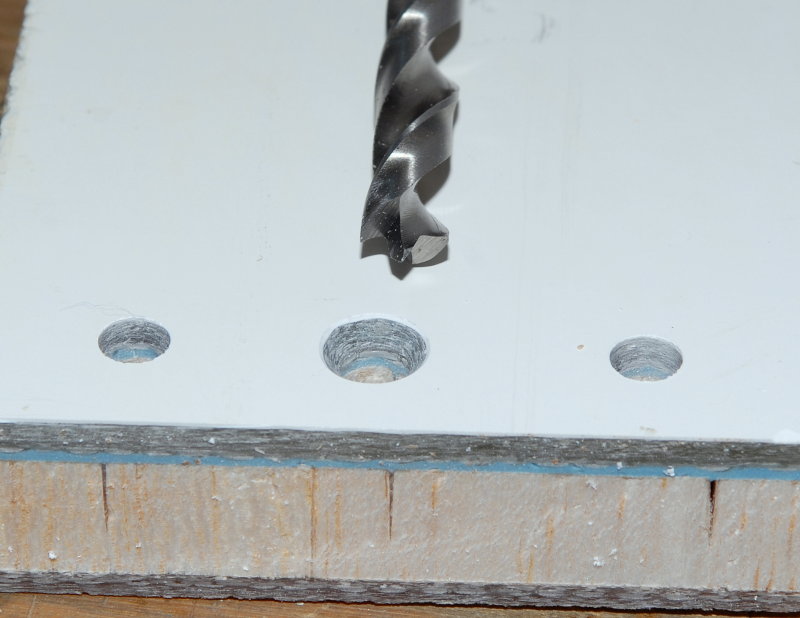
Drill For Making Over Sized Hole
Here's my 5/16" bit that I used to enlarge the hole on the top skin. Again do not drill all the way through the deck just drill through the top skin.
04-Nov-2006
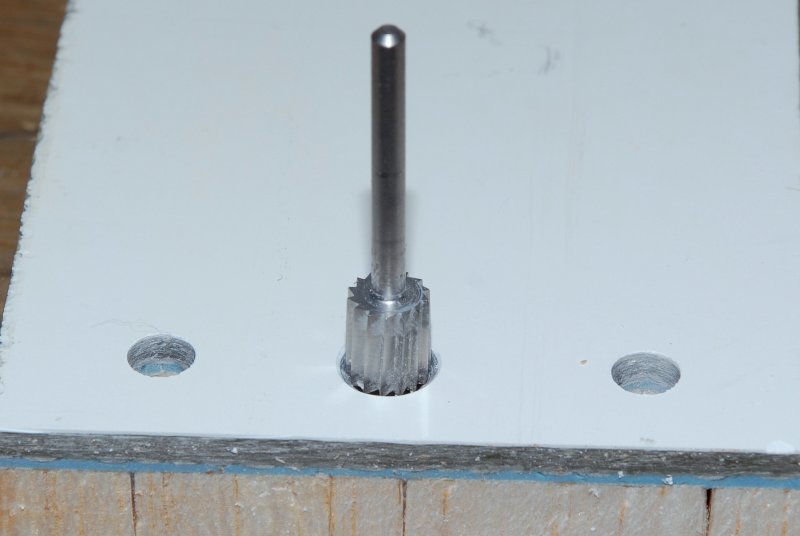
Clean Over Sized Hole
This image shows the 5/16" over sized hole, and the original 1/4" hole on the left. The new bigger hole is just as clean even though there was no "center point" to start the drill with.
At this point I have removed the core with the Dremel and you can see the cavity it created if you blow up the photo and look close.
When using the Dremel to rout the core away make it a practice to insert the head of the bit into the deck before turning it on. Once turned on use the bits shaft as a guide and work your way around the hole moving up and down and around the circumference of the deck hole to clean the core material from the the skins and to make a nice, even, round cavity for the epoxy to seal the deck.. Make a few passes and suck any dust out with a shop vac. It takes all of about 10-20 seconds, per hole, once prepped and ready for it..
04-Nov-2006
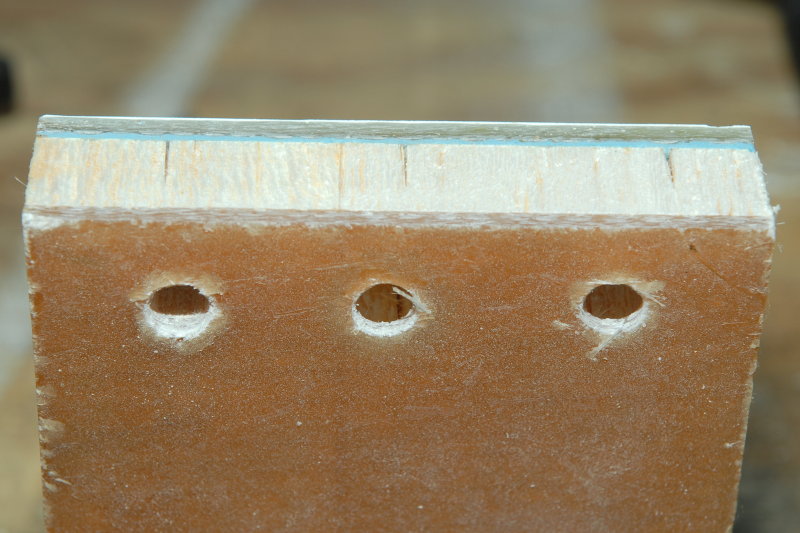
Bottom Holes
This photo shows that all the holes below deck are still 1/4" even though the middle hole has a 5/16" diameter on the decks surface. This leaves as much of the deck skins intact is as humanly possible.
04-Nov-2006
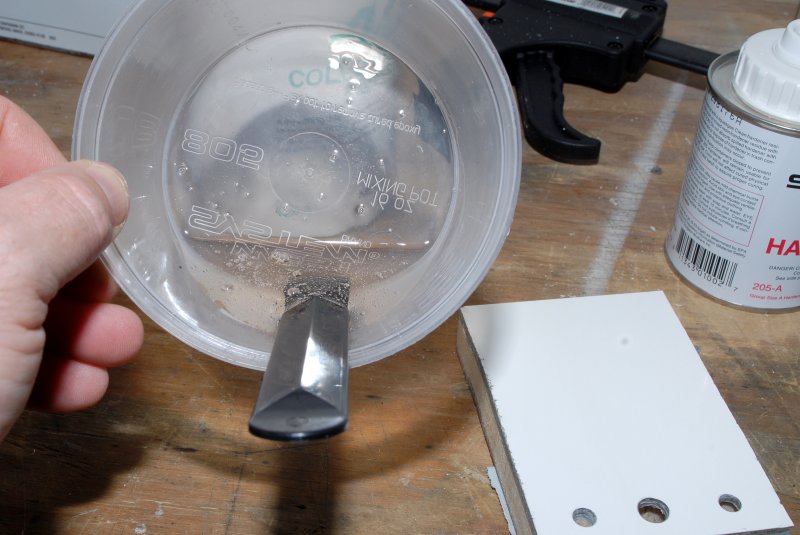
Mix Epoxy
Now that the core has been routed out with the #115 & #654 bits it's time to mix some epoxy. With West System they use metered pumps. Until you get good I don't recommend partial pumps. The mix ratio is a one pump hardener to one pump resin ratio. You will have about 20 minutes of pot life using the 105 resin and 205 hardener at temps in the low to mid sixties, which is plenty. At room temp, 72 degrees, you'll have 9-12 minutes of workable pot life.
Epoxies kick off faster when it's warm and slower when cold. If working in colder conditions remember that it will become more viscous and tougher to work with especially when you need it less viscous to fill deck holes.. For more info on using West System epoxy visit their great and informative web site.
*******CLICK BELOW FOR PAGE 2*******
04-Nov-2006
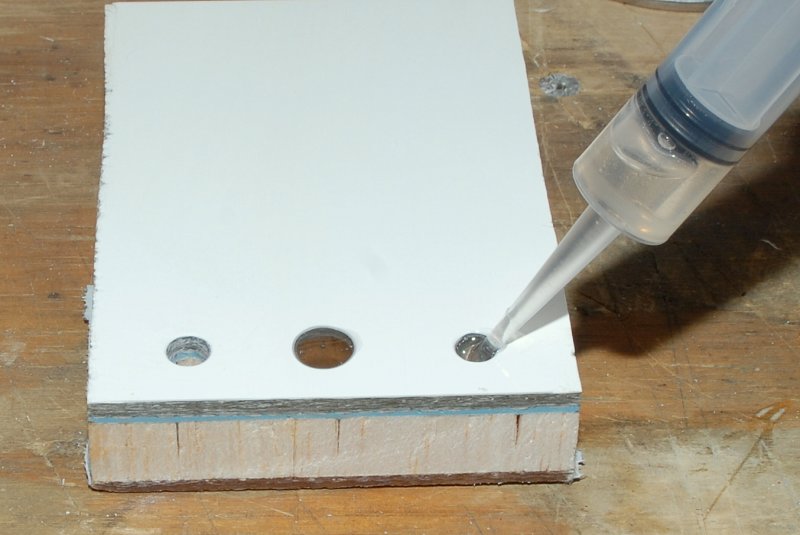
Inject Non-Thickened Epoxy First
I know I said "thickened epoxy", and we'll get there, but first it is a good practice to inject clear un-thickened epoxy into each hole. By doing this you allow the less viscous, resin only, without thickener, to penetrate the surface pores of the core. This tends to create a better and stronger final bond.
In order to do this I inject straight mixed epoxy into each hole with a syringe. I then let it sit in each hole for about 3-4 minutes and suck it back out with the syringe and squirt it back into the container where I add Cabosil to thicken it.
04-Nov-2006
Mix In The Cabosil
Adding Cabosil, or the thickener of your choice, is easy but you can not make it too thick. It needs to drool off the mixing stick in a steady stream. If it goes drip, drip, drip off the mixing stick it's probably too thick.
Remember this slightly thickened resin has to fill a hole and let air bubbles escape leaving behind no voids. If you make it too thick you will have bubbles and voids. Not too thin and not to thick..
04-Nov-2006
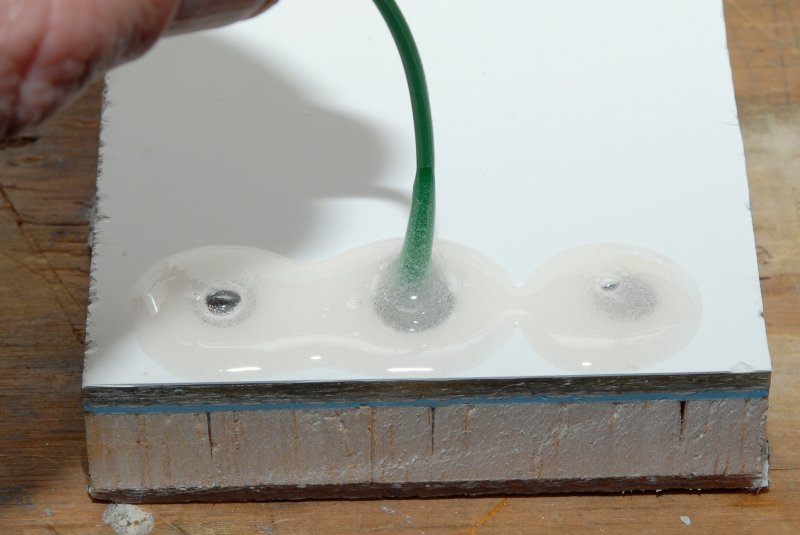
Remove Trapped Air Bubbles
Here I have re-injected the holes with my syringe. I did cut about .5 cm off the tip of the syringe which makes the hole bigger to accommodate the more viscous thickened epoxy.
The green stick you see is simply a piece of weed whacker line. This is a very simple and cheap tool for popping any trapped air bubbles and moving them to the surface so you don't get any voids. All you do is move it in, out and around the hole until you get no more air bubbles then slowly pull it out.
04-Nov-2006
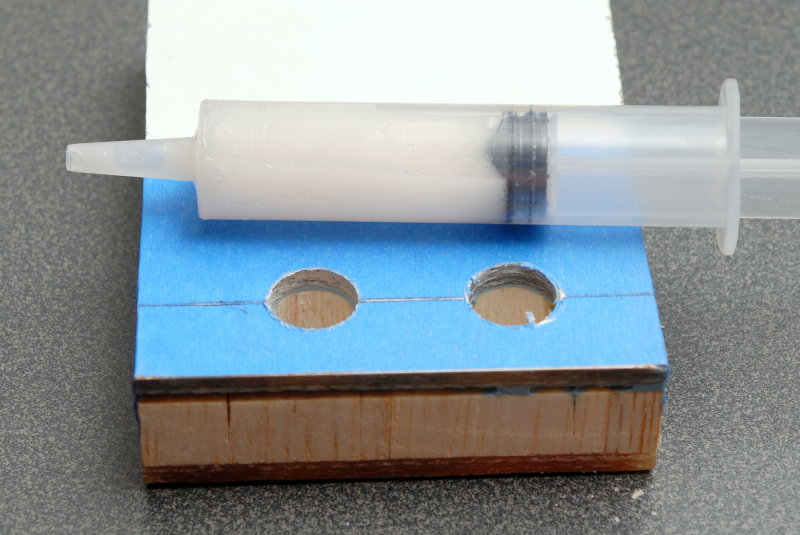
Tape Off The Deck
In this photo I have actually taped off the deck side to show what it will look like. You can use an X-Acto knife or a countersink spun between your fingers to get a clean hole. Taping prevents you from needlessly having to clean up epoxy residue which can be very difficult if not impossible once cured.
You will also notice the syringe filled with the Cabosil thickened epoxy and ready to go.
04-Nov-2006
Wipe It Down
Of course if I were doing this on a boat I would have first pre-taped over the holes, like the photo above, & then used my countersink bit between my fingers to remove the tape from the holes. This method protects the deck and the countersink carves out a nice clean hole in the tape.
In this photo I simply used a rag with Acetone to wipe away any over flow. Use tape and it will go much smoother and cleaner. I simply forgot when photographing this..
04-Nov-2006
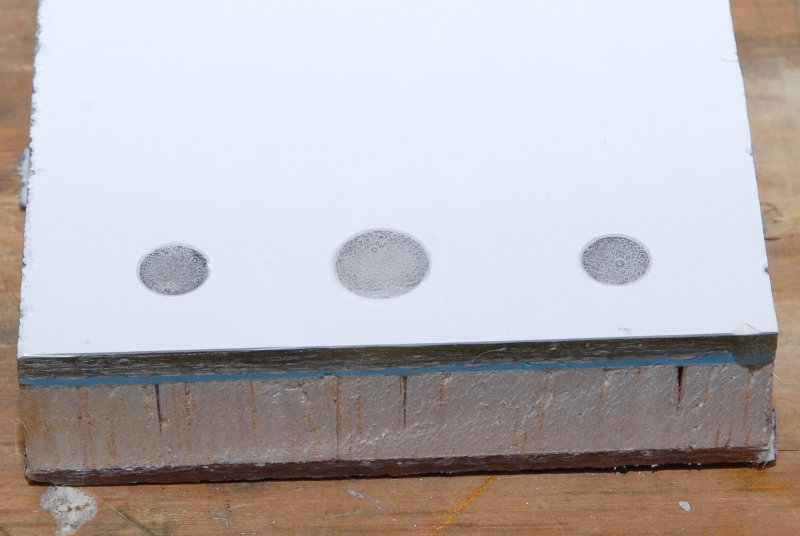
The Tape Side of the Deck
In this photo the epoxy has cured and I have removed the Duck brand UV resistant duct tape. It seals perfectly and is not affected by the curing resin.
TIP: Before applying the tape, wipe the surface clean with Acetone or a strong solvent that will remove any grease or wax. The tape will seal and stick better. Gorilla brand duct tape is about the most adhesive you will find and also works well for this type of job.
04-Nov-2006
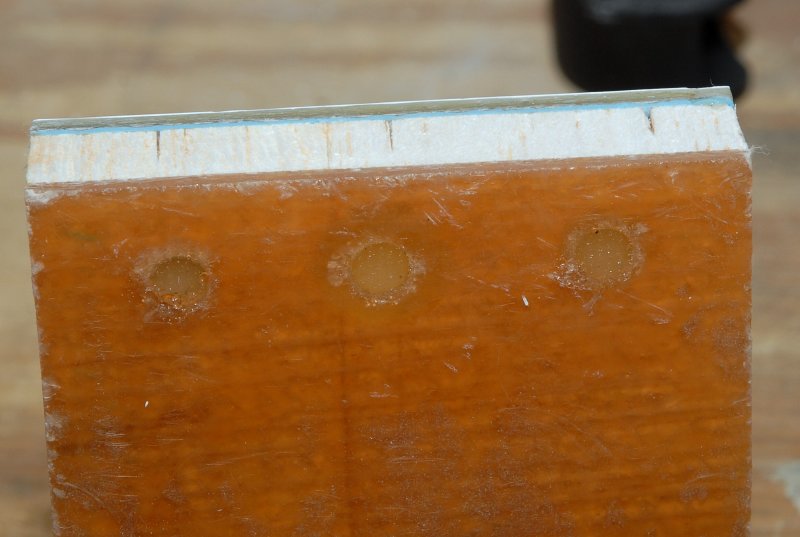
#654 Bit - Cut-A-Way of Potted Deck Hole
After I removed the tape I re-drilled each of the holes with my 1/4" drill and then counter sunk the two holes that had been potted.
This is a picture of the hole I made with the 1/4" #654 Dremel bit. The hole is clean and precise with plenty of separation between the epoxy and the core. Both the top and bottom holes through the deck skins remained at 1/4" for a factory original look and feel yet this is much better than how it would have come from the factory.
04-Nov-2006
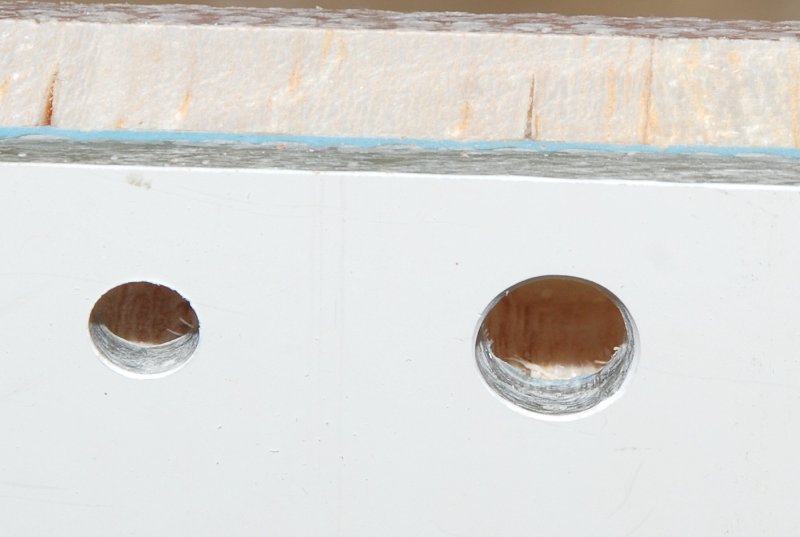
#115 Bit - Cut-A-Way of Potted Deck Hole
This is the cut-a-way of the hole I cored out with the #115 bit. If you'll notice the epoxy potting is a little thicker than with the #654 bit. I don't feel this serves much of a purpose, & both will seal the deck from future moisture, but does require slightly more work in the over sizing of the top hole to 5/16" or what ever size you choose.
When you re-drill your holes, after filling them with epoxy, try and do a better job than I did of centering your bit over the original hole or your deck hardware might not line up again.
This re-drilled hole is off set to the left a little bit. Please be careful when drilling over sized holes as it makes re-drilling that much more difficult. When in doubt mark the center points of all your holes using the deck hardware as a template.
04-Nov-2006
Explanation of Countersinking
So why on earth do I countersink or chamfer the deck side of the skins?
#1 It does a lot to prevent & limit gelcoat crazing. By feathering the edge of the gelcoat, through the use of countersink bit, you are less likely to start a crack or craze mark in the gelcoat.
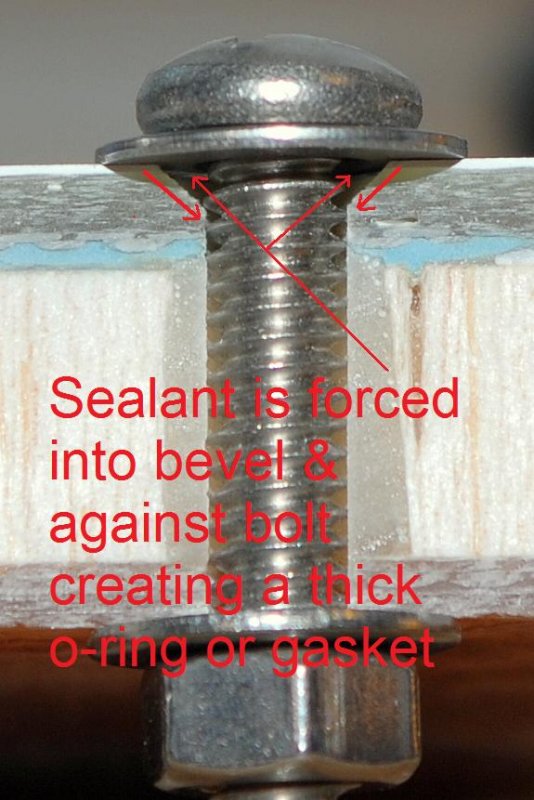
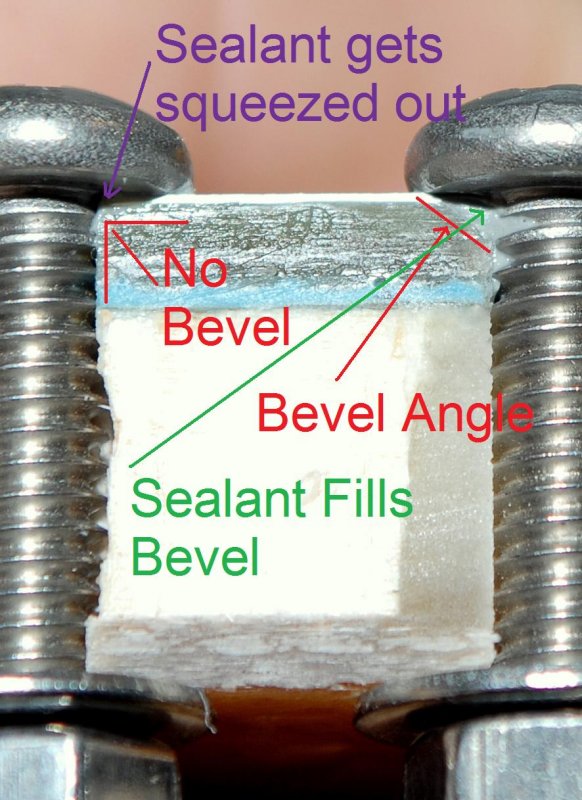
#2 By creating a bevel or countersunk recess in the surface of the deck the marine sealant or butyl tape has a cavity to fill. Without a bevel the hardware would compress the sealant to about 1/64th of an inch thick after the fasteners are tightened. Marine sealants do have some flexibility but not as much as you would guess. Follow me for a moment; Let's say you have a marine sealant that has a rating of 400% elongation before break on a 1/64" thick joint. Simple math shows you that 400% of 1/64" is only 1/16" of total allowable joint movement before a joint failure or leak starts. In the case of a stanchion base 1/16" is not much allowable movement before failure.
By countersinking around the bolt holes you increase the maximum thickness of the sealant, at the bevel, to roughly a 3/32" depth at it's deepest point. Using the same math as above 3/32" X 400% gives you a total joint movement before failure of 3/8". If a mechanically fastened joint is moving 3/8" you have more problems than just a deck leak! So 1/16" allowable movement before failure at 400% without countersinking or 3/8" allowable movement at 400% before failure with countersinking. Even a small bevel will drastically increase max allowable movement before failure. Countersinking to a mere 1/16" depth will give you 1/4" total movement around the bolt before failure. You don't need a deep bevel to make a large difference between a failure and a seal.
#3 Countersinking is really a no-brainer, and has many many benefits. For instance, you can install the fitting and tighten it down NOW with no waiting. This means you can seal deck hardware alone.
I am going to inject some strong opinion here so please move on to the next photo if you don't want to hear it. I truly discourage anyone from using the Don Casey "two step", "wait to tighten and form a gasket" method of bedding deck hardware with a "curing" marine sealant. Is this because it can't or won't work? Absolutely not? Is it because I don't like Don Casey? Absolutely not! Don is a great guy and tremendous asset to the boating community. Then why?
In my experience this method is probably one of the leading causes of deck core rot on the planet. Believe it or not, I'm not a conspiracy theorist.. This is NOT to say that when done properly it won't work, just that it is VERY, VERY, VERY, VERY difficult to actually do this properly. Many a DIY and pro have messed this up and ruined decks as a result.
Think about it? If the sealant cures, to form a gasket, and you then move the bolt while tightening it down on the second step.... You will likely lose. If you create a gasket too thick, it cures, and then can't get the mechanically fastened hardware tight enough against the deck because of compression resistance, the hardware will move, and also fail, so again, you lose.
I mean no disrespect to Mr. Casey, he writes some great stuff, but this method is very difficult to nail repeatably because cure rates change with humidity, temp and far too many factors to get good reliable repeat-ability.. I have witnessed far too many cases of core rot due to DIY & pro two-step bedding procedures than I would have liked to.
So where did I lean this countersinking method??? Hinckley Yachts. Sure this extra step takes all of about 30 seconds per stanchion but apparently it's too much "extra" work for most production builders.
OK I'm done with my rant...
04-Nov-2006
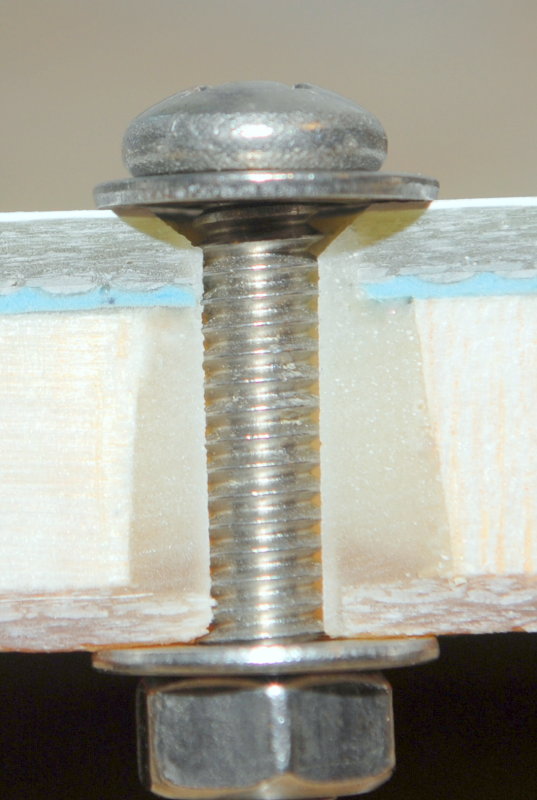
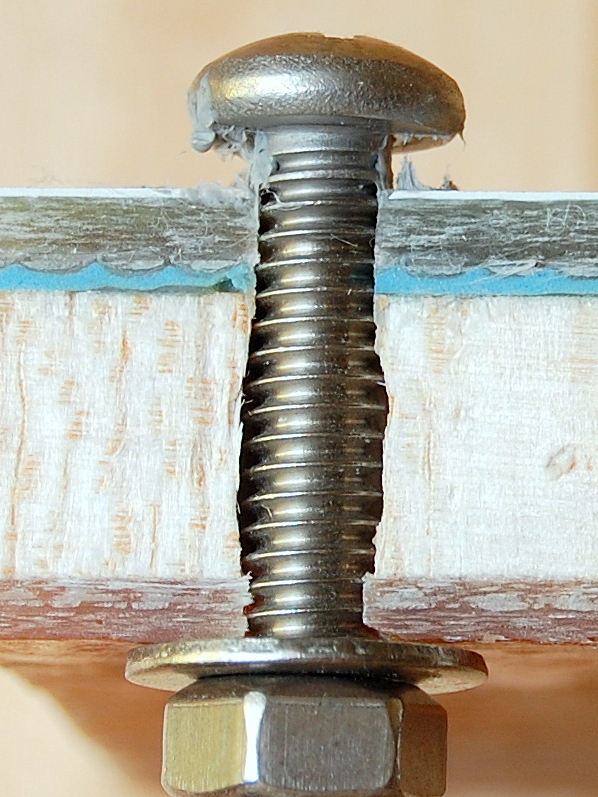
Stretch !!!
In this photo I used butyl tape as a bedding compound, it's what I use on 90% of my deck fittings. I loosened the nut and pushed the bolt up to show how much allowable movement can be had with a countersunk hole.
If you look close you'll see that the outer edges, where the bolt head meets flat deck, the sealant has begun to fail or failed entirely yet the butyl in the countersunk recess is still stretching and still there! The butyl is also still well adhered to the threads from being compressed by the bevel when tightening the bolt.
04-Nov-2006
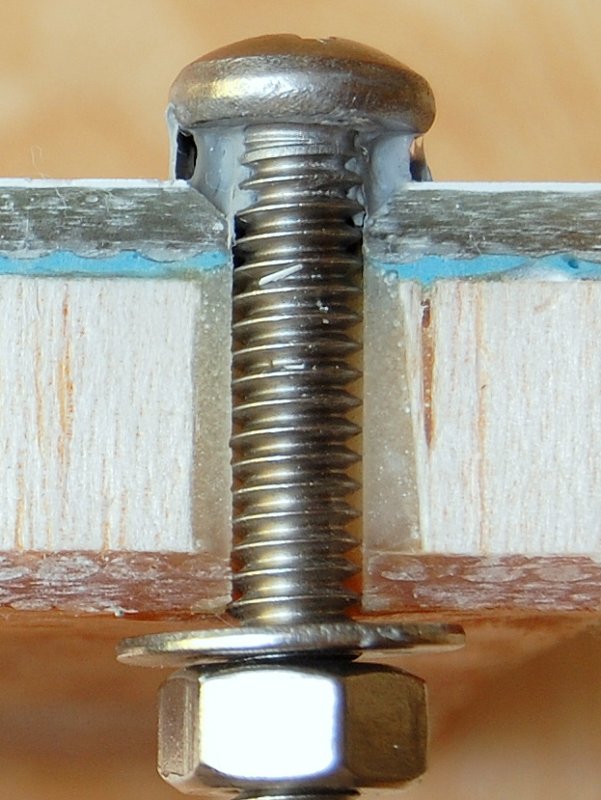
Not Much Stretch
This bolt hole has no bevel at the deck level. It was loosened and raised the same amount as the previous bolt, to illustrates how much difference in allowable movement one can attain through the simple step of countersinking.
When I tightened this bolt down most all of the sealant squeezed out leaving very little of it to stretch.
04-Nov-2006
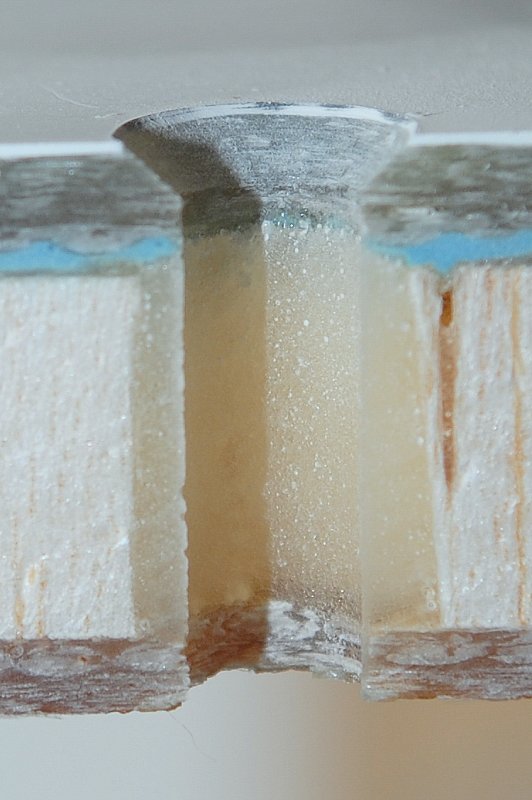
Another Illustration
Here you can see how the countersunk hole on the right has forced & compressed the butyl against the bolt and into the threads creating a great seal. The bolt on the left was not countersunk and has very little sealing surface area around the bolts shank or threads.
04-Nov-2006
Alternative Methods
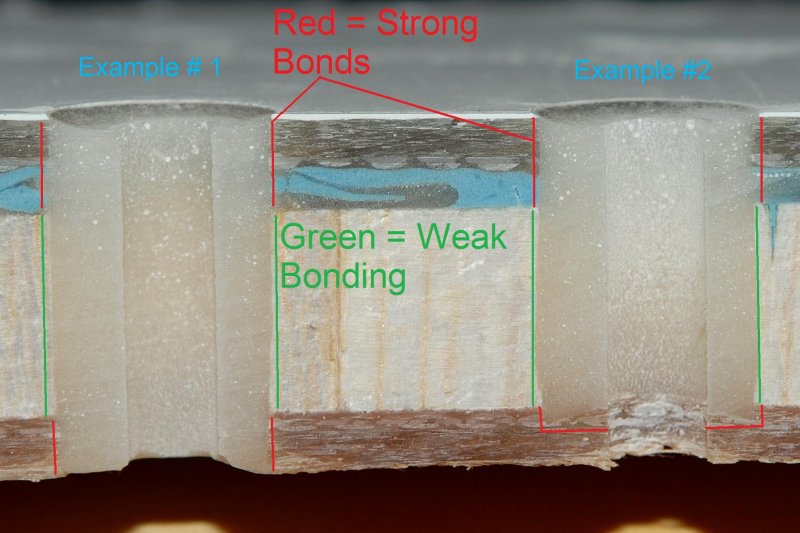
This photo represent two other ways of doing the same job. Personally I don't like either one as much as the previously mentioned methods using the Dremel bits. Why don't I like these methods as much?
1) In method #1 I drilled an over sized 1/2" hole clean through the deck and then filled it with thickened epoxy. By over drilling the entire thickness you have removed the deck skins which are a major structural component. End grain balsa has very little strength on the grain, which is where the epoxy adheres to in an over drill. Picture splitting fire wood. You split with the grain and if flakes off nicely. Epoxy adhered to the grain can do the same.
If you tried to split across the grain or pull balsa apart via the end grain it would be very, very difficult and this is why it is called "end grain" balsa and why the deck skins are laminated to the end grain not the grain of the wood. The areas highlighted in red, the skins, are thinner than they appear in this cropped photo, especially on light weight sailboats. In this example your only means of structural support are the circumferential bond between the top and bottom skins as the area in green is very, very weak comparatively speaking and would rally rely on the backing plate.
I have seen two failures of total over drills in my life. Theoretically speaking, when used with proper backing plates it should hold but if your balsa is even just moist your entire bond will only be the thin area of the two skins. It should be noted that epoxy does not adhere well to wet core this is why it is critical to seal the deck before it gets wet.
2) In method #2 I have only over drilled the top skin but left the bottom skin intact. This is slightly stronger than method #1. With the top skin gone it too is less strong than leaving most or all of the top and bottom skins intact and creating a captured plug.
3) Using either method #1 or #2 leaves you with a larger hole on the UV side of the deck. Some stanchion bases or hardware may not entirely cover the larger hole completely and epoxy does not like UV.
It's entirely up to you how you seal your decks all I can do is present the pro's and cons, as I see them. Of these two methods I prefer method #2 but I prefer the Dremel procedure far and above both methods #1 & #2..
04-Nov-2006
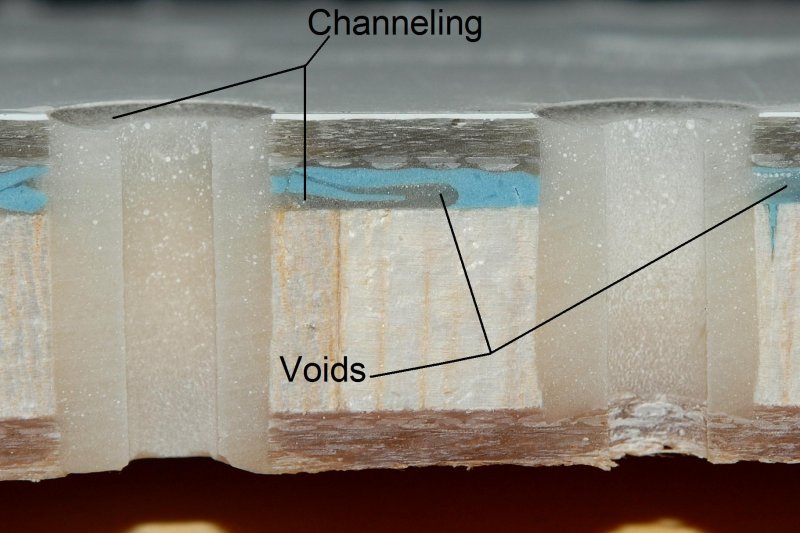
Chaneling & Voids
In my years working on boats I have yet to see any cut up section of hull or deck, unless made using vacuum bagging or SCRIMP, that does not have some voids. I will go so far as to say that I know of no builder, who hand lays a hull or deck, where having no voids is even 100% possible. Many builders also use thickened resin or "deck putty", as they often refer to it as, on the back side of the hull or deck skin to lay the balsa into during lay up. If this begins to kick, or the balsa in not padded down enough, there will be voids. Voids lead to channeling of epoxy, or water for that matter.
Why do I bring this up? I took this photo to show what is happening when you fill a hole with epoxy and come back 5 minutes later to find it has "settled". In reality the epoxy has not in fact settled, unless the tape failed, but rather it has channeled into the voids in the balsa or deck putty. If this happens to you you'll need to wait about 30 minutes then mix up another batch to re-fill or top off the holes. Don't let the epoxy cure entirely or you'll need to remove the amine blush and this can be a royal pain in a small hole.
MAY-2006
Help Support This Site
Like what you saw or read in this article? Was it helpful? Could the information save you some money? Would you like to see more articles like this?
If so feel free to donate, support the site, and keep it growing. Please DO NOT feel obligated at all. If you like it and want to make a donation, please do. Your donations help keep the content coming and also help keep it FREE.
Click the DONATE button below if you would like to make a donation via PayPal.