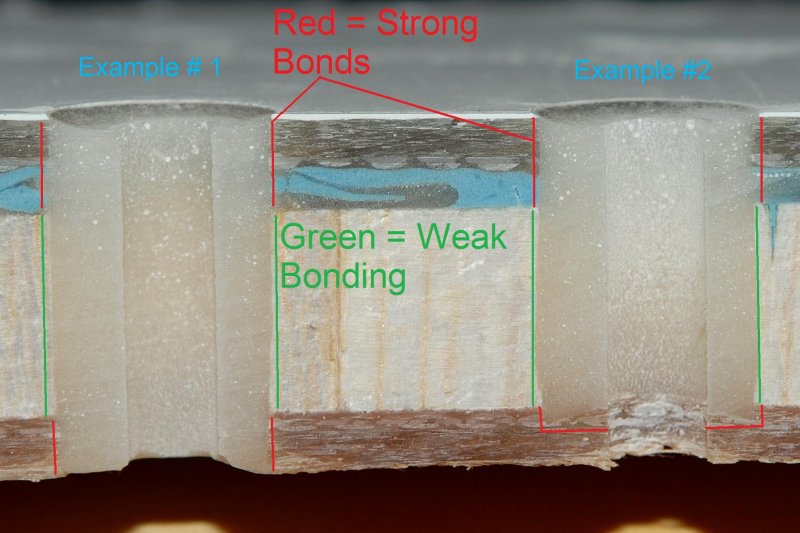
This photo represent two other ways of doing the same job. Personally I don't like either one as much as the previously mentioned methods using the Dremel bits. Why don't I like these methods as much?
1) In method #1 I drilled an over sized 1/2" hole clean through the deck and then filled it with thickened epoxy. By over drilling the entire thickness you have removed the deck skins which are a major structural component. End grain balsa has very little strength on the grain, which is where the epoxy adheres to in an over drill. Picture splitting fire wood. You split with the grain and if flakes off nicely. Epoxy adhered to the grain can do the same.
If you tried to split across the grain or pull balsa apart via the end grain it would be very, very difficult and this is why it is called "end grain" balsa and why the deck skins are laminated to the end grain not the grain of the wood. The areas highlighted in red, the skins, are thinner than they appear in this cropped photo, especially on light weight sailboats. In this example your only means of structural support are the circumferential bond between the top and bottom skins as the area in green is very, very weak comparatively speaking and would rally rely on the backing plate.
I have seen two failures of total over drills in my life. Theoretically speaking, when used with proper backing plates it should hold but if your balsa is even just moist your entire bond will only be the thin area of the two skins. It should be noted that epoxy does not adhere well to wet core this is why it is critical to seal the deck before it gets wet.
2) In method #2 I have only over drilled the top skin but left the bottom skin intact. This is slightly stronger than method #1. With the top skin gone it too is less strong than leaving most or all of the top and bottom skins intact and creating a captured plug.
3) Using either method #1 or #2 leaves you with a larger hole on the UV side of the deck. Some stanchion bases or hardware may not entirely cover the larger hole completely and epoxy does not like UV.
It's entirely up to you how you seal your decks all I can do is present the pro's and cons, as I see them. Of these two methods I prefer method #2 but I prefer the Dremel procedure far and above both methods #1 & #2..
04-Nov-2006
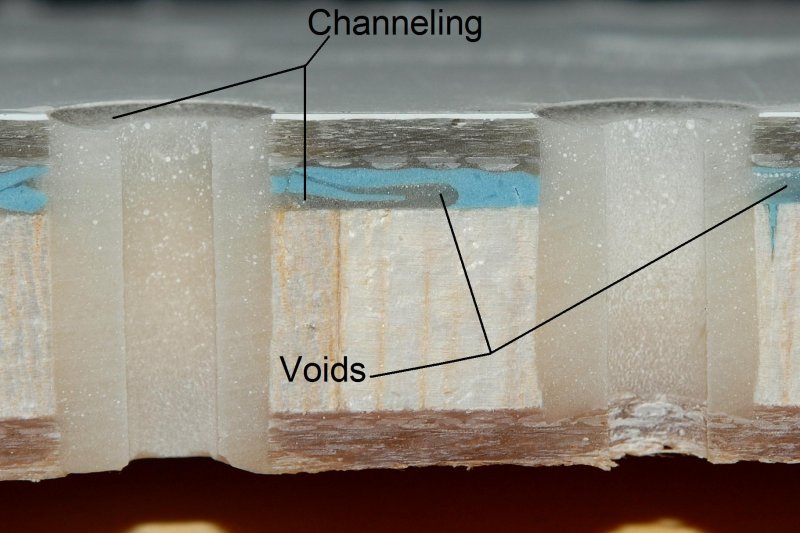
Chaneling & Voids
In my years working on boats I have yet to see any cut up section of hull or deck, unless made using vacuum bagging or SCRIMP, that does not have some voids. I will go so far as to say that I know of no builder, who hand lays a hull or deck, where having no voids is even 100% possible. Many builders also use thickened resin or "deck putty", as they often refer to it as, on the back side of the hull or deck skin to lay the balsa into during lay up. If this begins to kick, or the balsa in not padded down enough, there will be voids. Voids lead to channeling of epoxy, or water for that matter.
Why do I bring this up? I took this photo to show what is happening when you fill a hole with epoxy and come back 5 minutes later to find it has "settled". In reality the epoxy has not in fact settled, unless the tape failed, but rather it has channeled into the voids in the balsa or deck putty. If this happens to you you'll need to wait about 30 minutes then mix up another batch to re-fill or top off the holes. Don't let the epoxy cure entirely or you'll need to remove the amine blush and this can be a royal pain in a small hole.
MAY-2006
Help Support This Site
Like what you saw or read in this article? Was it helpful? Could the information save you some money? Would you like to see more articles like this?
If so feel free to donate, support the site, and keep it growing. Please DO NOT feel obligated at all. If you like it and want to make a donation, please do. Your donations help keep the content coming and also help keep it FREE.
Click the DONATE button below if you would like to make a donation via PayPal.