MAY-2006
Clean The Port & Trim Ring
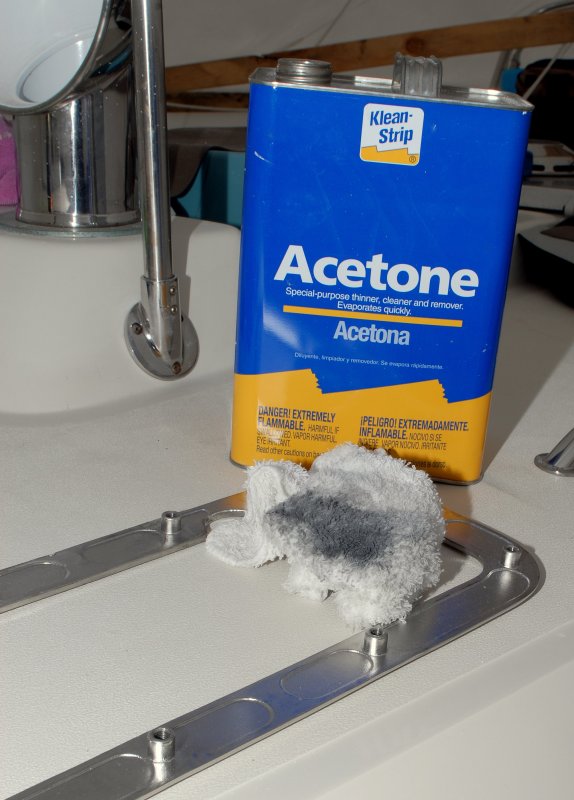
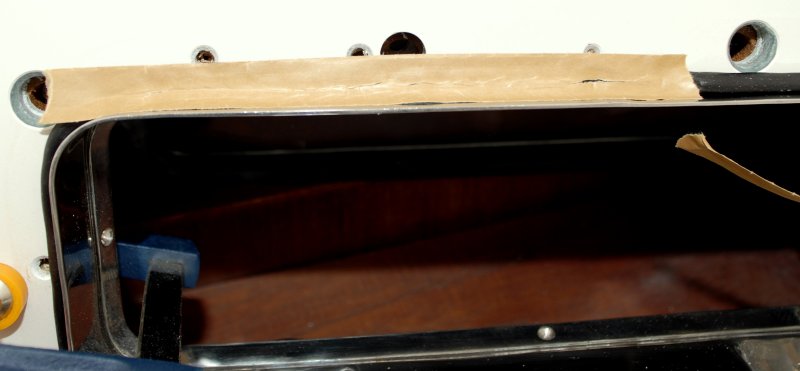
In the previous photo I had already cleaned & prepped the cabin sides. I can't stressed enough how important cleaning and prepping the surface of the boat is and cleaning the ports is also equally & very important.
That rag, in the photo, was white when I began cleaning this port. Just because they are new does NOT mean they are clean. I wiped the exterior of the spigot and the hull side of the flange with Acetone and there were plenty of cutting oils and grime to be taken away.
If you don't properly clean the stainless you run the risk of a leak. These ports are filthy when they arrive so please do clean them with a non-oily solvent of your choice.
MAY-2006
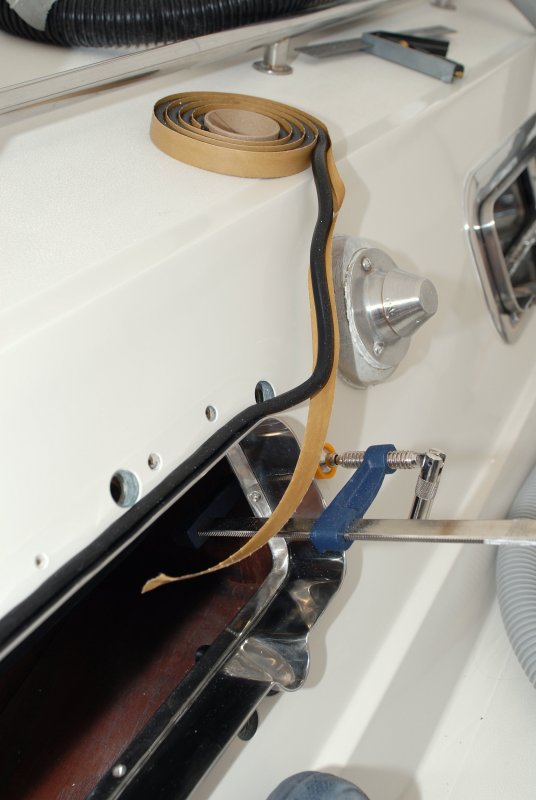
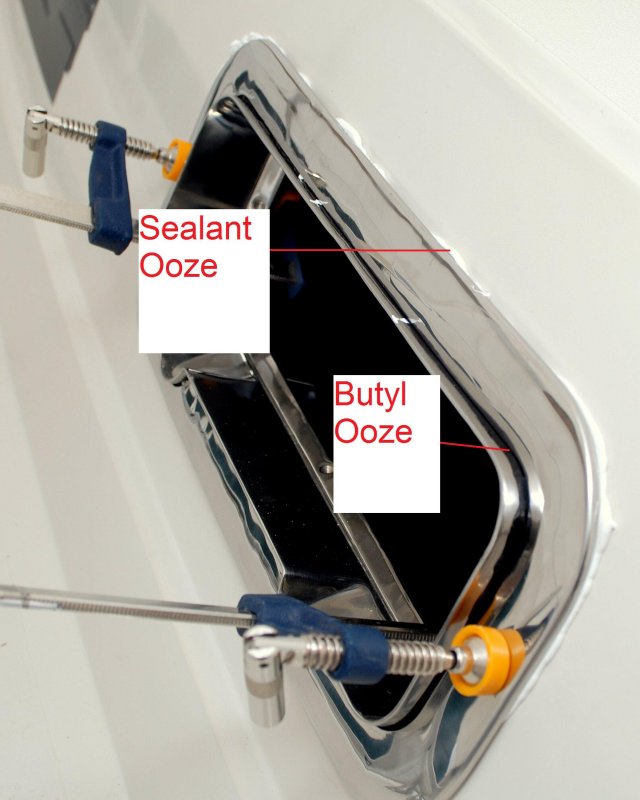
Wrapping The Butyl
In this picture I have already forced one round of butyl into the gap and I'm working on my second round. I found a silicone kitchen tool, don't tell my wife, that worked well for forcing the butyl into the grove without it sticking to the butyl to badly.
With the teak spacers it's very difficult to wrap the ports spigot first, as NFM illustrates in their instructions, before inserting it. Instead, I chose to clamp the port, level it, then install the butyl from the outside.
Again, I varied from the NFM instructions on this issue and installed my butyl from the outside not the inside but both methods will work.
I applied the butyl from the outside for one major reason. I don't believe in sealing any fitting, installed on a boat, from the interior side of the vessel. If I do get an external leak, between the fitting and hull, I want to know about it! If I sealed or bedded the cabin side of the fitting I may be trapping water or worse diverting it somewhere else because it can't escape out the back side of the fitting. Diversion of water by, internal sealing, creates an almost impossible scenario for tracing external leaks! Even though I don't have cored cabin sides I still chose to only seal from the front of the port to prevent trapping any water in there that could potentially freeze, expand and do damage in the cold Maine winters.. In short, I did not want any sealant between the ports inside flange and the hull only the outside flange, trim ring and the spigot.
In total I was able to get about five pieces of butyl around the spigot drain and two laps of butyl around the rest of the port, but I can assure you, this was NOT easy!
Squeezing in the butyl and seating it took almost 50 minutes per port before I even began to install the trim ring and bolts or clean up the "squeeze out".
Before you even think about installing the butyl & sealant please, for your own sake, clean the fiberglass surface with Acetone or another potent solvent or de-waxer but do wear chemical resistant gloves! If you don't clean the fiberglass & port you may get a leak! I first cleaned with paint thinner then followed that up with acetone.
If your previous ports were installed with silicone (read; BAD) you should, at a minimum, wet sand until you get NO water beading when you spray the surface with water. There is no chemical that will remove the embedded silicone from the gelcoat other than sanding. If anyone knows of one please email me! I've already tried just about every chemical known to man, even stuff only body shops can buy that is specifically intended for removing silicone. IT DOES NOT WORK ON FIBERGLASS either because it's to porous or it eats the gelcoat!
If water beads around where the trim ring is to seal it's NOT clean. I use a spray bottle filled with water for this test and do it every time I re-bed a fitting. Do not skimp on this detail.
MAY-2006
Using The Kitchen Tool
I sure hope my wife does not read this article! Here's the kitchen tool I used for seating the butyl. In combination with the waxed butyl paper this end worked well. The other, with the white silicone "spatula" part removed, worked great for stuffing it in between the hull and port.
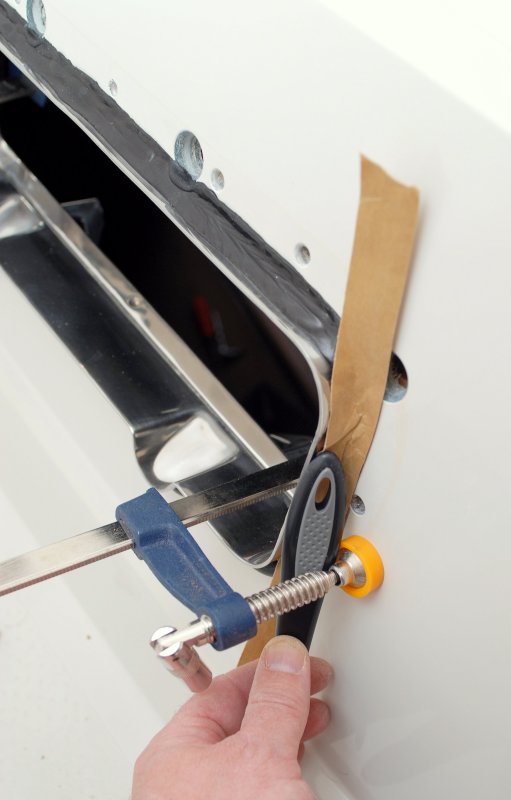
I applied all the butyl with the clamps in place. When the butyl is finally installed, and packed in place, you can quickly remove the clamps, install the trim ring then re-place the clamps until you get the machine screws in place.
MAY-2006
Second Round Seating The Butyl
In this photo the second round of butyl is just about ready. You do not want to leave the butyl to thick here or it will squeeze out the OUTER edges of the trim ring and make a huge mess!
I had to redo my first port because I used too much butyl in.
EDIT: If you use a gray butyl tape like Bed-It Tape there is no need for the marine sealant!
You need enough to make a seal, and to squeeze out between the trim ring and the spigot, but not so much that is squeezes out the outer edge of the trim ring..
MAY-2006
Butyl Tip
When installing the butyl you need to understand and know this stuff is STICKY! It's like Silly Putty but tenaciously gooey. Here's the tip. Use the paper that it comes wrapped in to seat it.
You can see how I've forced it into the seam using the paper. When your done simply remove the waxed paper.
MAY-2006
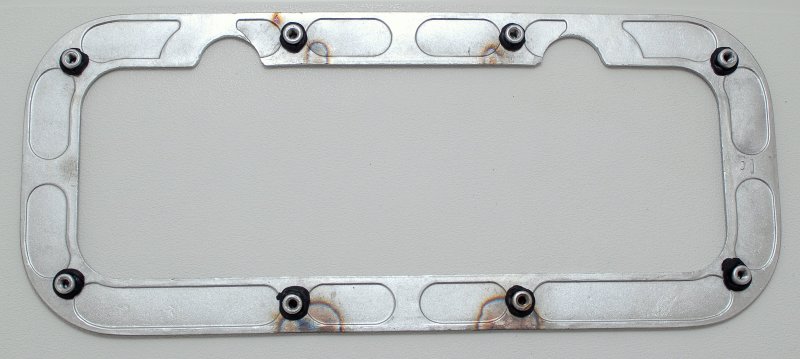
Prepping The Trim Ring - Butyl
Before you can even begin to install the trim ring there are three steps that need to be taken.
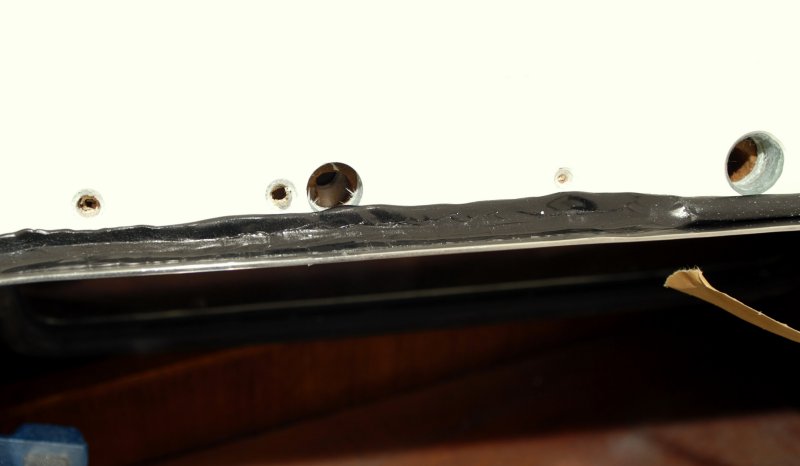
The first is to actually clean the trim ring as stated above. The second, pictured, is to wrap butyl around each of the trim ring studs. I found out the hard and messy way that you do not want HUGE globs of butyl around the studs or it will squeeze out the top of the trim ring and make for some messy clean up. I actually re-did my first port because of this.
Seeing as I countersunk each hole I wanted just enough to fill the bevel and a touch more, that's it.
To make the butyl thinner I simply rolled it between my fingers while pulling slightly at the same time, like you would do with a joint, If your not familiar with this action a visit to any college campus will teach you. I then cut it using a knife and a silicone cutting board and wrapped it around each stud.
MAY-2006
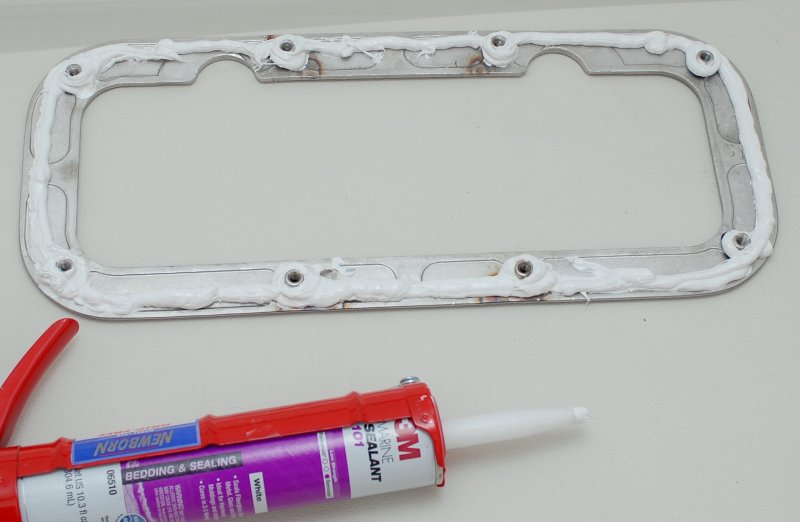
Prepping The Trim Ring - Sealant
The next, or third step, in prepping the trim ring, is to apply the sealant. Do not skimp on sealant! Sure it will squeeze out and you will waste a lot of it but it's important that you have enough in there to seal the entire face of the trim ring. I also doubled up around the studs by applying the sealant on top of the butyl rings.
For this task I used 3M 101 which is a one part polysulfide. It has a bond strength of about 140 PSI and an elongation at break of over 400%. I have been using 3M 101 or Sikaflex 291 a lower bonding (220 PSI) single part polyurethane sealant for years and had great success.
I chose to use 3M 101 polysulfide because it's easily removable in the future, never hardens as it's what they used for the UV exposed seams in teak decks. Polysulfides are quite UV resistant by nature, without added UV stabilizers like the polyurethanes need. Even the lowest adhesion polyurethanes like Sikaflex 291, at 221 PSI, offer more adhesion than is necessary in a mechanical fitting which a port is.
NFM recommends, in their instructions, Sikaflex 295UV, a one part polyurethane. The problem I have with 295UV is this. 295UV bonds at 450 PSI (adhesion strength per square inch) which is 150 PSI more than other polyurethanes such as Sikaflex 291 at 221 PSI and 3M 4200 or 3M 4000UV which are both 300 PSI. Anyone who's ever used 3M 4200 knows how difficult a 300 PSI product is to remove let alone a 450 PSI product like Sikaflex 295UV.
I know the owners of NFM have the utmost confidence in their ports but at some point they WILL need to be removed or re-bedded and with a 450 PSI adhesion it will be difficult, quite difficult. Heck, it's even hard to remove stuff bedded with 3M 101 at 140 PSI.
EDIT: 3M 101 has been discontinued. If doing this project over again I would use gray Bed-It Butyl tape and avoid the entire marine sealant process.
MAY-2006
Setting The Trim Ring
Once the butyl is in place and you have prepped the trim ring with a polyurethane or polysulfide of your comfort and choosing it's time to set the trim ring.
If you used the method I outlined it is possible to remove the clamps, for a brief period, after you've seated the butyl tape so you can install the gooped up trim ring.
Once the clamps have been removed slide the trim ring over the ports spigot/flange and re-set the clamps. Do not over tighten them and use just enough pressure to get the machine screws started from the inside.
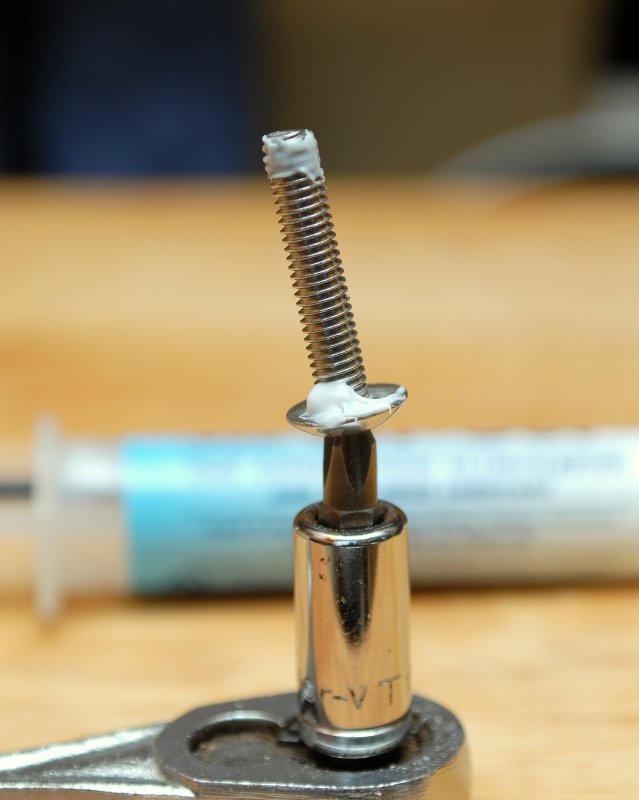
MAY-2006
3M 101 On Bolt Threads & Tef-Gel On Bolt Head
Why did I used 3M 101 & Tef-Gel on this machine screw?
Over the last 35 years of boating and messing with stainless steel nuts & bolts I've come to know a phenomenon called "thread galling" quite well. Some may not know what this is, even though they may have experienced it.
Thread galling is most prevalent with fasteners made of stainless steel, aluminum, titanium, and other alloys which self-generate an oxide surface film for corrosion protection.
During fastener tightening, as pressure builds between the sliding thread surfaces, protective oxides are flaked, sloughed or perhaps wiped off. These flaked off pieces create an interference or high point and thus seize or lock the nut and bolt together.
This clogging action causes increasing surface adhesion. In the extreme, galling causes seizing or the actual freezing together of the threads. If tightening is continued, the fastener can be twisted off or its threads ripped out.
Some stainless bolt manufacturers actually refer to this phenomenon as "cold welding." Anyone who has seen a bolt and nut seized in this manner understands the nature of this description.
Please use some sort of lubrication for the threads as this is the only way to minimize thread galling.
Galling is a problem that can occur between two un-lubed stainless pieces such as a nut and a bolt. Essentially, as you begin to tighten they bind together never to come apart again. You never know when this will happen it just does.
The last thing I wanted was to "gall" one of the machine screws into the flange as this would require a drill out and re-tap of the trim ring. I could have used Loc-Tite on the threads, to prevent galling, but I know from experience that Tef-Gel or 3M 101 works and it too prevents the bolt from backing out. I used Tef-Gel at the head of the bolt for lubricity for the stainless to stainless mating where the pan head machine screw meets the ports interior flange. This allows a very smooth tightening of the machine screw with no false "grabbing"..
EDIT: With 3M 101 now discontinued I would suggest using Tef-Gel for both the machine screw threads and under the head. I have not found that Tef-Gel has a tendency to loosen over time if properly torqued.
MAY-2006
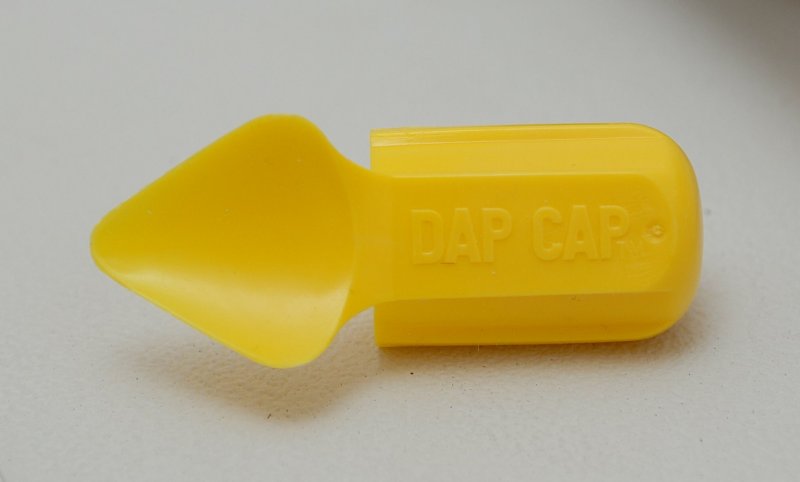
The DAP CAP
This handy little item is called a DAP CAP and it's available in the Home Depot paint department. It serves two purposes. #1 It can be used to clean up the excess sealant that squeezes out. #2 It fits over the end of an open tube of caulk to seal it for future use.
WARNING: The DAP CAP does not fit Sikaflex nozzles but does work on 3M brand tubes.
MAY-2006
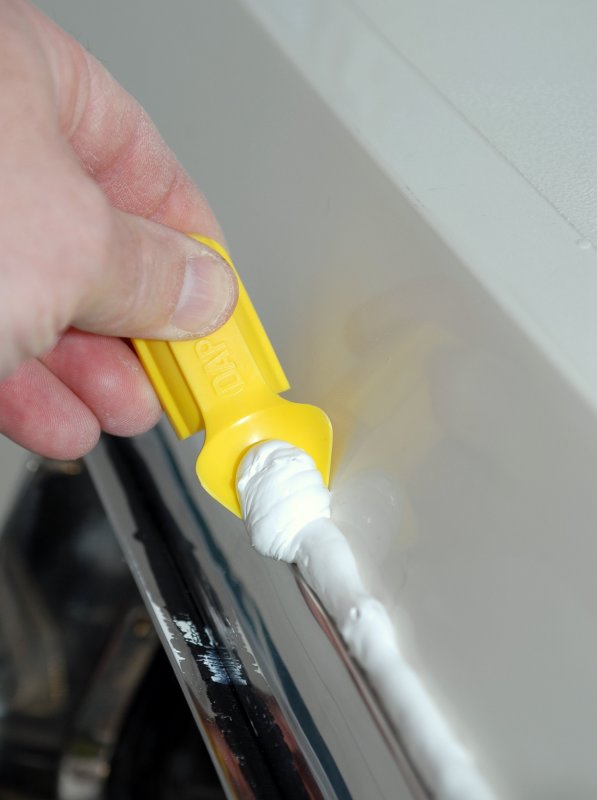
Clean Up The Squeeze
This is how you use the DAP CAP. Once the scoop is full simply wipe it onto a paper towel or rag and toss in a bag lined trash can. Then your ready for your next scoop of goo..
MAY-2006
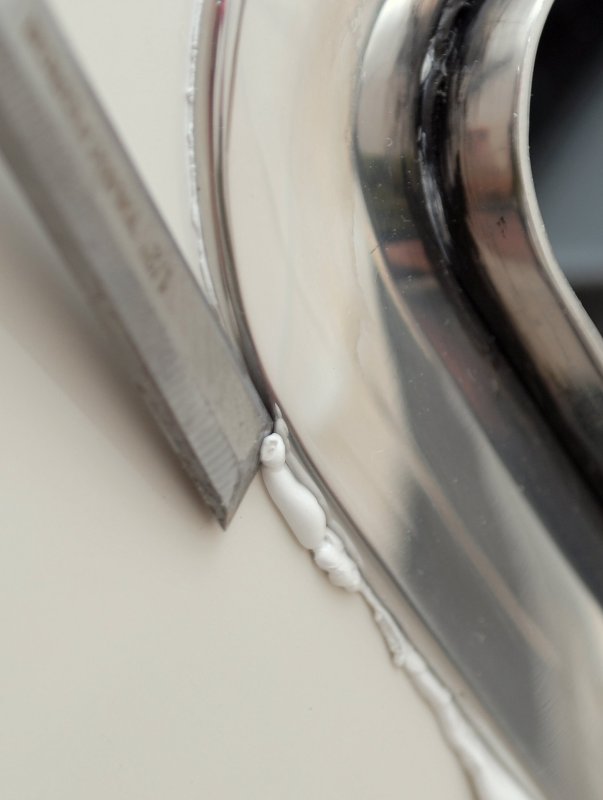
Day Two Clean Up
I let all my ports sit after the tightening them down and then came back and did the final clean up. For the fine detail cleaning I used my boat chisel.
*******CLICK BELOW FOR PAGE 5*******