


|
|
|
|
|
|
| |
| 11-MAY-2012 | |
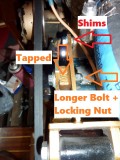
In this image we can see the alternator in-place and aligned. It needed shimming as referenced by the red arrow. On this engine it took two metric washers with one of them partially sanded thinner.
TIP: One thing I see over and over is adjustment arm bolts and alternator ear bolts coming loose and slipping thus reducing tension on the alternator belt and causing it to slip and create belt dust.. On these Universal engines the bracket itself is drilled and tapped to accept a bolt, as is the alternator ear. (ORANGE ARROWS)
I go one step further than the factory and purchase a longer bolt that sticks all the way through the bracket so I can add a locking nut to the back side. In doing this extra step I have never once had an adjustment arm come loose!
I would recommend you use at least blue Loc-Tite on the studs that go into the water pump housing to hold the alternator bracket.
****PLEASE CLICK HERE FOR THE NEXT PAGE****
© All Images property of Compass Marine Inc.