


|
|
|
|
|
|
| |
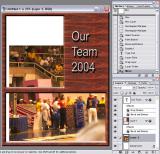
Open new document, set size and resolution for your final print. (e.g. 8x10inches and 240 ppi)
Creat new layer.
Turn on the grid and Snap to Grid.
Use the rectangular marquee tool with ADD to SELECTION option. Make windows for your picures in desired location.
Invert selection and fill with pattern (or background picture) of your choice
Open the layer style option dialog box (double click on the layer icon) and add 3 dimensional effects with Bevel/emboss, etc.
If desired, add a text layer to title the composite and move to available area of the template. Can use similar blending style for the lettering as used on the template frame.
Save the layered image as your template.
Open team and individual pictures and drag them onto the template picture. The picture sizes should be slightly larger than the template openings to hide edges.
Move the team picture image layers just above the background layer and use the move tool to position behind the template openings.
© Joseph E. Filer