photo sharing and upload picture albums photo forums search pictures popular photos photography help login
Canon DSLR Challenge | all galleries >> Challenge 29: Imagine (Hosted by Olaf.dk) >> Eligible > if only*
previous | next
21-NOV-2004 Anna Yu

if only*

Skansen, Stockholm

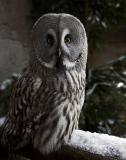
Imagine what a nice shot this would have been if I had the right lens with me. Oh well.

Here is the latest (3rd) version after modifying in Photoshop with Roumen's detailed instructions. Kinda hit or miss still, but this is the first time I've ever used masks in PS. These challenges are great when one gets to learn these things. Thank you again Roumen.

Canon EOS 1D Mark II ,Canon EF 24mm f/1.4L USM
1/160s f/3.2 at 24.0mm iso800 hide exif
Full EXIF Info
Date/Time21-Nov-2004 13:31:00
MakeCanon
ModelCanon EOS-1D Mark II
Flash UsedNo
Focal Length24 mm
Exposure Time1/160 sec
Aperturef/3.2
ISO Equivalent800
Exposure Bias-0.67
White Balance (-1)
Metering Modemulti spot (3)
JPEG Quality (6)
Exposure Programshutter priority (2)
Focus Distance

other sizes: small medium original auto
share
Canon DSLR Challenge28-Nov-2004 17:02
Thanks Anna, trying to pass some of the things I learned from the wonderful people at the Retouching forum. -Roumen
Anna Yu27-Nov-2004 22:33
WOW Roumen, thanks! That is a super tutorial. I'm too sleepy tonight to do anything but will work on it tomorrow morning. That was a lot of work you went to and I need to find a way to copy it down for future reference. Thank you again.
Canon DSLR Challenge27-Nov-2004 21:55
Wow Roumen, thanks for taking the time to give us such a detailed Photoshop tutorial! It's always interesting to see how other people work with their software - so many ways of doing things and you usually end up learning something new... And for everyone else working with the full version of Photoshop - this is highly recommended reading (and trying out on your own)! --Olaf
Canon DSLR Challenge27-Nov-2004 20:18
Hi Anna, I have further description and placed it here since it is long. –Roumen
Anna Yu27-Nov-2004 05:55
Roumen, I followed you as far as "...Select, invert the selection and save as alpha channel (background only)...." After creating a new layer called background copy, I used the Select menu to select and inverse, the save as. But the alpha channels box doesn't work. Will work more with this. Thanks for the detailed description! PS is difficult for me.
Canon DSLR Challenge26-Nov-2004 21:15
Hi Anna, duplicate the layer in PSCS and then filters->Extract will bring the extract tool window. With brush highlighter tool on top left and brush size eg.15 paint on the edge. If there are clean edges it is better to work with as small brush as possible. The green should include any loose feathers. With the eraser (the third on the left) you can erase and thin the green line. If the colors inside and outside are too close like on the back of the body of the owl use small brush 3,4,5 and paint exactly. Once you are done selecting (the green line should be uninterrupted closed selection or going from one end to the other) use the second tool (Fill tool, paint bucket) and click inside the owl. It should turn blue inside. Then click preview. Use alternating eraser and paint with smaller brush to fix the places that were extracted incorrectly. Then click OK and it should process it in its own layer. Select, invert the selection and save as alpha channel (background only). I used Corel’s KnockOut extract filter for this selection which supposedly is better for difficult selections, but PSCS Extract should work too. Then use lens blur filter which, according to Adobe makes more realistic blur, emulating a real lens behavior and not just indiscriminately blurring everything as a Gaussian blur. This is a perfect time for this filter: filter->blur->lens blur. Depth map: Source –Alpha1 (background selection saved as a new channel), Blur focal distance-0, Iris: Shape-Octagon, Radius -38, Blade curvature -100, Rotation-56 Specular highlights: Brightness -12, Threshold -222 (controls the circle size made by the highlights and threshold, try different ones). On the original file these settings might be different. Curves layer on masked owl layer 102->140 to lighten the owl. Cheers! --Roumen
Anna Yu26-Nov-2004 18:43
How can you choose the owl so exactly? I just use a careless lasso tool with feathering, guess that's not to good. Thx for any tip.
Canon DSLR Challenge26-Nov-2004 09:16
Hi Ana, it is in the right direction. Maybe the selection of the owl could be more precise. There are many beautiful sharp feathers on the head which when contrasting with the smooth background will help the owl jump out. I had yesterday’s version and here is the image using PSCS lens blur on the background and slight lightening of the owl with curves. Nothing was cloned out. Here is a picture of an owl of mine that I had in mind initially. The background is an autumn tree, the lens is 135 mm, F 3.5. Let me know if you want me to write the lens blur settings. --Roumen
Anna Yu25-Nov-2004 18:15
OK Roumen, I tried to separate the background a bit, but I don't like cloning things out so the tree stays as it is. Thx for the suggestion, hope this is slightly better.
Canon DSLR Challenge25-Nov-2004 05:35
Nice eye contact and expression! It is good as it is. With just a little more separation of the background will be even better. I would clone out the stick around the bird and apply a lens blur on the saved as channel background. –Roumen
Canon DSLR Challenge24-Nov-2004 21:31
That expression made me LOL! Looks pretty good as is (taken with the 24/1.4) too! --Olaf
Canon DSLR Challenge24-Nov-2004 18:19
That's a look of surprise! Beautiful shot.

-Noel