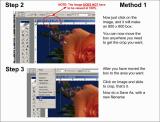
After you have made the settings at the top, all you have to do is click on your image. You will now see a 'Bounding box', move the box to the position where you want the crop to be, or the patch cut from. After it is at the correct position click on "Image" on the tool-bar and then slide down and click "Crop", thats it, you have your 100% crop and the image is now only 800 x 600. At this point all you have to do is save it to a new image, click on "File" on the tool-bar and slide to "Save As", give it a new file name and you are done.
Remember you can view the image at any size you like, but if you have the setting right on the top for the Marquee tool you will get the correct size image.