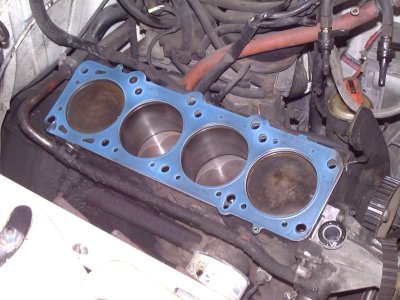
this pic shows the MLS HG in position after the two rivet tabs have been cut off.
That created no problem: the locating dowels in the block locate the HG in its correct place.
That blue you see is the Hylomar coating I applied to the MLS HG.
[a couple of light coats, top and bottom. Where my fingers smeared the Hylomar a bit on two corners while handling the HG to set it in place can be seen in the pic.]
The Cometic MLS HGs have a viton-like coating on the two outer layers. Cometic recommends that the MLS HGs be installed dry.
I normally install HGs dry.
BUT...as an added sealing insurance, I applied a coating of Hylomar gasket sealer to the HG.
Hylomar is similar in composition to the fluoroelastomer coating Cometic uses, and it is compatible to that coating: it will not damage the Cometic MLS HG.
Because I had some very minor imperfections on the head surface and on the block surface, I chose to use some Hylomar to make sure that things seal up nicely.
[and when I 'confessed' that I had used Hylomar on one of their MLS HGs, my contact at Cometic just sort of chuckled a bit, and said 'not a problem'.]
HOW I TORQUE A MLS HG:
The Volvo spec is 15 lbs-ft; 45 lbs-ft; and 90 degree angle tighten...following the torque sequence pattern.
For Penta redblocks, the final angle tightening spec is 120 degrees.
For NA motors, I use the 'standard' specs. For boost motors, I MAY** go with the Penta specs.
When torqueing down a regular composite head gasket, the procedure is easy to follow:
...the first stage, going through the sequence of tightening the 10 headbolts to 15 lbs-ft is mostly to get the head and gasket seated in place.
...the second stage...45 lbs-ft...applies the benchmark clamping force onto the head gasket: setting things up for a uniform final angle tightening.
With a MLS HG, things do not quite proceed the same.
Why so?
...because the MLS HG has three embossed layers, that will compress [flatten out] AS the headbolts are tightened.
This flattening out of the embossments is not as totally uniform and constant, like it is on the regular composite HGs.
Which brings me to the way I do it...
I have found that the MLS HG will start to flatten out during the first stage of torque...the 15 lbs-ft.
Meaning: by the time I have done the tenth headbolt, the middle headbolts are loose.
SO...I do the 15 lbs-ft first stage twice or three times [and sometimes four]...to get all the headbolts to the same level of 'snugness'.
AND...I also do the second stage of torqueing....the 45 lbs-ft...twice or three times.
With a quality clicker type torque wrench, it is easy to NOT overtorque [when it clicks, you stop]; and it is easy to get the 'feel' of how snug each of the headbolts are.
By doing the second torque stage three times, I KNOW that all the headbolts are tightened the same...
...because I heard and felt them through the torque wrench.
THEN, things are really ready for the final angle tightening...
...for which I use a 1/2in breaker bar for the 90 degree twists
...for which I use a 1/2in breaker bar with a cheater pipe for the 120 degree twists [when I am angle tightening to the Penta specs]
The multiple repeats of the first and second torque stages sets the head gasket in place, flattens it out uniformly under the head, and guarantees me a more uniform clamp once I do the angle tightening.
And truthfully, it is a good idea to allow several minutes to pass between stages...the repeats of each stage as well as between the 15 lbs-ft and the 45 lbs-ft stages. Giving the MLS HG the time it wants to seek its flatness is wise.
On one FT motor***, I let the MLS HG sit overnight after doing the 45 lbs-ft stage for the fourth time; and came back to do the final angle tightening stage the next morning. I checked the second stage torque: all headbolts were still steady at 45 lbs-ft.
THEN: I did the final angle tightening.
[so...YEAH...it took some time for me to go through each of the torque stages several times.
BUT:
I got what I wanted: a properly torqued and tightened and uniformly clamped MLS HG.]
Installing a head gasket is NOT a speed contest.
...unless you are a flat-rater...
Seeing how fast it gets done is not on MY program.
Getting it right...so it can do its job for MANY thousands of miles...IS...
************
**The reason I use "MAY" is this: With the regular composite headgasket, the extra clamp of going with the Penta 120 degree angle tightening can be assistive. With the MLS headgasket, that extra clamp becomes something questionable.
Why so? Because the MLS HG is three layers of stainless steel. Trying to squeeze that more underneath a metal that is softer...the aluminum alloy head...becomes almost counterproductive from my viewpoint.
The steel layers in the MLS HG can withstand more clamp force than the aluminum head. Any 'extra' clamping force is going to put more stress on the aluminum to deform than on the steel layers to compress more. The head alloy will give way first.
Perhaps for a really high boost application, I might go with the Penta specs on an MLS HG. But for street use, I stay with the stock 90 degree angle tightening final round.
***that particular FT motor was my own, a B21FTi with over 370,000 miles on it. The original stock HG finally let go: it was losing coolant out the side of the block, and would let coolant pass between #1 and #2 under boost.
The original head was a 160 BCP casting. I had a SCP 398 Kjet head that I prepped to upgrade from the BCP 160.
One slight problem with that, though: the 398 was warped. It had a nearly perfect 5 thou warp right in the middle of the head. In other words, with the head sitting on a flat surface, there was a 5 thou gap right in the middle, on both sides of the head. And the warp was evenly tapered both directions from the middle, out to the ends of the head.
[a perfect warp....not twisted]
I had a choice, and it was also an opportunity. I could either have the head resurfaced to restore TRUE flat, or I could try something....just to see if it would work. It was my own motor, so if there was any problem, the only person I could bitch at was myownself.
I decided to go for it....installing a slightly warped head on top of a 27 thou MLS HG, and see what would happen.
I DID carefully lap the head surface to make absolutely sure that there was NO 'arching' in the head deck between the headbolt holes. [and yeah, that did take some time to do.] Once I had the head nice and smooth...with no 'arching'...but still with a perfect 5 thou warp...I did the install.
And that one I did do the 45 lbs-ft torque sequence a fourth time and let the wagon sit overnight.
When I went to the shop the next morning, I rechecked the torque: all 10 headbolts were still right on at 45 lbs-ft. I then did the final angle tightening to 90 degrees.
NOW, well over 10,000 miles later, running around 10 psi on 87 octane, there is NO coolant loss, NO oil consumption, and she runs GREAT! And I have done a number of 18 hour straight runs.
Soooooo.....was I being too picky to go to that length of effort?
...I don't think so.