photo sharing and upload picture albums photo forums search pictures popular photos photography help login
Alan Smallbone | profile | all galleries >> High Dynamic Range Imaging >> Comparison test of different HDR software and an overall review - September 2008 tree view | thumbnails | slideshow

Comparison test of different HDR software and an overall review - September 2008

HDR TESTING AND COMPARISON OF SOFTWARE AND BOOKS

High Dynamic Range Imaging or HDR or HDRI is becoming popular and it is also a very polarized topic, it is usually loved or hated, depending on the person. I, myself, was very intrigued with the possibilities of increasing dynamic range beyond what could be captured with a single shot. So I decided to do some research. I read three books on the subject, which will have mini reviews below. I also tried most, if not all, the software packages out there. My review is mostly subjective; it is pretty much all you can do when evaluating the software. They all work differently and have different methods of generation, so what I did was come up with three sets of test images, and run them through the software and tried to make them as pleasing as possible. As a side note, all images generated using HDR techniques will need some sort of post-processing, usually in Photoshop or your favorite image editor. If you do not like to edit and deal with editing, then HDR is not for you. Stick with traditional methods, graduated neutral density filters and other such techniques.

First, a disclaimer, I am by no means an expert when it comes to HDR imaging. I was interested, so I set out to learn. I learned a lot, but there is still a lot to learn. The biggest hurdle and this is true with any kind of photography, you have to start with good images and use good techniques to capture them. I highly recommend using a tripod with hdr, yes you can can hand hold it, but expect to spend a lot of time being frustrated with trying to edit out ghosting and other artifacts. Garbage in equals garbage out. Ghosting can occur with any kind of movement between frames, water ripples, tree branches, people moving around, something to consider when deciding to make an HDR image. In other words it should be something thought out and planned rather than shotgunned. Taking HDR images is a 4 step process, image acquisition, generating the HDR image, tone mapping the HDR image, and finally post processing.

This comparison was a real learning experience, and is not really a comparison of whether or not hdr is the best way to capture images, it is a comparison of the software out there and compares them on equal footing. What I have learned from this is that I need to go back and look more at my image captures, in most cases I did not capture the entire dynamic range of the image, especially with only 3 exposures. I used that because it was convenient. The 1D Mark II was setup to capture 7 exposure brackets, this is setup in the personal functions. Without examining the histograms while exposing this is probably the way to go to capture the full range in an image without studying the captures. In both cases of the Laguna Beach Sunset and the Pasadena City Hall I did not capture the full dynamic range of the image because I did not watch my histogram. A better approach would have been to take a series of test exposures and determined the entire range and best spacing and then captured the sequence. This is not always possible due to changing light conditions, weather and other reasons. Good image capture is fundamental to good hdr images. I plan to do a full test of different methods of capturing and compare then against a single image with lots of image manipulation. Also the low cost of memory cards certainly makes capturing large brackets of images a lot more practical.

One thing I did not cover in this tome is the realm of panoramas. I have also been testing hdr for panorama generation and I am finding that to be an extremely good use of hdr imaging. I will really consider capturing in hdr for panoramas in the future as part of a normal cycle.


CONCLUSIONS AND RECOMMENDATIONS

You are probably wondering why this is not at the end. Well I figured most people might want to see this up front, for whatever reason, and if you really wanted to know you would read the rest of it. I hope some find it useful, please feel free to email me with comments and suggestions and corrections to apsphoto at gmail dot com

The overall conclusion is there is not one superior stand out program, at least in my opinion. They all handle different scenes in a different manner. A lot depends on what you want to get out of HDR imaging and how much time you are willing to use to generate the image. I don’t think one tool does it all. I think that several tools would be good to have in the toolbox. The good thing is that none of these programs are really expensive and so having one or more is certainly an option. Compared to the price of Photoshop they are quite affordable.

However, if I had to make a recommendation, I would say, get Photomatix, FDRTools and Dynamic HDR as a good suite. If I had to choose only one program that would be difficult, I like FDRTools because of the flexibility and curves adjustment. Photomatix and Dynamic HDR are a little easier to get to the extreme settings for that “hdr” look, so it depends on what you are after, you would not go wrong with any of the three. So I don’t think I could have only one. If you use Lightroom and want something relatively quick, get the Enfuse plugin as well, that is pretty cool for not a lot of effort. My opinions may change over time. I felt the Enfuse plugin did a pretty good job for something quick and dirty, it is handy and you never have to leave Lightroom!

I recommend Photomatix, because it is probably the most robust and most used of the programs and does a great job with minimal tweaking. FDRtools is the ultimate, I think, for people who like to tinker and get it perfect. The ability to decide what is used during the generation of the HDR is excellent, and it makes excellent natural looking tonemaps. Dynamic HDR also has good ghost elimination and generates pleasing images with minimal fuss. All three of these programs have some sort of ghost elimination.

EssentialHDR, EasyHDR, and Picturenaut have potential and will probably be better as they mature and have features added and routines are improved. The price for Picturenaut is certainly in its favor and could be used to get a taste of hdr before dipping in completely.

Photoshop CS3 is too limited in how it does it’s tonemapping and to get the upgrade to CS3 Extended adds another $300 makes it a pretty expensive program for HDR. Although Photoshop CS3 does do a good job of aligning and can save in HDR format, you could always tonemap with a plugin or use another stand alone program to do the tonemapping


BOOKS

I have read three of the books out there, there are more coming and more available, I picked these as they seemed to cover what I wanted to know. There may be better books out there, but these were my choices. They are from 3 different publishers and all of them contain typos, captions that are wrong and some other poor editing and content, which surprised me. It is not too say that they are unreadable, but I expected better. All three books are worth reading, depending on your interest level, so I will try and summarize what is best about them.

The HDR Handbok – High Dynamic Range Imaging for Photographers and CG Artists, by Christian Bloch. This is an excellent book in terms of a general overview of all of the applications of HDRI including the uses in Hollywood and computer graphics. It is an excellent overview of the topic, with lots of reasons as to why to use the HDR techniques and what the benefits are, and how in general terms to use them. It explains the reasons and the methods in laymans terms and does a good job. It has some good suggestions on capturing and what is possible. There is also a whole section related to CGI and film and tv usage. The chapter on Tonemapping has an article which details a practical use of hdr in photography by Uwe and Bettina Steinmueller and another by Dieter Bethke, with detailed explanations of how they used HDR techniques in generating some images. The chapter on Panorama generation and considerations for image capture, Bernhard
Vogl, contributes his expertise. Overall a good book, some depth, but as one reviewer on Amazon described, it is like the contents of a good one day workshop transcribed into a book. There is perhaps a bit more details, but mostly it is a detailed overview. The companion DVD is a real bonus with images from the book for you to try and to compare. Also comes with the program PictureNaught.

Complete Guide to High Dynamic Range Digital Photography, by Ferrell McCollough. This is not a bad book either, lots of interesting images and pretty pictures. If I had to summarize in a couple of words, it is a quick start guide for people who are not interested in the theories or the methods. People who want to dabble and get some interesting images and create some “art”. A lot of the examples were way too overboard for my tastes when viewed as photographs. If you looked at them as pieces of art, they are quite well done. I can see for some purposes and some aspects, the exaggerated tones looks interesting and at some point I will experiment with it, for some subjects it will be worthwhile, but I mostly prefer as close to realism as my mind’s eye sees! There are some good examples and processing techniques and he does have a very unique concept and idea for using flash to fill and generate a multi exposure image with a single flash. Something to try.

Mastering HDR Photography – Combining technology and artistry to create high dynamic range images, by Michael Freeman. This is perhaps the best book for describing good techniques and some nuts and bolts examples. It is well written and is filled with good advice and good techniques. It gives a lot to think about when trying for natural looking images and issues to consider. It also discusses problems and how to deal with them in various software packages. My biggest complaint about this book; is the examples. They are probably great examples and would be really worth looking at if you could see them adequately. The have used tiny little thumbnails and they are so small that it is really difficult to see some of the points being made, when shrunk down the subtle differences disappear. I would complain less about it if they gave the examples on a cd or dvd, no excuses not to do include them. If it was not for the content I would have really felt burned. The written content however, has lots of good information and almost makes up for the lack of not being able to see the examples clearly.


TESTING THE SOFTWARE

After having completed my tests with these programs, I feel I could go back and definitely improve the results. That comes with knowledge. Like I stated above all could be improved with a little post process editing in photoshop. My goal was to take some test images, run them through the software and using only the tonemapping tools in the program, generate an image. All but two of them are stand alone programs. Although, several vendors also offer tonemapping plugins for Photoshop. While it is possible to tonemap a single image it is not the same as truly combining images with different dynamic ranges. Some people try to make an hdr image by adjusting the exposure with a raw converter and making several images with different exposures and trying to combine them as an hdr. To me this is a last resort, you are still only starting with the original dynamic range captured in the file and not really expanding the range, just applying exposure differences, it is not the same in practice, at least for me.

The general process involves two steps. The first step is to combine the images together to generate a single image that contains all of the levels of detail from all captured images, since this could not be contained in a 8bit or 16bit per channel file, they are combined into a floating point image that can contain, an essentially unlimited number of colors. There are two major file formats used at this point, Radiance (hdr suffix) or OpenEXR which uses a exr suffix on the file. Most all programs support the .hdr format, while a few support both. It is always good practice to save this image, consider it the HDR negative, so to speak.

The next step is to tonemap. This is the practice and theory of mapping the colors from the HDR image into something that can be displayed and visualized on paper or on a computer screen. There are a lot of different algorithms and techniques and all of the programs do it slightly differently. There is a learning curve as with any new technique. Once you are happy with the tonemapping save a 16bit tif or psd or whatever suits your purpose and either use as is, or finish post processing in your favorite image editor. I use Photoshop CS3.

The test files were all taken in RAW format while using a tripod. The were then converted with no adjustments to 16 bit tif format in Lightroom 2 using the camera white balance. Although some of the software will read and convert from raw files, not all would so tif was decided upon to be the standard for this test. The finished tone mapped files were saved as 16bit tiff and exported to the web versions you see by Lightroom 2.

One test image was sunset from Laguna Beach, part of a panorama, taken with a 15mm fisheye lens, this was bracketed +/- 2 stops and the exposure was an average for the whole width of the panorama and the white balance was set to cloudy. The camera was a Canon 40d. The second test image was also a sunset taken at Joshua Tree NP, this was a 7 shot bracket with 2 stops in between so, from -6ev to +6ev at 2 stop increments. Camera was a Canon 1D Mark II with a 17-40mm lens set at 17mm and daylight balance. The third image was taken with a Canon 40D and 17-40mm at 17mm of the Pasadena City Hall. This shot combined 3 images with a +/- 2 stop bracket with an extreme change in contrast, from the shadow of the hallway to the noon day sun outside.


THE SOFTWARE

The following are more notes than anything, there is some discussion of the images generated, the examples are in galleries below. The LB stands for the Laguna Beach sunset test, PCH is the Pasadena City Hall test set, and JT is the Joshua Tree NP test set.

PHOTOSHOP CS3

http://www.adobe.com

Cost: $600 but useful for more than HDR

Automatic hdr and alignment with “Merge to HDR” very little adjustment as an HDR file, alignment good but a little slow. No adjustment to control the HDR generation after generation as a 32 bit only able to adjust, Levels, auto level, auto contrast, auto color, photo filter, Hue/Saturation, Desaturate, channel mixer, exposure (exposure, offset, and gamma adjustment), minimal view options.

To tonemap must go to 16bit and then use shadows and highlights and curves, etc. Extended CS3 has more 32 bit controls but $300 more for software.

Can save as HDR and EXR formats.


LIGHTROOM AND ENFUSE PLUGIN

http://timothyarmes.com/lrenfuse.php

Cost: demo resized output to 800pix max. For unrestrictive version cost is donation ware, send any amount via paypal that the user feels the program is worth and an unlocked version is granted.

Works with Lightroom 1 and LR2. Simple to use, based on open source application called enfuse. Simple generation options some options for tonemapping but default seems to render decent tonemapped image. Highlight images and then click on file and plugins and start the enfuse plugin. It will align and generate hdr and tonemap to reasonable level, requires some touch up, but that is the same with all of them. Quite natural looking output.


ESSENTIAL HDR

http://www.essentialhdr.com/

Cost: $48.99 currently soon to be $69.99
Demo produces watermark on image

Save as HDR, tif (8/16bit) and the usual formats
Reads typical formats and camera raw and EXR but will not save EXR

HDR generation pretty straightforward, select files and align. No alignment options, either align or not align, no ghosting options

Tonemapping:
Global (Fast Tone Balancer) Controls are Contrast/Brightness and Color Saturation
Local operator: (Detail Revealer) Details/Brightness/Color Saturation/Fill light)
Histogram to set black and white points
Color balance sliders

LB
Overall balance and color profile appear to be ignored, color flatter looking and also not as warm as original color balance. Produced nice tonal values
PCH
Has problems with extreme contrast, outside way too bright and could not bring down. Colors washed out, color saturations were lost.
JT
Natural looking, did not have any issues with brightness, but still color balance off


PICTURENAUT

http://www.hdrlabs.com/picturenaut/index.html

Cost: Freeware with a $5 voluntary donation. Also included on HDRI Handbook DVD. Also download plugins.

Files: Save as HDR or EXR and can only load tiff or jpg, no raw support, No ability to blend the HDR. Each time auto align was checked it reported an error and said alignment failed.
Appeared to align just fine.

Tonemapping
Two types of tone mapping a global, Adaptive Logarithmic, and a local, Photoreceptor Physiology. Based on University research papers.

LB
Overall balance seems to ignore color profile. Photoreceptor gave poor results while adaptive gave much better results on this image.
JT
Worked well used photoreceptor, gave best values.
PCH
Color balance ok but tough time on high contrast, light areas too high a contrast could not wheel in, used adaptive logarithmetric


PHOTOMATIX PRO 3

http://www.hdrsoft.com/

Cost: $99, also plugin for photoshop available for $69 or combo for $119

Probably most popular and been around a long time, lots of interesting features, quite popular.

Files, just about everything, can load raw, tif, jpg etc.

Tonemapping

Two types; global called tone compressor and local called details enhancer, some options on the combine. Including ghost elimination

LB,
Appeared to use color profile of camera shot, very easy to make good image with lots of detail and dynamic range. Easy to tweak. Easy to make natural looking image.
PCH
Color balance good. Tonemapping easy to do, quite close, no issues with contrast.
JT
Balance good tonemapping also easy to get decent results


DYNAMIC-PHOTO HDR

http://www.mediachance.com/hdri/index.html

Cost: $55. As a bundle with photoshop plugin for $63

Lots of features, low price, already had new features added since I got it a couple of weeks ago, added support to produce layered psd files. Lots of tone mapping options including some very artistic ones. The tone mapping preview is my only complaint, the window is small and cannot be expanded. You are able to tweak the alignment, has ghost removal options, easy to manipulate but small preview window. Has ability to “warp” the images to deal with hand held bracketing. The alignments options are very handy, but do check them carefully, auto align was often off slightly. Has ability to tweak HDR file before tonemapping. Histogram display. Interface has quick help always up and easy to get information. Check for updates frequently.

Files: reads most everything, raw and tif, jpgs, etc. Supports HDR format and a compressed format DPHDR.

Tonemapping: Several different methods all can be tried by clicking on a button, defaults is eye-catching, others are Ultra Contrast, Smooth Compressor, Auto Adaptive, Photographic, Human Eye. These are based on different algorithms, and have different sliders and some are more global and others more local. Curves and color adjustments are always available. Color temperature is easily adjusted with several methods. As well as clarity, d-haze, and a noise reduction. Overall a lot of interesting adjustments and lots of possibilities. You could spend a lot of timing tweaking before Photoshop.

Tutorial files are pretty good as well. Biggest complaint is a small preview windows.

LB
Did not use color profile. Used eye catching and tweaked sliders and used curves for adjustment, simple and easy, pleasant results. Original alignment was off, but easily adjusted in the window.
PCH
Easy to get decent image, defaults very close. Easily handled contrast range in the tonemapper.
JT
Alignment off slightly but again easily adjusted. Easy to get decent image, default was close, lowered saturation and slight tweak of other sliders and used slight curve.


FDRTOOLS

http://www.fdrtools.com/front_e.php

Cost: Basic is free. Advanced 49euros, add the photoshop tonemapping plugin 59euros.

By far the most flexible and the most feature packed of any of the HDR software for generation of the HDR image, you can adjust just about every aspect of the HDR generation including which portions of the images are used. Alignment, etc. very powerful tool. Project based interface. One complaint is the manual and help is online, wish it came as a PDF. No easy way to deal with ghosting but can be dealt with some effort.

Files. Reads and writes HDR, and in EXR format. Also reads camera raw files. Reads and saves in tiff and jpg, and most other common file types. Outputs exif information in the headers.

Tonemapping. Very easy to use tonemapping. Quite natural looking. Has three types of tone mapping, Simplex, Receptor, and Compressor. All are curve based on top of a histogram, so very easy to adjust. Compressor has the most adjustment for contrast, saturation and compression. Placing points on the curve which is placed over a histogram is very intuitive and makes adjustment easy. Preview window is updated in real time and is size adjustable, along with a small 100% view. Color balancing very nice, easy to adjust with eyedropper.

LB
Very realistic color after color balancing with eyedropper, before that tone was taken from color profile. Easy tonemapping.
PCH
Used color profile, No problems with the high contrast. Easy to get a decent image and curve adjustment was pleasant and easy to deal with.
JT
Auto alignment was off, easily adjusted. Curve adjustment followed by some slider adjustments. Easy to adjust.


EASYHDR

http://www.easyhdr.com/

Cost: $30 euros Basic version freeware

HDR generations is simple, alignment options are auto or manual. No ghosting options, HDR generation option is to specify a simple average. Annoying feature is the default wants to downsize the image automatically rather than staying full size, can be set in preferences. If you want the EXIF transferred to the output files you must download EXIF tools and place it in the Easyhdr directory. After tonemapping there are a large group of “filters” to do post processing, including Gaussian blur, unsharp mask, color adjustments and transformations. Program may have some bugs, I got to one point where the previews were not updating at all, I had to process the image to see changes. Help is online, but tutorial is downloadable as a pdf.

Files: HDR saving must be specified during the generation, cannot save after. Reads HDR, camera raw files and fits (astronomical) files, as well as reads and writes tiff, jpg and bmp.

Tonemapping Curves based with sliders for global adjustments. Curve displayed on top of histogram. Easy to adjust global and local operators. Must check box for auto preview, when the mouse is released it will then update.

LB
Easy to adjust and default was fairly close, color balance pretty good. Sliders and curves were pretty easy to adjust. Used post processing color balance picker to adjust color balance.
PCH
Able to handle the contrasts and able to adjust quite easily. Did a good job with default settings.
JT
Some issues with posterization, but seemed to do ok. Color balance pretty good.


I hope you found this useful and maybe interesting. Thanks for reading.

Alan
Laguna Beach Sunset HDR Test
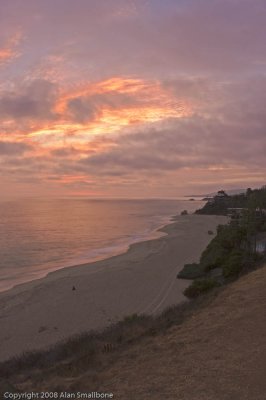
:: Laguna Beach Sunset HDR Test 
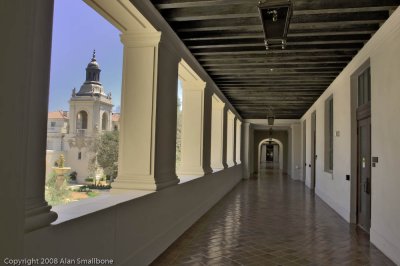
::
Pasadena City Hall HDR test
:: Pasadena City Hall HDR test 
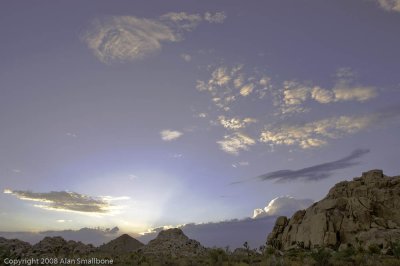
::
Joshua Tree NP HDR Test
:: Joshua Tree NP HDR Test ::