photo sharing and upload picture albums photo forums search pictures popular photos photography help login
Steve Lockhart | profile | all galleries >> Camera Issues >> Focus Problems >> Auto Focus Test and Fine Tune Procedure tree view | thumbnails | slideshow

Auto Focus Test and Fine Tune Procedure

Procedure Summary
This describes a reliable procedure for tuning the View Finder's (VF) phase detect autofocus (PDAF) using Live View (LV). The procedure basically compares LV focusing accuracy against the VF's PDAF focus accuracy when presented a good AF target while mounted on a tripod. This example uses one of my lenses that back focuses on both my D300 and D70 cameras.


Background on Back Focus
Phase detect AF does not directly measure contrast off the imaging sensor. It is an indirect or proxy measurement for focus. Loose tolerances within its makeup, submirror misalignment or the AF module's installation in the camera can lead to focusing errors. Also, the PDAF unit looks through two small sections of opposing sides of the lens in much the same way that split prism focusing aids do for an optical viewfinder. It does not receive the entire cone of light from a lens, so lens aberrations can contribute to focus errors.

Live View on the other hand utilizes the light from the lens just as it does for imaging, so it is a more direct measure of focus. It's hard to beat LV focusing for accuracy. (But it's not infallible.)

Obviously for this AF test procedure, the camera must have some sort of live view sensor capability. And to accomplish the PDAF tuning, the camera must have some sort of fine tune capability. The Nikon D300 has both features. (My older/cheaper D70 has neither)

Procedure Details
First create a good AF target. The target must be flat and have multiple bold high contrast stripes. The stripes should be of irregular widths since regular repeating patterns may fool PDAF. I size the pattern so that about 5 or 6 line pairs fill the selected AF point's bracket indicator in the viewfinder. (A line pair consists of a black and its adjacent white line.) I just create a set of irregular width lines using MS Word's draw tool and print it out on sturdy card stock (8 1/2" x 11" or A4 paper size). Note that only a portion of the paper is used for the target lines. (See the test photos below.) I fill the surrounding white space of the 8 1/2" X 11" paper with letters. The size of the bold target lines on the paper used below are good for testing at distances of 50-70 times the lens focal length.

Important note: LV auto focusing is not sensitive to lines that run parallel to the long axis of the frame. So the target lines are oriented to run vertically in landscape orientation. The central PDAF point is sensitive to vertical and horzontal running lines, so the target in the orientation shown is fine. However, many of the outer PDAF focus points are sensitive to detail running in only one direction. The direction varies with the AF unit and where they are located in the frame. For instance, the left and right outer focus points of the CAM-3500 AF module are sensitive to lines running horizontal when the camera is in landscape orientation. So if you use this type of target to test the outer AF points (as many new D800 owners like to do, hehe) turn the target so the lines run horizontally or test the camera in portrait orientation. This causes a complication when comparing CDAF focusing to PDAF focusing on the outer AF points as they each require detail running in different directions!

Surround the AF target pattern with smallish print of various size fonts. This is used to evaluate image sharpness. A classified ad section from the newspaper does well. The print detail will generally be too small for the PDAF module to reliably use for autofocus hence the need for bold irregular lines on the actual target. I use a small wall mounted cork poster board to mount the target and the surrounding newsprint. Make sure there are no signifcant buldges in the target or the newsprint. It doesn't have to be perfectly flat since the camera will be far enough away that the depth of field will be great enough to "absorb" any bulges measuring a few millimeters.

Testing Distance
The target used in this example is sized for 50 to 70 times the lens focal length and the AF bracket size of my D300. For example when testing a 35mm focal length lens the target will work well at 50x35mm = 1750mm or 1.75 meters (about 69 inches)

The distance used for testing is not critical. The important thing is to make sure the irregular stripe pattern fills most of the selected AF bracket. It is preferable to test at your most used working distance. If that turns out to be say 30X focal length then just scale the AF target stripes down a bit. Make the target stripes bigger for 100X focal length so they'll fill the bracket. The size and extent of the target stripes may need to be adjusted a bit for the camera model. My older D70 has significantly larger AF brackets so I would use the test target below closer for it than the D300.

Be aware that testing near a len's minimum focus distance (MFD) can cause focus errors with some lenses. The Nikon manuals for my D300 and D70 list some lenses that will not AF accurately at some focal length settings and MFD. I suspect the residual lens aberrations near MFD are not that well controlled in these lenses thus "fooling" the phase detection based AF mechanism.

Alignment
The camera's image plane needs to be reasonably aligned parallel with the target. Great precision is not required since we are only measuring the effects of focus change in the very center of the image. (Alignment requires more care when we were trying to detect lens centration issues where we compare one corner to the opposite corner which spans the entire image.)

Tripod support
Don't even attempt this test without a tripod. Camera shake and position changes must be eliminated from the variables when comparing the images. It doesn't take much shake to influence the results when comparing the images at 100%. It also fixes the camera's position so there's no chance the camera moves between AF confirmation and shutter release. It helps to use a remote release or timer release so your finger isn't touching the camera during shutter operation.

I used a Gitzo 1531 tripod with Markins Q3 ballhead and RRS L-plate on the D300 for this test. It provides good support for my D300 and a small kit lens like the 18-70mm. However I wouldn't trust it at slow shutter speeds when testing my 70-200mm VRI. For that I would use a more rigid tripod like a Gitzo 1325 and heftier ball head like the Arca Swiss mono ball. If you have any doubt about your support system keep your shutter speed up as high as you can.

The mirror motion (a.k.a mirror slap) just prior to shutter release can sometimes cause vibrations great enough to noticably soften the image. I've found these to be most problematic with longer telephotos that have their own tripod mount point. Shutter speeds in the neighborhood of 1/10s are most susceptible to the effect of mirror slap. Try to keep the shutter speed well above this value if you aren't confident in your tripod/head and especially when testing long telephotos. Some cameras implement a mirror-up (MUP) mode which allows you to first bring up the mirror then later release the shutter. This works best combined with a remote release since you otherwise still have to touch the shutter release button which can disturb the camera. If you don't have a remote release some cameras provide an exposure delay option which adds about one second between mirror-up motion and shutter release. This gives enough time for the mirror slap vibrations to dampen out. If you also set the timer release delay to about two seconds then handling contact disturbances will not be an issue as well.

Lighting
Use reasonable lighting for the test. I carried out this test in a small room with one 27 watt daylight (5500K) CFL (equivalent 100w incandescent bulb). The room had two large windows which provided most of the light but it was overcast outside. The exposure value (EV) was about 7. This required 1/25s at f/3.8 and ISO 400. The slow shutter speed was not a problem since I used a good tripod and the lens is not very large. If I needed to get the shutter speed up I could have simply added more lights with reflectors. There's no need for photo quality lamps or diffusors, but you do want the light to be distributed evenly enough across the chart to avoid hot spots.

Example Images
The three photos below are 100% center crops from a test I ran on my Nikon D300 and 18-70mm f/3.5-5.6 lens. (IMPORTANT: select "original" size to view) I set the camera on a tripod about 60 inches (about 1.5 meters) away from the target using a lens focal length of 24mm. That distance is about 64 times the focal length of the lens setting. It should work well at a distance of 50 times the lens focal length setting.

First Photo
The first photo uses LV (tripod mode) autofocus. After engaging LV I magnified the LV image to the maximum setting (200%) to verify good focus. To engage tripod LV AF one must press the AF-ON button. LV does not use the shutter release half-press action to engage AF on the D300.

I defocused the lens to infinity and engaged AF-ON. (Focusing is slow in this mode.) After the camera provided AF confirmation I then carefully and fully depressed the shutter release button to take the photo. I also noted the lens's distance scale reading.

Second Photo
I then switched to single servo action in single area AF using the center point. Brought up the camera menu with AF Fine tune and turned it off. I defocused to infinity. Then I half-pressed the shutter release, got focus confirmation, and took the photo. I noted that the lens's distance scale registered a noticably greater range (back focus) than the previous LV AF. The image is noticably softer than the LV and the tuned images.

Third Photo
For the third shot I returned to the AF fine tune menu and turned on fine tune. From a previous test I had entered -10. However that was overshooting just a bit so I changed the value to -7 for this shot. I then defocused to infinity and took the shot. I noticed the lens distance scale matched the LV AF focus distance.

I used my 18-70mm f/3.5-5.6 D70 kit lens for this test. Why? Because I know it back focuses at 24mm. (It's fine at 70mm.) This lens back focuses on my D70 and D300. It provides a realistic example of the effect of back focus and how AF fine tune can help counter its effect.


A Short Cut
If your lens has a distance scale on it you may have gotten the idea to use it for your calibation steps. I've found it to work very well. In fact, the slight changes in distance scale position from one AFFT setting to the next reveal focusing errors that are not even noticable in 100% crops. Of course these scales are not very accurate in an absolute sense and they don't have many reference marks, but in terms of relative position accuracy I have found them to be very accurate or at least consistent. Carefully note the final focusing position on the dial when the live view focus stops. This will be your reference position. I will sometimes reposition the camera to the target just so that the lens's stationary reference tick mark lines up with the edge of a numeral on the distance scale when the LV AF operation completes. It then becomes a matter of simply dialing in the appropriate AFFT value to make the VF AF achieve the same final position. Don't be surprised if you see some shot-to-shot variation at the same AFFT value. Go for an average placement. This beats pixel peeping a half dozen photos looking for the sharpest image. It also avoids the issue of camera shake's effect on the image. The camera just needs to be stable enough during AF aquisition for this to work well.

A final caveat
As helpful as AF fine tuning can be for this specific case it does have significant limitations. PDAF focusing errors often vary with lens focal length, target distance and aperture. I have lenses that benefit from fine tuning at some distances but when used at other distances the adjustment hurts. Others have reported AF accuracy is significantly affected by color temperature. (One can substitute soft white (2700K) for the daylight CFLs to test for this influence.) Be sure to check your results under various conditions before you commit to a setting.

Test Image Center Crops

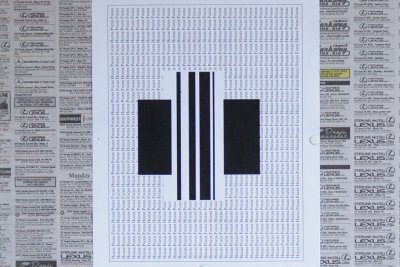
AF test 18-70mm 07 LV.jpg
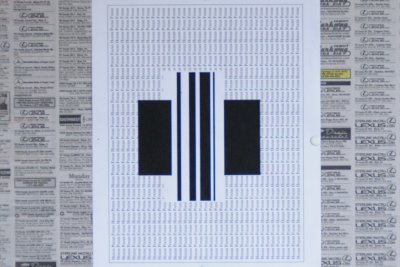
AF test 18-70mm 08 PDAF Fine Tune off.jpg
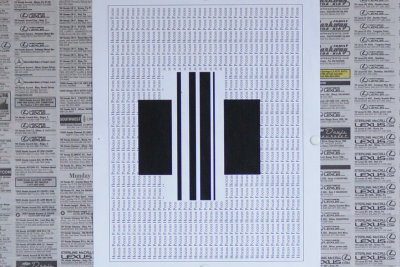
AF test 18-70mm 09 PDAF Fine Tune -7.jpg