


|
|
|
|
|
|
| |
| 01-MAR-2008 | |
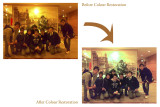
In some occasions, the camera's colour white balance may be mis-adjusted in an inaccurate setting so that the picture may be heavily casted with red colour. If the photo is captured in raw format, there is a much pretty easier way to set the white balance. But if the picture is captured in jpeg format, how would you restore the white colour? In photoshop, for sure is that you can simply adjust the "colour balance" to get more cyan, but I do not find this way the best way in dealing with those picture casted with heavy red. After comparing different ways, I would suggest to use the following procedures to all of you.
(1) Image > Adjustments > Match Colour. Set the level of Luminance, Colour Intersity and Fade (with the Neutralize ticked) to a appropriate level. In this photo, I set Luminance to 200, Colour Intensity to 150 and Fade to 50. By this step, the image would become less saturated in red/yellow but the graduation of colour is remained.
(2) Repeat step (1). This time I set Fade to 80 so as not to over-adjust the colour into cyan/blue (remember to tick Neutralize)
(3) Now the image is darkened. In order to brighten it, I set Image > Adjustments > Curves > RGB Channel. Slightly adjust the curve in the upward direction. In this photo, I move the centre point upward with an input level being 127 and output level 164.
(4) Now the photo is casted with yellow, but not in a heavy dose. I simply set Image > Adjustments > Colour Balance. In Midtones, slide Blue to 50, with Preserve Luminosity ticked.
(5) Repeat step (1) if necessary. I set Luminance to 200 and Colour Intersity to 100. After this step, the photo becomes brighter and the colour graduation is enhanced.
(6) However, some shadow areas of the photo is cased with a weird blue colour. Use the Magic Ward Tool, select those blue regions, then Select > Feather, input 20. Use Eyedropper Tool, pick up the blue colour, then Image > Adjustments > Replace Colour. Set Fuzziness to 200 and Saturation to -50. The blue colour is removed.
(7) Refine the skin tone. Use Eyedropper Tool to pick up the skin colour (set Sample Size to 5 by 5 Average). Then Image > Adjustments > Replace Colour. Set Fuzziness to 200, Hue -4, Saturation 5 and Lightness 8.
(8) Image > Adjustments > Auto Colour. Now the photo becomes more natural. If you don't like the effect of Auto Colour, or just want to have some control of Auto Colour, use this function together with Layers so that the Opacity % and Fill % could be manually adjusted.
(9) Image > Adjustments > Brightness/Contrast. Set Contrast to 5.
(10) Image > Adjustments > Hue/Saturation. In Master, set Saturation to 3.
(11) The photo editing process is now completed and the orginial colour is restored.
Copyright @ Jacky S.K. Lee