The technique described here is called Focus Stacking (a.k.a. Hyperfocus, Z-stacking, Focal Plane Merging)
Depth of Field (DOF) can, of course, be expanded by simply stopping down the camera's aperture. Depending on circumstances though, this isn't always practical or even the best option (click here to learn about diffraction). Plus there are times you simply want to control DOF after the fact, for instance, having more than one plane of focus in a shot, which is something beyond the ability of most cameras and something best done in post processing anyway.
In the past, in the olden but not so golden (IMO) film days, you could 1) adjust the plane of focus if you were shooting with gear that allowed tilt and shift of the lens, which could do absolutely amazing things with extending the plane of focus, or 2) you could double expose a frame in the camera, using a different plane of focus in each exposure and assuming image size didn’t change with the change of focus, or 3) you could take two shots, again each with a different plane of focus and then with suitable masking, create a double image in the darkroom. However, in the first two cases your control over that aspect of the image ended there and in the last case, doing such work in the darkroom was hit-and-miss, tedious, and time consuming, especially if the image sizes were different between the shots.
In today’s digital world, I haven’t yet seen a digital camera that allows double exposing, although tilt and shift lenses are available. It wouldn’t surprise me to learn digital cameras exist with a double exposure function, but I can’t imagine why anyone would prefer double exposing in camera when it’s so simple to blend exposures in post processing, which offers complete control over the blending, then and later.
In recent years, when I’ve run into a situation where I wanted more DOF than what one shot would give me (for whatever reason), I would take two shots, or more if needed, each with a different plane of focus and then blended the shots in my image editor, using masks to reveal the areas of best focus. I use Photoshop, but this sort of thing can be done with any image editor that allows stacking of images into layers and masking them.
With Photoshop CS3 and earlier, the masking had to be done manually, but with the coming of CS4 and later, Photoshop can do this for you automatically and in most cases, does a much better job of it than I could have done manually.
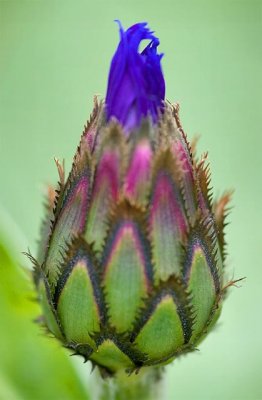
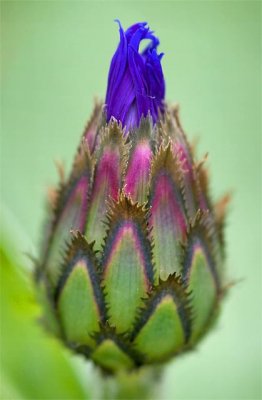
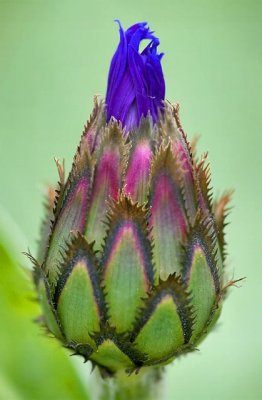
The images below show a closeup of a flower bud (Mountain Bluet) and represents a situation I often run into where I can’t get enough DOF when shooting macro and in which I take shots of more than one plane of focus, two in this case, one for the front, another for the sides, and then blend the shots in Photoshop and in CS4 or later this is quite simple, even though I took these handheld and the framing didn’t match between them.
To blend two such shots in CS4 or later...
1) First open both images
2) Stack them into layers (File > Scripts > Load Files into Stack... > Add Open Files > OK )
3) Select both layers
4) Align the layers (Edit > Auto-Align Layers... > Auto > OK )
5) Crop into the image enough to remove edges that no longer overlap
(this will be minimal if you shot from a tripod, but can be significant
if shot handheld, depending on how steady your hand is)
6) Select both layers again
7) Blend the layers (Edit > Auto-Blend Layers... > Select ‘Stack Images’ and ‘Seamless Tones and Colors’ > OK )
8) And voilŕ, if Photoshop did its thing properly, the resulting blended image should reveal the sharpest planes of focus from both images, as was the case in the images below.
To best see the differences between the shots, view each image below in turn at ‘original’ size, click ‘next’ in each of the first two pages, and then step ‘Back’ and ‘Forward’ with those commands in your web browser and the differences between these images will be obvious.