


|
|
|
|
|
|
| Marco Raugei | profile | all galleries >> Technique >> Simplified Zone System | tree view | thumbnails | slideshow |
| ZONE | Exposimeter reading | Resulting tone | Examples |
| II | -3 STOP | BLACK (almost no detail) | - |
| III | -2 STOP | Very dark | Dark shadows in bright sunlight, black subjects with detail (darkest areas of the frame with detail) |
| IV | -1 STOP | Dark | Dark vegetation (e.g. fir trees), soft shadows, black skin |
| V | 0 STOP | MEDIUM | Green grass, deep blue sky, tanned Caucasian skin |
| VI | +1 STOP | Light | Light rock, yellow subjects, shady snow, pale blue sky, sky at sunset, light Caucasian skin |
| VII | +2 STOP | Very Light | Bright white subjects, sunlit snow (brightest areas of the frame to retain detail) |
| VIII | +3 STOP | WHITE (almost no detail) | - |
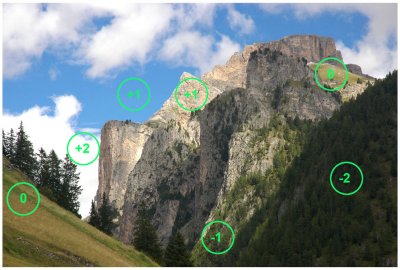 EXAMPLE |
| comment |
| timotheus | 15-Dec-2009 14:48 | |
| Peter | 26-Nov-2009 05:28 | |