The five 'golden rules' of landscape photography (according to yours truly):
1. Be discriminating about what gets into your frame.
As simple as this may sound, there are countless occasions when an otherwise perfectly good picture is spoilt by a spurious element that mars the composition, which you had not noticed in the viewfinder before releasing the shutter. This is more likely to happen when using wide angle lenses, since these tend to 'get it all in' and it is sometimes very hard to pull off a really clean composition using them.
2. Add depth to your pictures.
We see the world in 3D, but the camera is hopelessly two-dimensional. Hence, many scenes which appeared grand to our naked eyes often end up looking bland in our photographs. To counteract this, always strive to include some depth clue in your photos.
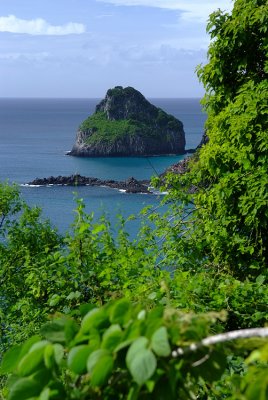
Examples of how to do this are using a long lens at wide apertures so as to throw the background (or foreground, or both) out of focus [EXAMPLE 1], and including close foreground elements in your wide-angle shots [EXAMPLE 2].
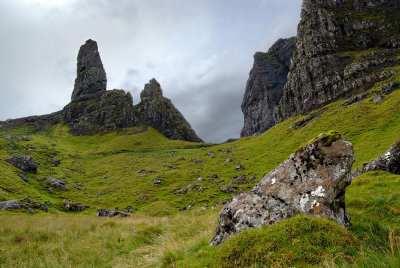
Also, positioning your main subject according to the 'rule of thirds' (i.e. at the intersection of imaginary grid lines dividing the frame into thirds) tends to produce less 'static' results than placing it bang in the middle of the frame [EXAMPLE 3].
3. Be fussy about getting perfect exposure in camera.
This can usually be achieved either by spot-metering selected key areas of the frame and applying the Simplified Zone System (as I explain in my little on-line tutorial), or by blindingly trusting your camera's advanced 'Matrix' metering mode and bracketing at least 3, or even better 5 frames. Wait until you are back home to critically review your slides on a light table, or your digital images on a good calibrated monitor.
If you shoot digital, do NOT trust image review on the little screen on the back of your camera to judge exposure, since this is rarely calibrated, and it can even be hard to see properly in broad daylight. Individual colour (R, G and B) histograms are better tools for this, but since card storage is cheap, when unsure it is always best to expose an extra frame.
Getting perfect exposures is of paramount importance with slide film, which has close to zero tolerance for under/over-exposure, but even shooting digitally, it is far better quality-wise to have a perfectly-exposed picture straight out of camera, than to salvage a less-than-perfect shot in the 'digital darkroom'.
4. Use a tripod (and cable release).
Firstly, this ensures you get critical sharpness when using slower shutter speeds. The old rule of thumb for the 35mm format goes like: always use a tripod whenever you need a shutter speed slower than the reciprocal of the focal length of the lens you are using (e.g. 1/50s with a 50mm lens) - but to get critical sharpness with today's high-resolution digital sensors, you should at least double that (e.g. 1/100s with a 50mm or 50mm-equivalent lens).
Shutter speeds in the 1/15 to 1/4 of a second are particularly critical for (D)SLRs, since 1/15s is the average duration of mirror-induced vibrations.
Using a tripod also allows you to use a slow, fine-grained film, or stick to your digital camera's base ISO (at which its quality is at a maximum).
Further benefits of using a tripod are that it allows you to slow down, achieve perfect framing and focus, keep the two consistent from one shot to the next, and keep horizons level (viewfinder gridlines and/or a little hot-shoe mount spirit level are also very helpful here).
5. Use filters.
In my opinion, filters in photography should not be used to create special effects, but to help you overcome the technical limitations of the medium you are using to capture a scene (i.e. film or digital sensor). That being said, there are certain situations when a filter can also be used to further enhance the 'mood' of a scene.
The three most useful types of filters for landscape photography are the Polarizer, Neutral Density (ND) and Graduated Neutral Density (GND) filters.
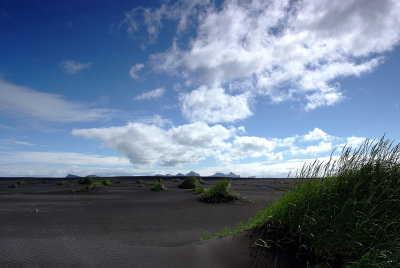
A polarizer can be used to darken blue skies at roughly 90 degrees of orientation with respect to the sun, and to saturate natural colours by cutting down unwanted surface reflections [EXAMPLE 4].
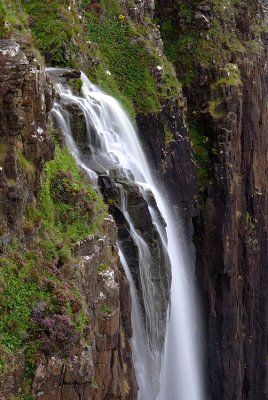
ND filters (available in several densities) simply reduce the amount of light reaching the film or sensor, and thus allow you to use slower shutter speeds (which comes in handy for blurring flowing water, for instance) [EXAMPLE 5].
GND filters (available in 1, 2 and 3-stop densities and in 'hard'- or 'soft'-edge types) are used to balance the exposure between the foreground and a comparatively brighter sky [EXAMPLE 6].
If you shoot slide film, warming (amber) filters are also useful to counteract the bluish cast that you get in heavy overcast weather (use an 81C or KR3 filter) and in open shade under a clear blue sky (use an 81EF or KR6 filter). Shooting digitally, you can adjust the white balance in-camera, so filters of this type are no longer necessary.