08-OCT-2008
What Not To Use
For winterizing your fresh water system you will need a few items.
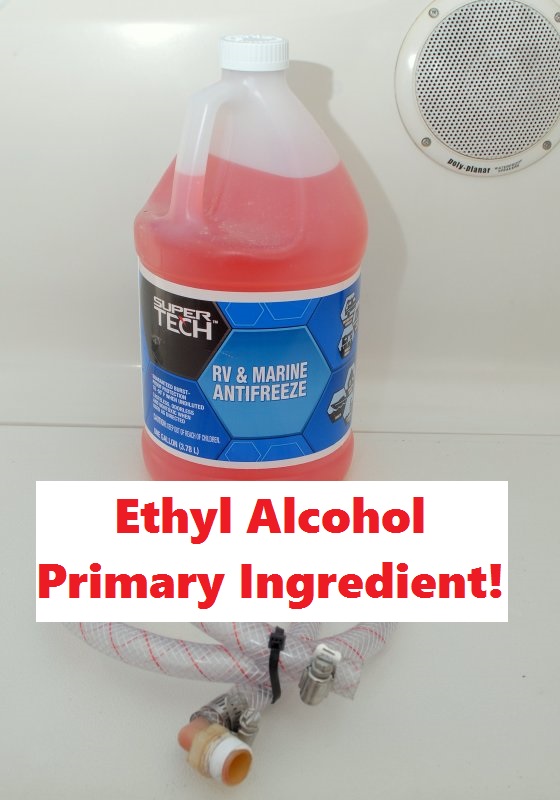
The number one item to have is RV type antifreeze that is safe for domestic plumbing systems. Unfortunately I see this type of product all too often.
The pictured bottle is NOT a propylene glycol product it is alcohol based antifreeze. Alcohol based products can damage certain plastics and seals. While it is cheap please don't be tempted by price and DO read the labels.
NEVER use ethylene glycol that is designed for use in automotive engines. It is poisonous! Propylene glycol usually comes in windshield washer bottles and ethylene glycol generally comes in Prestone or Peak type bottles.
Using the method outlined below the RV type antifreeze is sucked through the system pipes only, and the tanks are left dry and drained with no antifreeze to purge in the spring.
You will also want a section of hose and the associated fittings to bypass your hot water heater so it too has no antifreeze in it for spring purging.
Some other items to consider would be a five gallon bucket, turkey baster, screw driver and some spare hose of the same diameter as your plumbing system.
Why don't I just blow the lines out with air? While this technique may work on some boats it does not successfully work on all boats. Also most boat owners generally don't have large enough portable compressors to facilitate doing so. The Maine based boat yard we use for storage winterizes over 200 boats and they blow out none of them. Every boat has antifreeze sucked through the pipes because it is far more reliable.
10-NOV-2012
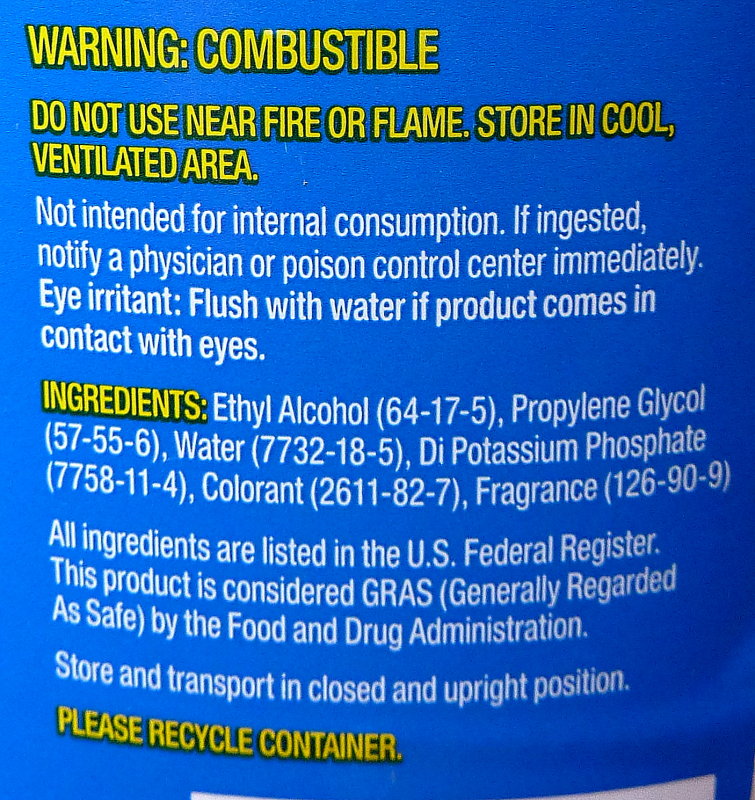
COMBUSTIBLE...???
Here's a simple tip. If the RV antifreeze says "WARNING:COMBUSTIBLE" walk away. A propylene glycol product is not flammable but one made with ethyl alcohol is. This cheap product is a blend of ethyl alcohol and PG. Choose a product that does not contain alcohol.
When in doubt always read the labels. Do not be tempted by price. Ethyl alcohol blends can be had for as little as $1.99 to $2.99 per gallons while a typical price on a propylene glycol -50F rated product is about $4.50 - $5.50 per gallon..
31-OCT-2013
A Better Product
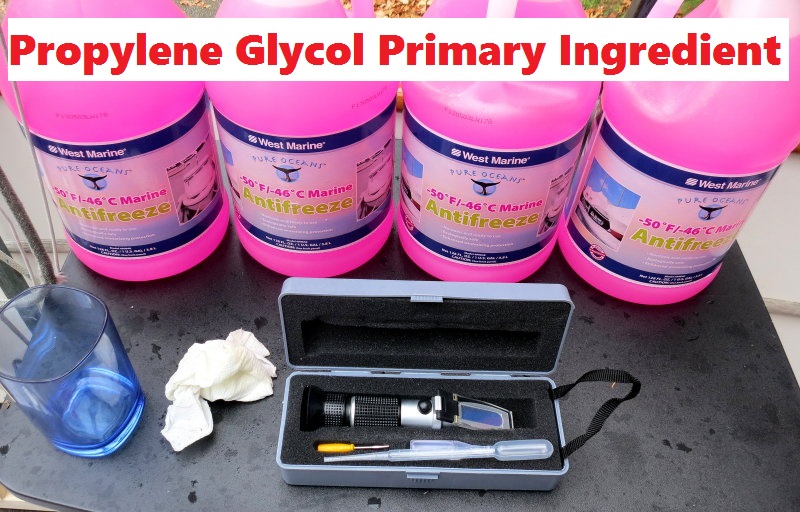
Here is a shot of a better true propylene glycol antifreeze product safe for most plumbing parts. It also has a decent corrosion inhibitor. It is safe for engines and domestic plumbing systems. It has no alcohol in it.
The item in front is a sight refractometer. This is a tool I use to test the concentration of teh AF in the system to determine when I have pumped enough through the system. Samples are taken at each faucet, shower head and wash-down spigot etc...
Star Brite Aintigel -50 is also an excellent -50F product. If you are in an area that gets really cold, less than -25F then you may want to consider a -100F rated product.
08-OCT-2008
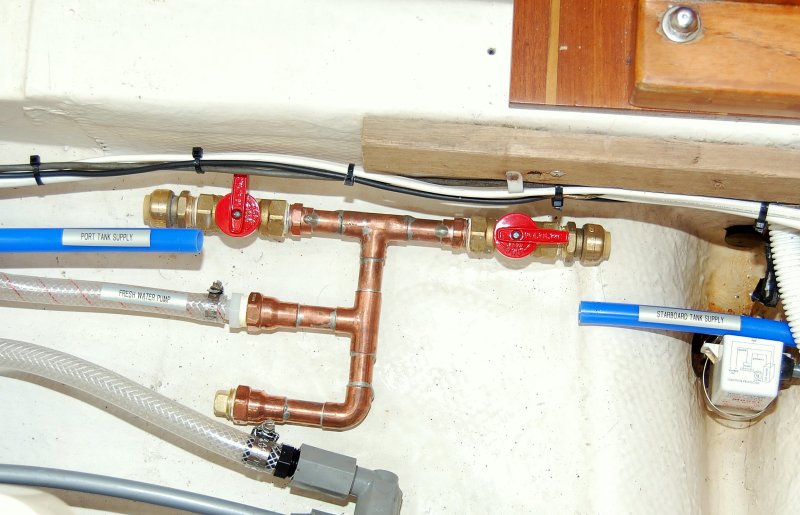
The Water System Manifold
Step 1 - Drain Tanks:
In this photo I have drained the port and starboard water tanks with the fresh water pump & then disconnected them from the manifold, via the "Shark Bite" PEX tube fittings, so they can drain into the bilge compartment, naturally & through gravity, with the rocking motion of the boat.
This photo was taken after only a few hours and it was almost totally drip free and dry at this point. This means both tanks have virtually zero water in them and will get NO antifreeze.. I prefer not to put any antifreeze into my tanks because it is a bear to get out through the process of dilution in the spring.
I'm rather uptight about keeping a dry bilge, mold allergies, that's why you'll notice a rubber stopper in the limber hole to keep the water contained in that compartment.
11-OCT-2010
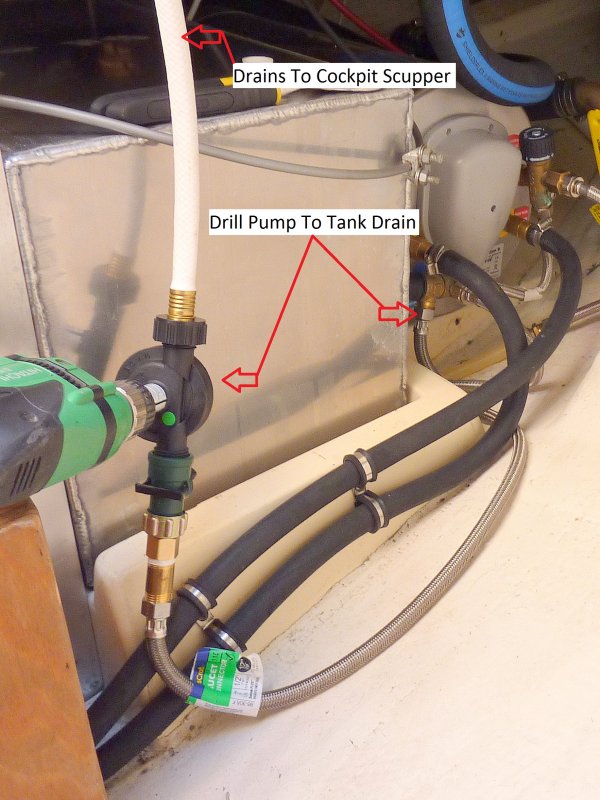
Drill Pump To Drain Water Heater
Step 2 - Drain Water Heater:
I use this drill mounted pump to keep my bilge dry and to avoid draining the entire contents of my water heater into my bilge. I simply connect it to the drain of the water heater and then suck the water out and into a bucket in the cockpit. I'm allergic to mold and as such try very, very hard to keep a dusty dry bilge. As of now I am winning the battle and have zero leaks and a very arid bilge. This drill pump helps keep it that way.
08-OCT-2008
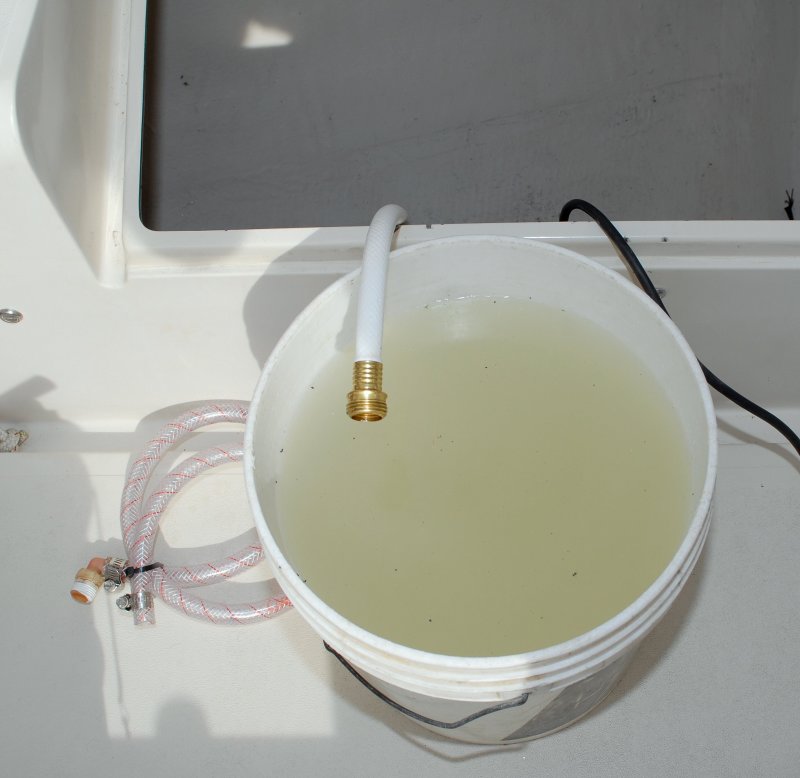
The Water Heater Drain Bucket
For illustrative purposes I used a bucket to catch the contents of my water heater after pumping it dry. You can also just drain it onto the floor of the cockpit or stick the hose directly into a scupper. Heck if you don't mind water in your bilge just drain the water heater into your boat..
08-OCT-2008
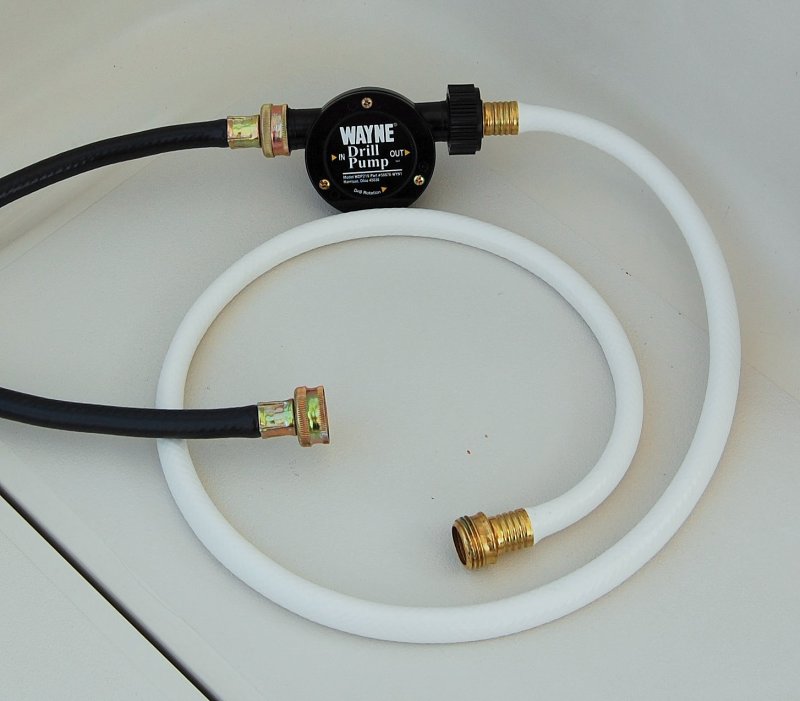
The Drill Pump
This is the drill pump I use to drain the water heater. I think it cost me about $7.00, at Wal*Mart, and has been used to winterize for over ten years now.
08-OCT-2008
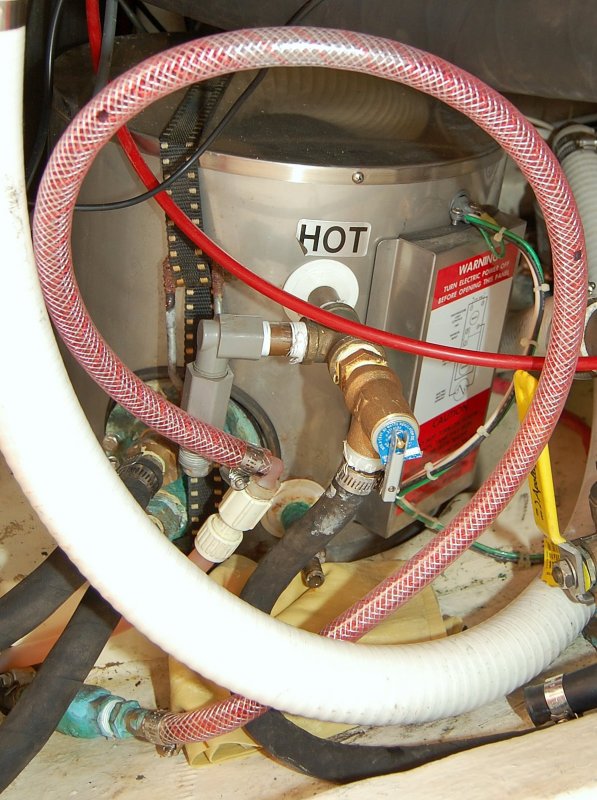
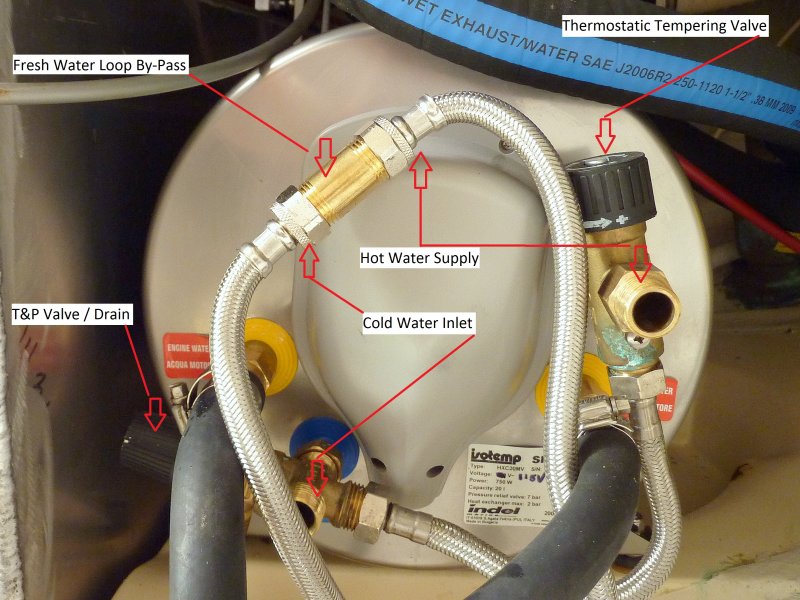
Water Heater Bypass Hose
Step 3 - Install Water Heater Bypass Hose:
This is the water heater bypass hose in use. It's installed so I don't have to fill my water heater with antifreeze. I sucked all the water out first with a drill mounted pump then placed an Absorber (brand name) synthetic chamois under the drain. After a few hours of rocking at the dock no more water came out.
To install this hose simply disconnect the cold supply and hot return line for the domestic water side of the tank and connect them with the bypass hose.
Do not try to bypass the engine supply & return lines for the water heaters internal coil. these lines will usually be black, like a radiator type hose, and will not generally be the same color as the domestic water side. When in doubt follow the lines. If they lead directly to the engine they are the wrong hoses..
11-OCT-2010
Water Heater Bypass Nipple
The brass nipple between the stainless hoses is the bypass for this IsoTemp water heater.
08-OCT-2008
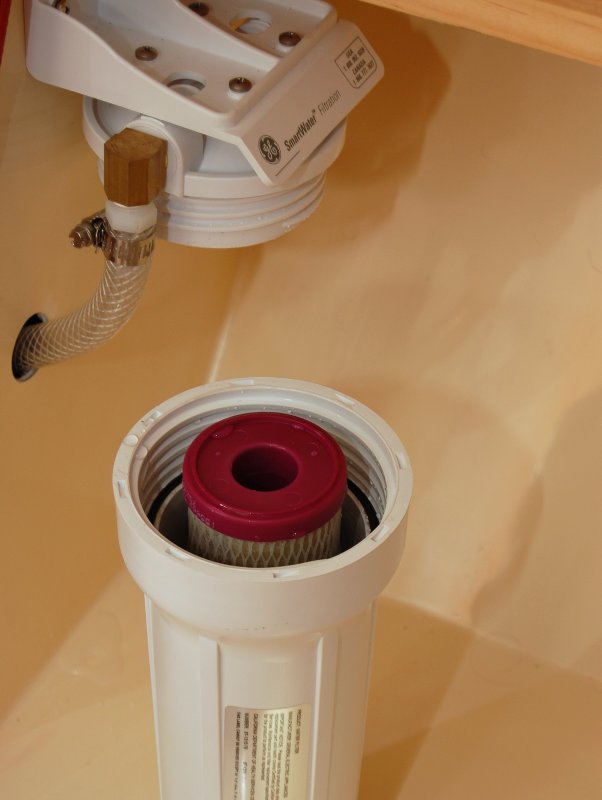
Remove Any Water Filters
Step 4 - Remove Water Filter Cartridge:
If your boat has any on board water filters now is the time to remove them. Simply pull the cartridge out and spin the filter back together without one.
08-OCT-2008
Add A Lenght Of Hose To Your Water Pump Supply
Step 5 - Adding Sucking Hose:
As you can see I've pulled the supply hose for the water pump off the manifold. I then use a hose barb and a spare length of hose to make an extension that could reach the antifreeze bucket.
08-OCT-2008
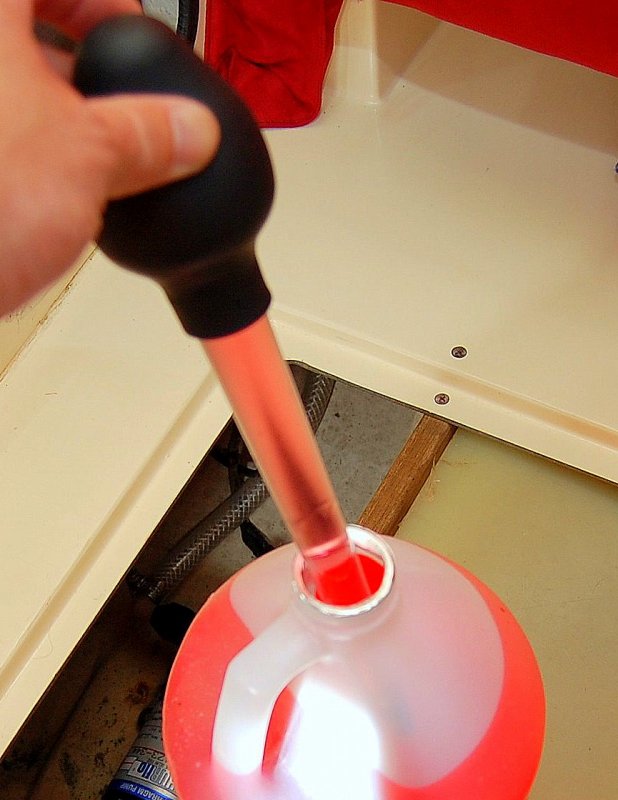
Using Turkey Baster To Prime The Pump
Step 6 - Priming The Water Pump:
Sometimes when you run a water pump dry, from draining the water tanks, it can become hard for the pump to create a new prime and begin sucking fluids again.
An easy way to avoid this problem is to pre-prime the water pump using a turkey baster. Not all pumps will require this trick and if yours won't prime this will do the trick.