Please Visit www.marinehowto.com
This old format has run its course and the new site is now up and running. Articles here will no longer be kept current, or up to date. Eventually this site will go the way of the buggy whip. If you see this "WARNING" image, the article has been moved, updated and may have more added to it than you will find below.
IMPORTANT: If the first image of the article below features strikethrough; strikethrough it means updates or edits have been made and we are urging you to visit the new site for more current information.
Please change your bookmarks and please visit the new site. See new links below.
April-15-2005
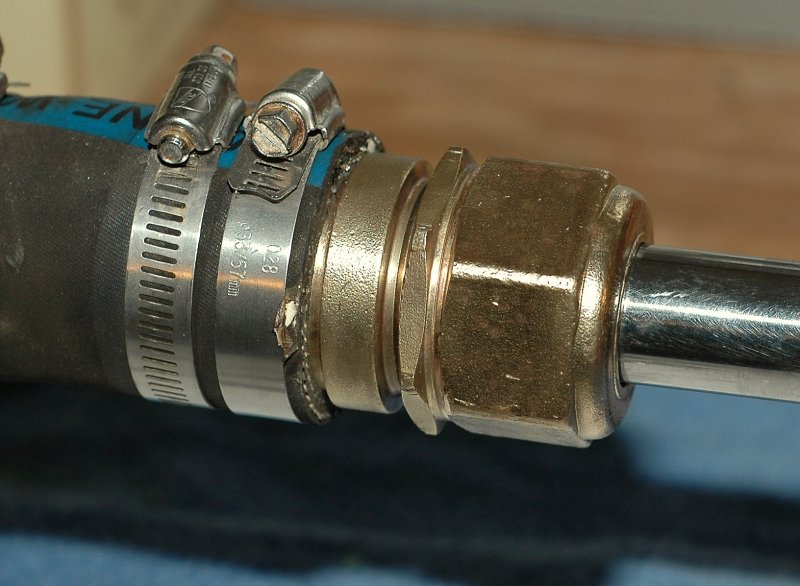
The Stuffing Box (click any image to see a larger version)
A few weeks ago, while digging around in some old boat parts boxes, I found the stuffing box from my old Catalina 36. It was sitting in the parts box because I had chosen to replace it with a PSS Shaft Seal to make my bilge totally dry. Today is a rainy Sunday and I though it would be a good time to rig it up in my garage and photograph how to replace the flax packing inside one of these "work horse" style stuffing boxes.
For illustrative purposes I cleaned the stuffing box of it's oxidation and grime with my drill press and a wire brush. I used a piece of 1" diameter stainless steel as my makeshift prop shaft to complete the picture and present this as it would look inside a boat.
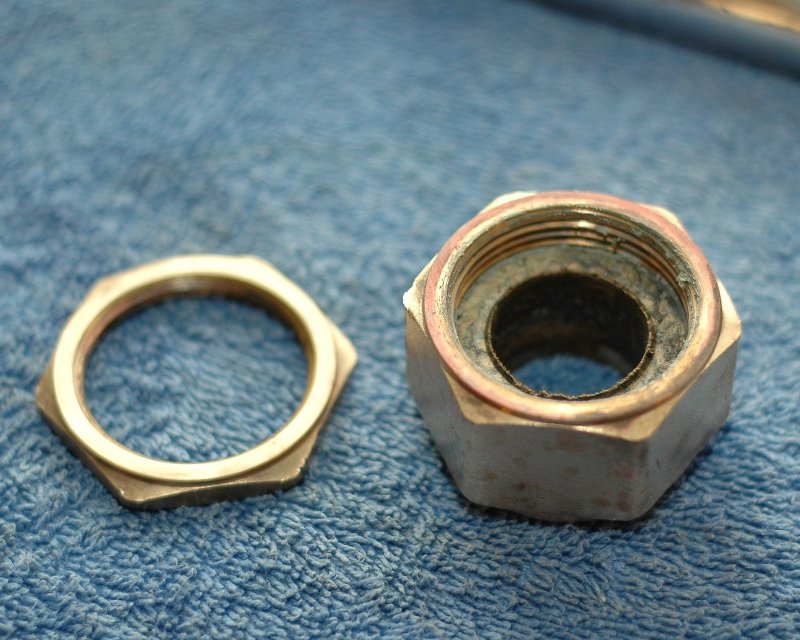
In this picture what you are actually seeing are two nuts not one. The larger of the two is where the flax resides. The thin nut, on the left, is the locking nut. Once re-packed, & properly adjusted, you lock these nuts together with two large wrenches.
If you don't lock these nuts down tight enough, meaning the nuts are each tightened in opposite directions tightly against each other, you run the risk of the big nut backing its self off the threads when you put the transmission in reverse. There have been more than a few boats sunk by improper tightening of the stuffing box nuts.
Note:I am not advocating the used of perforated hose clamps on a stuffing box. This article was done in my shop and I used what was easily on hand to make the article work. On the day I shot this I did not have non-perforated hose clams that fit this hose. The article is about re-packing the stuffing box not about the hose clamps..
April-15-2005
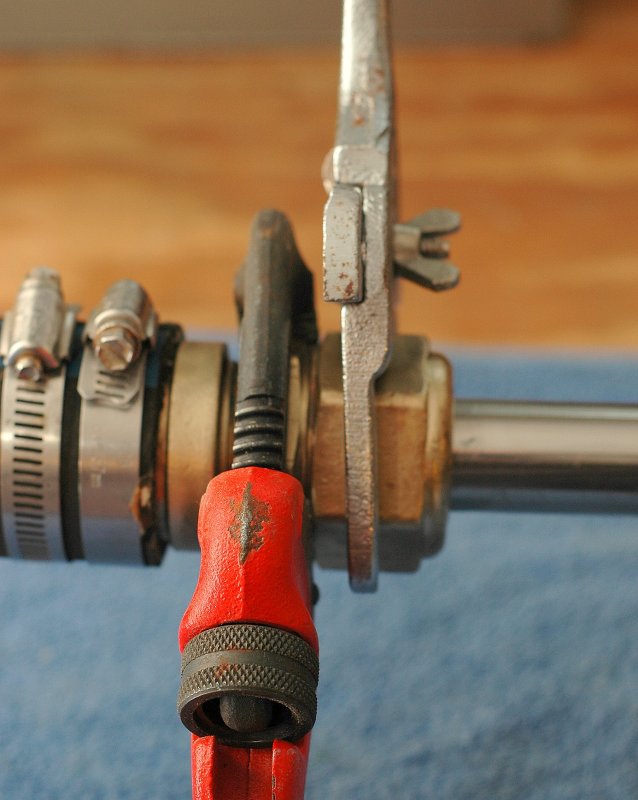
Stuffing Box Wrenches
This picture shows the wrenches I use to loosen and tighten a stuffing box. One wrench is a traditional pipe wrench and the other is a spanner wrench designed for a sink drain. Both of these wrenches are available at Home Depot or a hardware store. I find it easier to use the pipe wrench on the small & thin locking nut and the spanner wrench on the big nut. It's very important to use wrenches that fit the nuts well. Water pump pliers will, in many cases, not work very well or will not get the nuts tight enough after adjustment. Use good wrenches and not pliers for safety's sake.
If you have tried the above method and the nuts don't break apart use a little bit of PB Blaster penetrating oil. Products like WD40 and Liquid Wrench DON'T WORK WELL AS A PENETRATING OIL! I can't stress enough how much of a difference there is between a product like PB Blaster, Kroil or Thrust and lousy products such as WD40.
Here's a direct quote from a guy who used this site for directions. Unfortunately after three hours, Liquid Wrench and a broken tool he gave up and emailed me for advice:
QUOTE: "I knew where the cap and the locking nut were, I just couldn't budge them. Went out and bought PB Blaster. Ten minutes after spraying it broke loose. PBB rocks!"
*WARNING, WARNING, WARNING:
Be very careful NOT to get PB Blaster near ANY engine or transmission seals. True penetrating oils will EAT engine seals causing catastrophic failure of that seal. The most common seal DIYers destroy is the transmission output shaft seal. Be very, very careful using PB Blaster on your engines coupling bolts and DO NOT use the spray feature when working that close to seals. If you need to use a penetrating oil on coupling bolts fill the PB Blaster cap with the penetrating oil and then use a Q-Tip to dab PB Blaster on the bolts being very careful not to drip ANY on or near the transmission output shaft seal.
April-15-2005
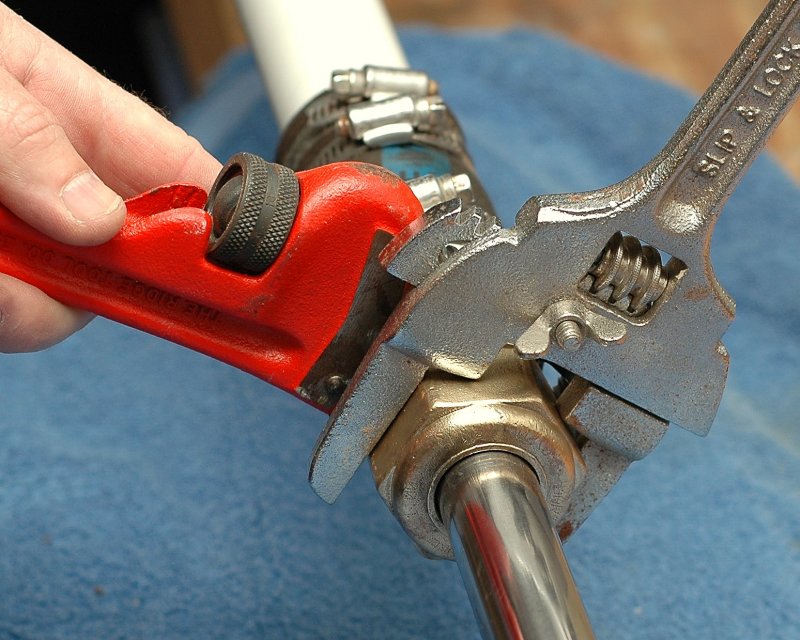
Getting The Stuffing Box Nuts Apart 2
Here's another view of the wrenches and the process. When loosening the nuts the two wrenches are moved towards each other. When tightening the nuts the wrenches are moved away from each other as shown here.
April-15-2005
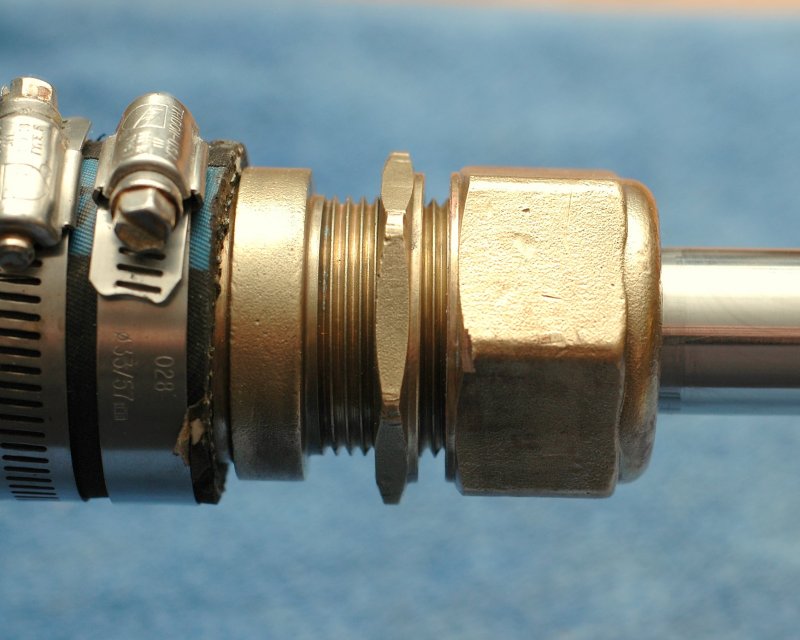
Broken Free
In this photo it's much easier to see the two distinct nuts. Again, the thin one on the left is the locking nut and the big thick nut on the right is the stuffing/flax nut.
April-15-2005
Bolts Loose
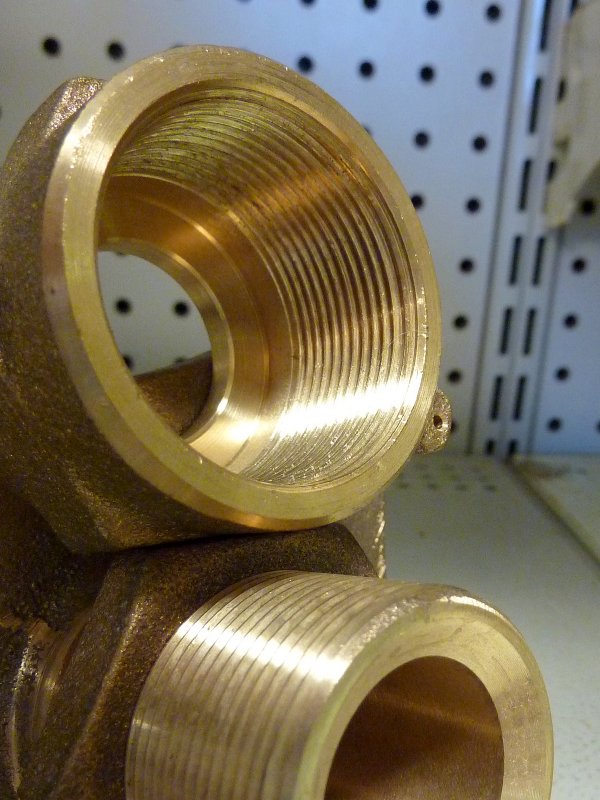
This photo shows the threaded male end of bronze stuffing box and the flax nut or the female end of the stuffing box separated from the male end. The white PVC pipe is my mock up of a fiberglass shaft log.
The rubber hose connects the bronze stuffing box to the boat and must be replaced periodically. If this rubber hose cracks, and starts leaking, it could sink your boat. Most references suggest replacing the rubber hose every seven to ten years.
26-OCT-2009
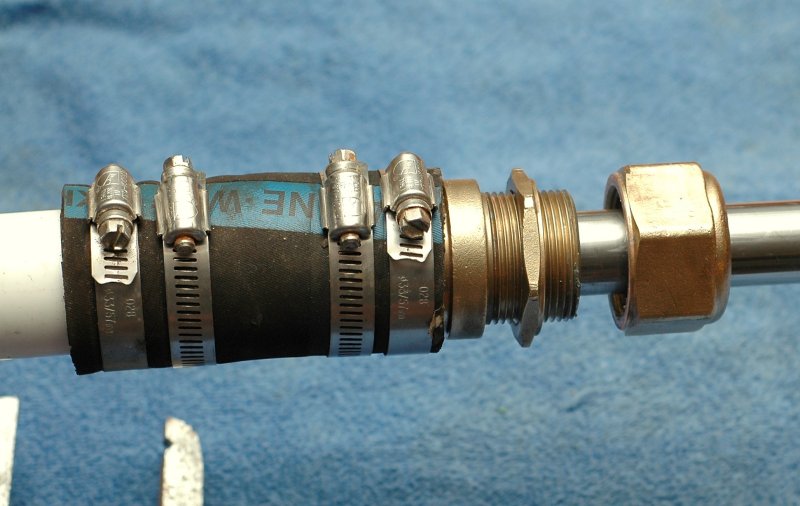
Right Hose vs. Wrong Hose
If you happen have your shaft out now would be a good time to replace your stuffing box hose. The thick hose on top is specifically made for stuffing boxes. It's robust 6 ply hose, and meant to take the abuse of a drive train. The thick hose on top is made by Buck Algonquin a manufacturer of quality bronze of packing boxes.
This Buck Algonquin hose sized for a 1 3/4" shaft log can be purchased from Hamilton Marine for about $9.00 or less. Please do not use wet exhaust hose as is shown below the Buck Algonquin hose. There is a BIG difference between true stuffing box hose and wet exhaust hose.
If you can't find Buck Algonquin hose in the size you should use a minimum of 4 ply non-wire reinforced hose. Do not use 2 ply or 2 ply wire reinforced hose.
05-JAN-2012
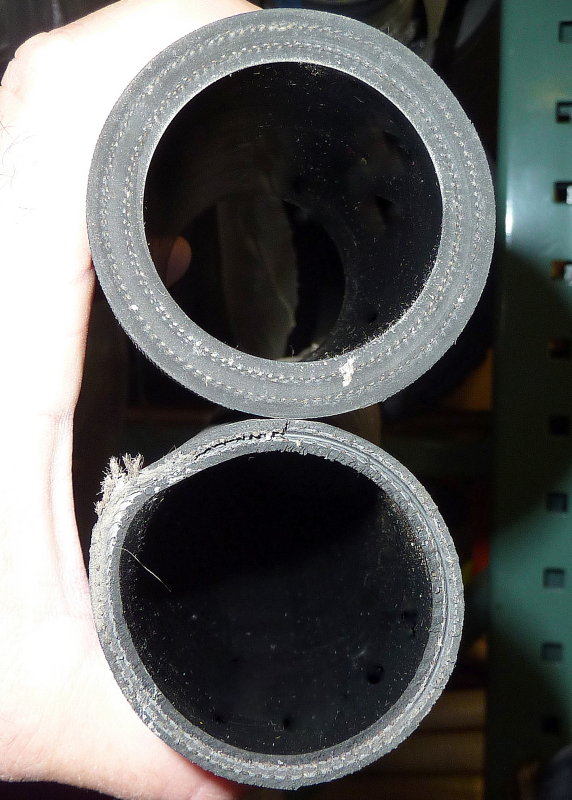
WRONG HOSE!
As you can see from the last picture there is a huge difference in hoses. I take many pictures of bad installations but a reader sent me this one. It takes the cake!
Please do not use the wrong hose. This boat came darn close to sinking. Use 4 ply minimum, non-wire reinforced hose. The Buck Algonquin product is six ply.
05-JAN-2012
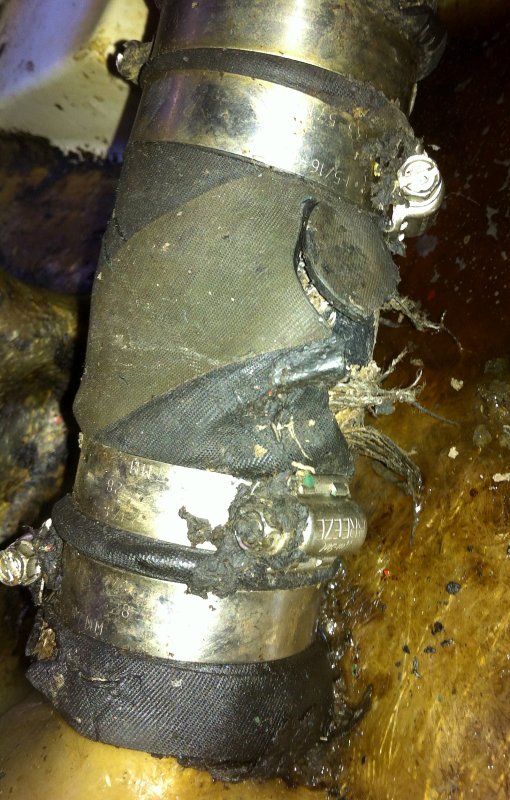
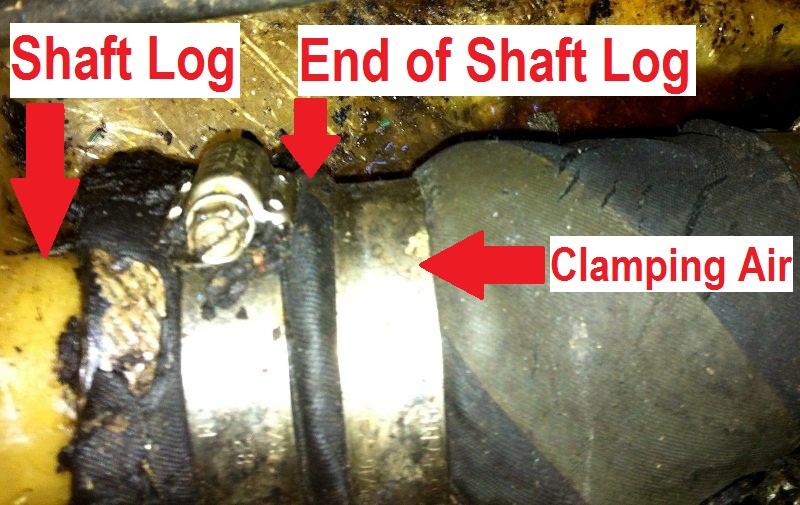
Incorrectly Clamped
Double hose clamps won't do any good, and can actually be detrimental, if they are not clamping anything but air.
Please be sure your hose clamps are clamping what they are intended to clamp.
April-15-2005
Stuffing Nut Shown WIth Old Flax Still In It
When you are replacing your flax packing you will most likely never see this view unless you remove the transmission coupling and take the nut off. When removing the flax, with a pick, this is what you are trying to dig out! I took this photo to show the female nut with the old flax still in it. You can see the shiny surface where it meets the shaft and the thickness (3/16) of the flax its self.
This particular stuffing box is a 1 inch box from a 1985 Catalina 36 and uses three rings 3/16 flax packing. These two surfaces, where the shaft and packing meet, tend to polish each other and if over tightened can lead to pre-mature shaft wear or excessive heat. Over tightening of the flax nut, and running the stuffing box with no water drips, will eventually wear a grove in the prop shaft and ruin it. It's very important to allow a few drops of water per minute, when the shaft is spinning, for lubrication. Even the newer synthetic W.L. Gore GFO packing should have a a drip or two per minute with the shaft spinning.
April-15-2005
Empty Stuffing Box Nut
This is what the female stuffing box nut should look like, after you have removed all the old packing from it.
April-15-2005
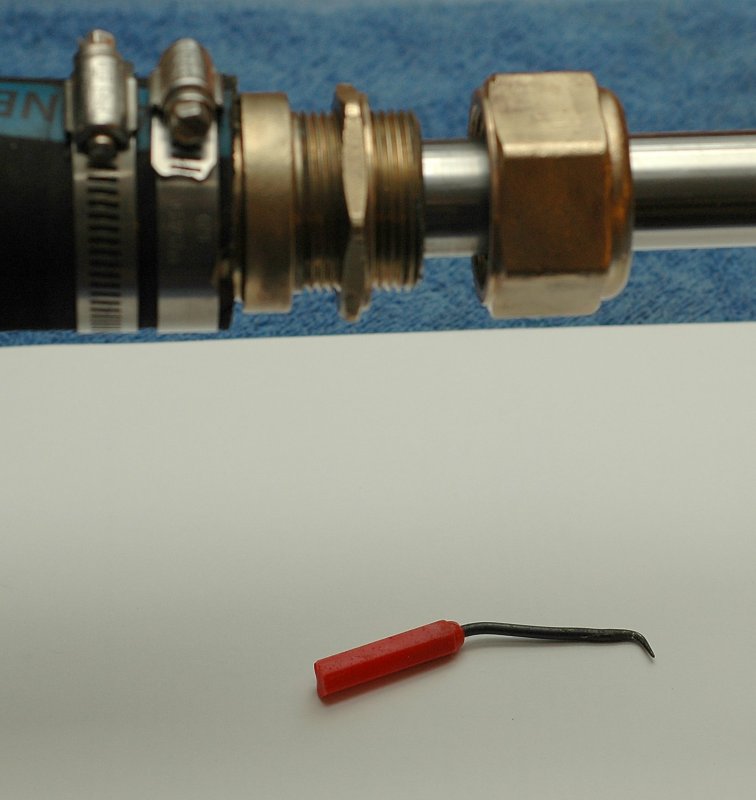
My Home Made Pick
I can't remember where I found this pick, perhaps Sears, but it used to be straight and was designed for removing engine seals! I used a blow torch and a bench vice to create my own, custom made, flax removal tool and it works remarkably well. Even a sheet rock screw can be used to remove flax but in tight spaces it's nice to have a couple of bends in your flax removal tool.