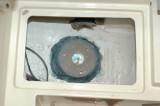
In this photo I have fiberglassed the backing plate to the hull, dry fitted and drilled it. The picture also clearly shows why I needed a quick 90 degree turn for this seacock.
To tackle this part of the process you'll need a few things. The first item is an electric drill and a coarse brass wheel to fit in the drills chuck, or an aggressive grit sand paper. The second is some fiberglass "kitty hair", Yes, it's really called Kitty Hair! Kitty Hair is a thick fiberglass filler mixture consisting of of long strands of chopped fiberglass mixed with a peanut butter consistency resin. The third item is a 3 inch bolt, that fits the pilot hole from the hole saw, and some Acetone.
You could also use West System, System Three, M.A.S. Epoxy or any of the other epoxy based resins and your favorite filler. Regular old polyester fiberglass cures quickly though and bonds very well to a properly prepped surface. While polyester kitty hair is not as tough as an epoxy it's more than strong enough for installing backing plates.
To begin the process you'll want to insert the brass wheel into your drill and rough/scar up both the hull's surface and the backing plate or use a low grit sand paper. Using a brass wheel, instead of sandpaper, creates nice deep scratches on both surfaces ensuring tenacious adhesion of the backing plate to the hull. Next vacuum up any dust and wipe both surfaces with Acetone. Now your ready to mix the Kitty Hair or epoxy what ever you chose. Follow the manufacturers directions on the can for both temperature and humidity and then mix it until you have a uniform color. In most cases the Kitty Hair hardener is blue so you can easily tell that it's mixed thoroughly.
To adjust the backing plate, and center it over the existing hole, insert the three inch bolt through the hole saw's guide hole. This will make it easy to center when you are out side the boat. You'll be able to grab the bolt and move the plate until it's seated and centered. Once the bolt has been inserted through the backing plate, spread a judicious amount of the Kitty Hair mixture on both the hull surface and the backing plate, then place it over the hole but don't push down or seat it just yet. At this point climb out of the boat, grab the bolt, and center and seat the backing plate into position. Now climb back into the boat and smooth the Kitty Hair with your finger, being very careful not to move the backing plate, until you have a nice smooth fillet.