


|
|
|
|
|
|
| |
| MAY-2006 | |
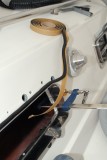
In this picture I have already forced one round of butyl into the gap and I'm working on my second round. I found a silicone kitchen tool, don't tell my wife, that worked well for forcing the butyl into the grove without it sticking to the butyl to badly.
With the teak spacers it's very difficult to wrap the ports spigot first, as NFM illustrates in their instructions, before inserting it. Instead, I chose to clamp the port, level it, then install the butyl from the outside.
Again, I varied from the NFM instructions on this issue and installed my butyl from the outside not the inside but both methods will work.
I applied the butyl from the outside for one major reason. I don't believe in sealing any fitting, installed on a boat, from the interior side of the vessel. If I do get an external leak, between the fitting and hull, I want to know about it! If I sealed or bedded the cabin side of the fitting I may be trapping water or worse diverting it somewhere else because it can't escape out the back side of the fitting. Diversion of water by, internal sealing, creates an almost impossible scenario for tracing external leaks! Even though I don't have cored cabin sides I still chose to only seal from the front of the port to prevent trapping any water in there that could potentially freeze, expand and do damage in the cold Maine winters.. In short, I did not want any sealant between the ports inside flange and the hull only the outside flange, trim ring and the spigot.
In total I was able to get about five pieces of butyl around the spigot drain and two laps of butyl around the rest of the port, but I can assure you, this was NOT easy!
Squeezing in the butyl and seating it took almost 50 minutes per port before I even began to install the trim ring and bolts or clean up the "squeeze out".
Before you even think about installing the butyl & sealant please, for your own sake, clean the fiberglass surface with Acetone or another potent solvent or de-waxer but do wear chemical resistant gloves! If you don't clean the fiberglass & port you may get a leak! I first cleaned with paint thinner then followed that up with acetone.
If your previous ports were installed with silicone (read; BAD) you should, at a minimum, wet sand until you get NO water beading when you spray the surface with water. There is no chemical that will remove the embedded silicone from the gelcoat other than sanding. If anyone knows of one please email me! I've already tried just about every chemical known to man, even stuff only body shops can buy that is specifically intended for removing silicone. IT DOES NOT WORK ON FIBERGLASS either because it's to porous or it eats the gelcoat!
If water beads around where the trim ring is to seal it's NOT clean. I use a spray bottle filled with water for this test and do it every time I re-bed a fitting. Do not skimp on this detail.
© All Images property of Compass Marine Inc.