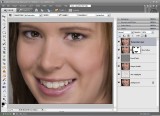
1- First we will deal with the highlights. Open your image and create a blank layer,use the eyedropper tool and sample the skin color next to the highlight/highlights to set our skin color. Now use the paintbrush tool set to 8% opacity and gradualy paint over the highlights till they are toned down but the skin texture is still visable, if the highlights are that badly blown that there is no skin texture then you will have to resort to using the clone/healing tool instead. Using the same layer you can now use the spot healing brush to take care of any facial blemishes.
2- Now on the keyboard press Ctrl+Alt+Shift together followed by E..this will place a composite layer of the adjustments we have made on top, rename this Merge Visable. Now is the time to use the spot healing tool to take out any large blemishes such as spots.
Next create a blank layer above this and fill it with 50% grey (Edit>Fill Layer and Choose 50% grey) and rename it Eyes and Teeth and in the layers pallete change the blend mode of this layer to Soft light.
Now using the paintbrush set to 10% opacity and the color white go ever the eyes and teeth to lighten them (using black will darken), you can also use the opacity slider on this layer to fine tune it.
3-Now using the same keyboard short cut as before create a composite layer on top and name it skin softening. Next go to Filter > Noise> Median and set a radius of between 6 and 16 this will vary on the size of the image(6 for web size and 16 for full size 8mp), now adjust the opacity slide on this layer till the skin tones are soft but you still have some underlying skin texture (this part is down to taste).
Now add a layer mask (or use a clipping layer if you have not downloaded the free layer mask as I advised) and use the paint brush tool and black to paint on the layer mask to bring back the sharpness in the image where you require it eyes mouth etc.
4- Again create a composite layer on top and apply sharpening or any other adjustment and finaly flatten the layers.
To see the finished image Click Next