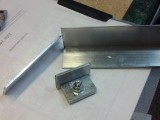
Pictured here is the final product and the two types of aluminum stock I used. The 1/8" angle bar is from the http://www.pbase.com/ebond/camper_carrier project and the 1/4" flat bar is from a different project.
Each end cap was made from cutting and stacking two angle bar sections together, transferring the pattern of the original and then cutting it out with a band saw with a metal-cutting blade.
The portion that houses the screw is the load-bearing section of the end cap and the most important. With the double layer of 1/8" angle stock in place, I added just a small rectangle of the 1/4" stock on the side that has the nut. This makes it about 1/2" thick and more than adequate for the job. It also helped to give proper spacing within the rail as the original plastic end cap had an additional lip on one side and mine does not, as shown best in End Cap6.jpg. During installation, I also used of couple of washers as spacers to complete the proper spacing and protect the tenting from the sharp edges of the rails that this cap is attached to.