Using a brass or plastic brush, clean up the exhaust nut threads on the head to remove dried anti-seize residue. Wipe clean with a dry rag.
Slather anti-seize liberally on exhaust nut threads on head.
If you removed them from the exhaust pipe, reinstall the finned exhaust nut, solid collar, and split ring, in that order, onto the header pipe.
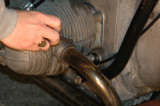
Insert exhaust header pipes into cylinder heads and mufflers. Tap lightly with a rubber mallet, alternating from side to side, until header pipes are fully seated.
Slide split ring and collar into position against head, then thread finned exhaust nut onto head. Tighten by hand until the special wrench is needed.
Finish tightening by wrench until resistance is felt, giving a reasonable grunt on the wrench, then STOP. Choke up on the wrench half-way up the handle to avoid overtorquing.
Wipe off any excess anti-seize that squeezes out from under the finned nut.
Reinstall and tighten the clamps at the muffler-header joints and engine rear mounting bolt. Make sure the footpegs are properly positioned, then torque the nuts on the engine mounting bolts to 55 ft-lbs.