


|
|
|
|
|
|
| |
| 23-MAY-2010 | |
Dry transfers are a coat of paint with a pressure sensitive adhesive on the exposed side. They will adhere to just about any clean, dry surface including your fingers so handle them with care. Read through all of these instructions and get a feel for how they work by transferring the part number to something. They are quite easy to work with - the gentleman whose hands you see in the instructions had never done this before.
NOTE: The bezel has a notch at the top. See the last picture for the correct placement of the transfers.
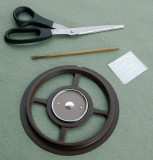
WHAT YOU'LL NEED
A pair of good scissors and a tool for burnishing like the cuticle pusher here (available in the cosmetics aisle of any good drug store) with a blunt, sharpened point on one end. You can also use a dull #2 pencil. You'll also need a freshly cleaned and/or painted instrument cluster bezel. Although I know of no over-the-counter paint that is an exact match to the original, Rustolium Brown 241239 and Krylon Camo 4292 are very close. I chose the Rustolium for the sample shown here.
(NOTE: Ignore the colors in these photos. No attempt at color calibration was used for these instructions)
© Woody Vondracek
Please login or register.