


|
|
|
|
|
|
| |
| 15-JUL-2005 | CJ Burianek |
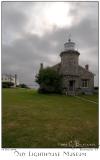
 Photo a Day, Day 108...This is actually 2 photos merged into one... One has the lighthouse drastically underexposed and the other has the clouds really overexposed. Exif is for the properly exposed clouds. Setting for the lighthouse shot are: 1/640s f/8 at 13.0mm iso200. Below are the two shots side by side.
 They were not properly aligned at first considering I took them hand held so I had to line them up. I placed the shot on the top right (clouds) on the bottom and the shot on the top left (lighthouse) on the top. Set the lighthouse layer mode to "Difference" the two shots are lined up when the image looks all black (Demonstrated in bottom left image). I then set the lighthouse layer mode to "Linear Burn" this effectively causes everything but the clouds to be black (bottom right image). I then used "Select > Color Range" to select this black area. I then inversed the selection and used it as a mask on the lighthouse layer. Effectively this causes the sky in the lighthouse layer to be masked out (becomes transparent). I then took a brush and touched up the mask.... It might seem like a lot of work but it really didn't take that long though I will fully admit I am a bit of a Photoshop geek... HAD I thought ahead... I should have brought my tripod along for the trip and did a bracketed exposure of the shot. I then could have used Photoshop CS2's new Merge to HDR to create the shot..
Also took a shot of two cormorants on a rock while in Stonington which I should have looked at before posting this one.. oh well...
Adobe Camera Raw, Merged two photos into one, Slight Rotation, Crop, Resize, Frame, SmartSharpen - PhotoshopCS2
All Images & CSS style © 2005-2009 Connie J Burianek. All rights reserved.
No use or direct linking w/o permission
| comment | |
| Dominic Kite | 19-Jul-2005 14:29 | |
| CJ Burianek | 16-Jul-2005 20:27 | |
| Guest | 16-Jul-2005 05:37 | |
| Robin Reid | 16-Jul-2005 04:14 | |
| Elaine (etfitz) | 16-Jul-2005 02:01 | |
| Guest | 16-Jul-2005 01:57 | |