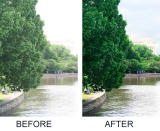
Original picture was shot by Angel. Here are the steps I used for the edit.
1. Duplicate background layer and change blending mode to "Multiply".
2. Make layer mask and lightly paint black on the layer mask over the foreground tree to lessen the darkening of the multiply blending.
3. Selected sky and building, copied, and pasted into image then change blending to multiply to darken it.
4. Selected just the building, copied, and pasted into image to create a new layer.
5. Colored new layer with a sandy gray using the paint bucket and change the layer blending to color. This added color to the building. I adjusted the amount by using the opacity slider.
6. On the background layer I selected just the roof area, copied, and pasted into the image to create a layer of just the roof.
7. On the roof layer I used a soft brush to paint the sandy gray color onto the roof, then used the opacity slider to adjust it.
8. Then on the background layer I selected just the sky, copied, and paste into the image for a layer of just the sky, and reselected the sky.
9. Took a bright sky with a little more color from another picture, copied it, and pasted it into the sky of the river walk image. I used the opacity slider to adjust it.
10. The last thing I did was to apply unsharpen mask at around 100%, 0.9, 6.